The ATOTO A6 Pro Android car stereo has been making waves in the aftermarket head unit scene, and for good reason. After spending two months with this feature-packed device in my own vehicle, I’m ready to share a comprehensive review and installation guide, especially focusing on its OBD2 capabilities and how it can transform your driving experience. If you’re considering upgrading your car’s infotainment system and want seamless OBD2 integration, the ATOTO A6 Pro is definitely worth a closer look.
First Impressions: Speed, Display, and Sound Quality
Right out of the box, the ATOTO A6 Pro impresses. It’s incredibly fast and responsive, mirroring the smooth operation of a modern smartphone. The 7-inch touchscreen display boasts a crystal-clear 1024×600 resolution, making it significantly sharper than many stock or even aftermarket units from brands like Pioneer or Kenwood. Even under direct sunlight, the screen remains bright and easily readable, and the adjustable brightness settings are a welcome feature for night driving.
 ATOTO A6 Pro display clarity
Sound quality is another highlight. Even without an external amplifier in my setup, the audio output is remarkably clear. Pushing the volume to its maximum on my JL Audio component speakers revealed no noticeable distortion. For audiophiles, the built-in 13-band equalizer offers plenty of customization, with several pre-set options like Rock and Rap. While you can tweak these presets, the inability to save custom EQ settings is a minor drawback. Overall, for everyday listening and even for those who appreciate good audio, the ATOTO A6 Pro delivers excellent sound.
This unit comes with external GPS and WiFi antennas, ensuring strong signal reception. It’s designed to support factory Toyota reverse cameras and ATOTO’s own dash camera (sold separately), and it seamlessly integrates with steering wheel controls, enhancing driver convenience and safety.
Important Note: A stable WiFi hotspot from your smartphone is essential for the ATOTO A6 Pro to access data for Google Maps, apps, and online services. Make sure your phone plan includes sufficient data, as there’s currently no workaround for this requirement.
Choosing Your ATOTO A6 Pro: Model Variations
ATOTO offers several versions of the A6 series. For a detailed comparison, refer to the official brochure Atoto Radio Brochure. I opted for the A6 Pro model primarily for its superior screen and enhanced amplifier. While gesture control is available on some models, I found it unnecessary given the steering wheel control integration.
It’s worth noting that newer ATOTO models feature flush “capacitive” buttons. However, some users have reported a parallax effect due to the air gap between the glass and display layers. The A6 Pro, with its physical buttons, avoids this issue and, in my opinion, offers a more tactile and aesthetically pleasing interface. The physical buttons are also easier to use while driving without taking your eyes off the road.
Unleashing OBD2 Potential with Torque App and More
One of the most compelling features of the ATOTO A6 Pro, especially for car enthusiasts, is its OBD2 compatibility. By connecting an OBD2 Bluetooth dongle (sold separately), you can transform this head unit into a powerful vehicle diagnostics and performance monitoring tool.
The ATOTO A6 Pro is fully compatible with the Torque Pro app, available on the Google Play Store. This app, combined with an OBD2 reader, provides real-time access to a wealth of vehicle data, including:
- RPM: Engine speed for optimal driving and performance analysis.
- Coolant and Intake Temperatures: Monitor engine health and prevent overheating.
- O2 Sensor Readings: Diagnose issues with fuel mixture and emissions.
- Estimated MPG: Track fuel efficiency and driving habits.
- Fault Codes: Read and clear diagnostic trouble codes (DTCs), saving trips to the mechanic for minor issues.
Having OBD2 data displayed directly on your car stereo is incredibly convenient. You can monitor your vehicle’s vital signs in real-time, identify potential problems early, and even track performance metrics for a more engaging driving experience. The Torque app interface is user-friendly and customizable, allowing you to display the data that’s most relevant to you on the ATOTO’s vibrant screen.
Beyond Torque, the Android operating system opens up possibilities for other OBD2 apps and vehicle-related software, making the ATOTO A6 Pro a truly versatile platform for car diagnostics and information.
Apps, Connectivity, and Voice Control
The ATOTO A6 Pro runs on Android 6.0 (Marshmallow) and grants full access to the Google Play Store. This means you can download and use virtually any Android app directly on your car stereo. Navigation with Google Maps is seamless, and you can enjoy your favorite music and podcast apps like Spotify, Pandora, or Pocket Casts. For entertainment on long trips, passengers can even stream YouTube or Netflix (when parked, of course!).
Voice control is supported through Google Assistant, Hound, Alexa, and other voice control apps. While not quite as instantaneous as Siri or Google Assistant on a smartphone, voice commands are generally responsive and useful for hands-free operation.
For calls and texting, the built-in phone app syncs your contacts and allows for hands-free calling. However, native hands-free texting is not directly supported. While text message banners or pop-ups are not displayed like on a smartphone, you can explore third-party apps or integrations like Pushbullet to potentially enhance text message notifications.
If you prefer Android Auto or Apple CarPlay, the ATOTO A6 Pro supports these platforms via the “Headunit Reloaded” app. However, in my experience, the free trial version felt somewhat laggy. Your mileage may vary, and this might depend on your phone and specific usage.
Installation: Steering Wheel Controls and Rearview Camera Integration
Disclaimer: Modifying your car’s electronics is done at your own risk. If you’re not comfortable with car wiring, professional installation is recommended.
The physical installation of the ATOTO A6 Pro is generally straightforward, especially if you use a vehicle-specific wiring harness adapter. For my Toyota Tacoma, the Metra 70-8814 harness simplified the wiring significantly, making it mostly color-to-color matching between the ATOTO harness and the Metra harness. Using heat shrink connectors or soldering is recommended for robust and reliable connections.
Steering Wheel Controls: Resistor Solution for Toyota
Integrating steering wheel controls with the ATOTO A6 Pro in a Toyota Tacoma (and potentially other Toyota models) requires a specific wiring configuration and the use of resistors.
Wiring for Steering Wheel Controls:
- ATOTO Steering Wheel Control #+ to Toyota PURPLE AND WHITE (middle one) – with 300 ohm resistor inline.
- ATOTO BLACK GROUND to Toyota White/Red stripe.
- ATOTO Steering Wheel Key + to Toyota Yellow/Black line – with 2000 ohm resistor inline.
Crucially, the resistors are necessary. Toyota button resistance values are sometimes too low for direct interface with the ATOTO unit. Using a 300 ohm resistor on the #+ wire and a 2000 ohm resistor on the + wire, as confirmed by ATOTO customer support, resolves this issue. While the exact resistor values aren’t critical (any resistors within the 200-10000 ohm range with different values should work), these values are a good starting point. After wiring with resistors, programming the steering wheel buttons within the ATOTO settings menu is simple and intuitive.
Rearview Camera Wiring: Maintaining or Replacing Factory Camera
Integrating the factory rearview camera with the ATOTO A6 Pro offers a couple of options, depending on whether you want to retain the camera display in the rearview mirror or solely use the ATOTO screen. This YouTube video is a helpful visual guide: https://www.youtube.com/watch?v=iIZZAtEcBqk&t=621s
Option 1: Dual Display (Rearview Mirror and ATOTO)
This is the simplest method if you want to keep the camera view in your rearview mirror and add it to the ATOTO. You simply tap into the existing camera positive and negative wires at the rearview mirror and run an RCA cable to the ATOTO’s backup camera input. This method retains the factory 6V power source for the camera.
Option 2: ATOTO Display Only (Disabling Rearview Mirror Display)
For displaying the rearview camera solely on the ATOTO screen, you can disable the rearview mirror display. Using a PAC-39 6V power adapter can potentially provide a cleaner video signal.
Wiring Method #2 Overview:
- Use a PAC-39 to provide a stable 6V power supply to the backup camera. Mount the PAC-39 above the dome light.
- Connect the PAC-39’s 6V output and ground to the Toyota shielded camera harness wires (refer to wiring details below).
- Run an RCA cable from the dome light area, down the A-pillar, and under the dash to the ATOTO’s backup camera input.
- Tape an 18g wire along the RCA cable to serve as the reverse signal wire. Connect this wire to the reverse input on the ATOTO unit (usually pink).
- Connect the other end of the reverse signal wire to the Toyota reverse wire (small gauge RED wire at the rearview mirror – test to confirm it’s 12V only in reverse).
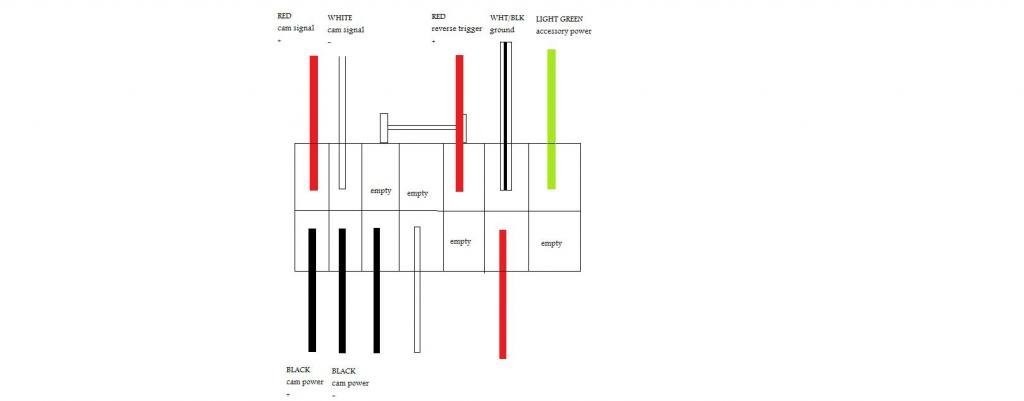
Toyota Shielded Harness Wire Identification (Rearview Mirror):
- Black: 6V output to camera (cut and cap mirror side). Connect to PAC-39 White/Red (6V output).
- Shield (Bare Wires): Camera ground. Connect to PAC-39 Black (ground).
- White: Camera video negative. Connect to RCA shield.
- Red: Camera video positive. Connect to RCA center pin.
PAC-39 Wiring Details:
- PAC-39 White/Red: (6V OUTPUT to camera) – Connect to Toyota shielded cable BLACK wire.
- PAC-39 Black: (GROUND) – Connect to Toyota white/black wire.
- PAC-39 Twist Red and Blue together: (12V POWER INPUT) – Connect to Toyota small gauge RED reverse wire at the rearview mirror.
Note: The factory rearview camera is generally low resolution, so even with careful wiring, the image quality on the ATOTO screen might appear slightly fuzzy or grainy. Using high-quality component video cable and soldering connections can help maximize video quality.
Flush Mount USB Connection
The ATOTO A6 Pro includes a flush-mount USB connector, which is a great way to replace the factory AUX input for a cleaner look. Removing the old AUX jack involves reaching behind the dash and pushing it out. It can be a tight fit. The new USB connector then pops into the same slot. Connect this USB to the “EZ-connect” port on the ATOTO, which supports data transfer and smartphone mirroring. The ATOTO also has a separate USB port for 2A quick charging, but this port does not support mirroring.
Customer Support and Final Verdict
ATOTO’s customer support is generally responsive, typically replying within 12-24 hours. While there can be a slight language barrier due to their China-based operations, they are reasonably helpful, especially if you can clearly articulate your issues and have some technical understanding. ATOTO also provides firmware updates, which are manually downloaded and installed, allowing for potential future feature enhancements.
Overall, the ATOTO A6 Pro is an outstanding Android car stereo that offers a wealth of features, excellent performance, and seamless OBD2 integration. Its fast operation, sharp display, and impressive sound quality make it a significant upgrade over many stock head units. The OBD2 capabilities, particularly when paired with the Torque app, provide valuable vehicle insights and diagnostics directly on your dashboard. While installation can require some wiring knowledge, especially for steering wheel controls and rearview camera integration, the results are well worth the effort. If you’re looking for a smart, versatile, and feature-rich car stereo with OBD2 functionality, the ATOTO A6 Pro should be at the top of your list.