The On-Board Diagnostics II (OBD2) port in your 2010 Chevrolet Malibu is a crucial component for vehicle maintenance and diagnostics. It’s the gateway for mechanics and inspection stations to communicate with your car’s computer, read trouble codes, and ensure your vehicle is running efficiently and meeting emission standards. If you’re facing issues with your OBD2 port not working, such as during a vehicle inspection, the first thing to check is often the fuse. This guide will help you locate the OBD2 plug, identify the relevant fuse, and perform basic troubleshooting steps.
Locating the OBD2 Plug in Your 2010 Malibu
Finding the OBD2 port in your 2010 Chevy Malibu is usually straightforward. It’s typically located inside the cabin on the driver’s side, underneath the dashboard area. You’ll usually find it near the steering column or in the space above the pedals. Look for a trapezoid-shaped, 16-pin connector. This is the standard OBD2 port, also sometimes referred to as the ALDL (Assembly Line Diagnostic Link) connector.
Identifying the OBD2 Fuse
Once you’ve located the OBD2 plug, the next step in troubleshooting a non-functional port is to check the fuse. For the 2010 Chevy Malibu, the fuse that powers the OBD2 port is often linked to other systems. According to repair information, the relevant fuse is typically the HVAC CTRL fuse located in the BCM (Body Control Module) fuse panel.
The BCM fuse panel is usually located inside the car, often under the dashboard or in the glove compartment area. Refer to your 2010 Chevy Malibu owner’s manual for the precise location of the BCM fuse panel and the fuse diagram. The HVAC CTRL fuse is commonly a 10 amp fuse.
To check the fuse:
- Locate the BCM fuse panel.
- Find the fuse diagram (usually on the fuse box cover or in your owner’s manual).
- Identify the HVAC CTRL fuse (or a fuse with a similar description related to the diagnostic port or data link connector).
- Visually inspect the fuse. A blown fuse will often have a broken wire inside or appear burnt.
- If you suspect the fuse is blown, replace it with a new 10 amp fuse. Ensure you use the correct amperage rating.
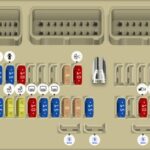
Image showing a diagram excerpt, likely from a 2010 Chevy Malibu fuse box, indicating fuse locations. Alt text: 2010 Chevy Malibu BCM Fuse Panel Diagram highlighting fuse locations, useful for identifying the OBD2 port fuse.
Troubleshooting if the Fuse is Not the Issue
If you’ve checked and replaced the HVAC CTRL fuse, and your OBD2 port is still not working, there could be other underlying issues. Here are further troubleshooting steps you can consider:
-
Check the OBD2 Port Connector Itself: Inspect the pins inside the OBD2 port for any damage, corrosion, or bent pins. A damaged connector can prevent proper communication.
-
Ground Issues: The OBD2 port requires proper ground connections to function. Grounding problems can arise from corroded or loose ground wires. Using a multimeter or test light, you can check the ground circuits at pins 4 and 5 of the OBD2 port. These pins should show a good ground connection.
-
Power Supply: The OBD2 port needs a 12-volt power supply, typically at pin 16. Use a multimeter to check for voltage at pin 16 with the ignition turned to the “ON” position. You should see approximately 12 volts.
-
Wiring Issues: Problems in the wiring harness leading to the OBD2 port can also cause malfunctions. This could include broken wires, shorts, or loose connections. Tracing and testing the wires requires more advanced automotive electrical knowledge.
-
PCM/Computer Issues: In less common cases, a problem with the Powertrain Control Module (PCM) or another vehicle computer could be preventing OBD2 port communication. This is usually diagnosed by a professional mechanic.
Image showing a wiring diagram excerpt, possibly for a 2010 Chevy Malibu OBD2 port, illustrating wire connections and pin assignments. Alt text: 2010 Chevy Malibu OBD2 Port Wiring Diagram detailing wire connections to the OBD2 port pins for diagnostic purposes.
Resetting the Computer (Battery Disconnect)
In some situations, a temporary computer glitch might cause OBD2 communication issues. A simple reset can sometimes resolve these problems. One method to reset your car’s computer is to disconnect the battery.
Caution: Disconnecting the battery may reset certain vehicle settings, such as radio presets and clock.
To disconnect the battery for a computer reset:
- Turn off the ignition and ensure all accessories are off.
- Locate the negative battery terminal (usually marked with a “-” sign).
- Loosen the nut on the negative terminal clamp.
- Carefully disconnect the negative cable from the battery terminal.
- Wait for about 15-20 minutes. This allows the computer capacitors to discharge and reset.
- Reconnect the negative battery cable and tighten the clamp nut.
After reconnecting the battery, drive your 2010 Chevy Malibu for about 100-150 miles. This driving cycle allows the car’s computer to relearn sensor data and system parameters. After the driving cycle, re-check the OBD2 port functionality.
Seeking Professional Help
If you’ve gone through these troubleshooting steps and your 2010 Chevy Malibu OBD2 plug is still not working, it’s recommended to seek assistance from a qualified mechanic. Diagnosing complex electrical and computer issues often requires specialized tools and expertise. A professional mechanic can accurately pinpoint the problem and perform the necessary repairs to get your OBD2 port functioning correctly, ensuring your vehicle can pass inspection and be properly diagnosed in the future.