If you’re diving into DIY car diagnostics for older Audi, Volkswagen, Skoda, or Seat vehicles, the VAG COM 409.1 KKL OBD2 USB cable is a budget-friendly tool to get started. However, getting it to communicate properly with your car’s computer requires the correct driver installation. This comprehensive guide will walk you through each step of installing the VAG COM KKL 409.1 cable driver on various Windows operating systems and troubleshoot common issues, ensuring a smooth diagnostic experience.
Understanding the VAG COM KKL 409.1 Cable and Driver Importance
The VAG COM 409.1 KKL cable is an interface that bridges the gap between your computer and the OBD2 port in your older VAG vehicles (typically models up to 2004). It allows you to use diagnostic software, like the free VCDS-Lite, to read fault codes, access live data, and perform basic adaptations. Think of the driver as a translator. Without the correct driver, your Windows computer won’t be able to recognize and communicate with the VAG COM KKL cable. Installing the right driver is crucial for establishing a stable connection and unlocking the diagnostic capabilities of your cable and software.
Step-by-Step Guide to Installing VAG COM KKL 409.1 OBD2 USB Cable Drivers
Before we begin, it’s important to note a crucial CAUTION: While the VAG COM 409.1 KKL cable is a starting point, its functionality is limited, mainly supporting vehicles manufactured up to 2004. For newer vehicles and more advanced diagnostics, consider investing in a more capable interface like the VAG-COM 2021 with the full version of VCDS software.
Important: Do NOT connect your VAG COM KKL 409.1 cable to your computer until instructed.
Step 1: Downloading the Correct Drivers
The first step is to download the necessary driver package. We recommend starting with VAG-COM Driver Pack 1.
Download VAG-COM Driver Pack 1 Here
This driver pack contains the necessary files to install the VAG COM KKL 409.1 cable driver on most Windows systems.
Step 2: Driver Installation Guide for Different Windows Versions
The installation process varies slightly depending on your Windows operating system. Follow the instructions below that correspond to your version of Windows.
Windows Vista, 7, 8, 8.1, 10:
- Unzip the downloaded file: Locate the “VAG-COM-USB-Driver.zip” file you downloaded and extract its contents to a folder on your computer.
- Run Install.exe: Inside the extracted folder, find and double-click on “Install.exe”. This will initiate the driver installation process.
- Connect the Cable: Once the installation is complete, plug your VAG COM KKL 409.1 cable into an available USB port on your computer. Windows should automatically detect the cable and complete the driver installation.
- Verify Installation: If the installation is successful, proceed to Step 2: Discover Port Number. If the installation fails, refer to the Troubleshooting section below.
Windows XP:
- Unzip the downloaded file: Extract the contents of “VAG-COM-USB-Driver.zip” to a folder.
- Run Install.exe: Double-click “Install.exe” within the extracted folder to begin the driver installation.
- Connect the Cable: Plug the VAG COM KKL 409.1 cable into a USB port on your computer.
- Found New Hardware Wizard: Windows XP’s “Found New Hardware Wizard” will appear. Select “Yes” when asked “Can Windows connect to Windows Update to search for the software?”.
- Automatic Installation: Choose “Install the software automatically” and click “Next”.
- Finish First Driver Installation: After the first driver is installed, click “Finish”.
- Second Driver Installation: The “Found New Hardware Wizard” will reappear as there are two drivers to install for this cable. Repeat steps 4-6 to install the second driver.
- Verify Installation: If successful, proceed to Step 2: Discover Port Number. If installation fails, see the Troubleshooting section.
Step 3: Troubleshooting Driver Installation Failures
If you encounter issues during driver installation, it’s likely due to driver conflicts or corrupted driver files. In such cases, VAG-COM Driver Pack 2 can often resolve the problem.
Download VAG-COM Driver Pack 2 Here
- Download and Unzip Driver Pack 2: Download “CDM 2.08.24 WHQL Certified.zip” and extract its contents to a folder.
- Open Device Manager:
- Windows Vista/7/8/10: Go to Control Panel » System and Security » System » Device Manager.
- Windows XP: Go to Control Panel » System » Hardware tab » Device Manager.
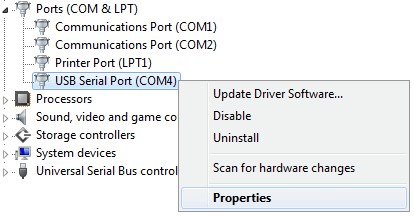
- Locate USB Serial Port: In Device Manager, look for “USB Serial Port” under either “Other devices” or “Ports (COM & LPT)”. It might have a yellow exclamation mark indicating a driver issue.
- Update Driver Software: Right-click on “USB Serial Port” and select “Update Driver Software…”.
- Browse My Computer: Choose “Browse my computer for driver software”.
- Specify Driver Location: Click “Browse…” and navigate to the folder where you extracted Driver Pack 2. Click “OK” and then “Next” to let Windows install the driver from the specified location.
Verifying the Installation and Configuring the COM Port
Once the driver is installed, we need to verify the COM port assignment and adjust it if necessary.
Step 1: Locating the COM Port Number in Device Manager
- Open Device Manager: (Follow steps in Troubleshooting section to open Device Manager for your Windows version).
- Expand “Ports (COM & LPT)”: Look for and expand the “Ports (COM & LPT)” section in Device Manager. If you don’t see this, check under “Other devices” for “USB Serial Port”.
- Identify COM Port Number: Locate “USB Serial Port” within “Ports (COM & LPT)”. Next to it, you will see a COM port number (e.g., COM5, COM3).
Step 2: Adjusting the COM Port Number (If necessary)
For optimal compatibility with VCDS-Lite and older systems, the COM port number should ideally be between 1 and 4.
-
If the COM port number is 1-4: You are good to go! Proceed to the next section: Testing Your VAG COM KKL Cable.
-
If the COM port number is above 4: You need to change it. Here’s how:
- Right-click on “USB Serial Port”: Right-click on “USB Serial Port” in Device Manager and select “Properties”.
- Navigate to Port Settings: In the “USB Serial Port Properties” window, click on the “Port Settings” tab.
- Advanced Settings: Click the “Advanced…” button.
- Change COM Port Number: In the “Advanced Settings for COM Port” window, find the “COM Port Number” dropdown menu. Choose a COM port number between 1 and 4 that is not already in use (it will indicate “(in use)” if it’s taken). Click “OK” to save changes in both Advanced Settings and Port Properties windows.
Testing Your VAG COM KKL Cable with VCDS-Lite
With the driver installed and COM port configured, it’s time to test if everything is working correctly using the VCDS-Lite software.
Step 1: Launching VCDS-Lite and Performing a Test
- Connect the Cable: Ensure your VAG COM KKL cable is plugged into your computer.
- Start VCDS-Lite: Launch the VCDS-Lite software on your computer.
- Access Options: Click the “Options” button within VCDS-Lite.
- Select COM Port: In the “Options” window, you will see a “Select COM Port” box. Choose the COM port number you identified or configured in the previous steps.
- Run Test: Click the “Test” button.
- Interface Status: Found!: If the test is successful, VCDS-Lite should display “Interface Status: Found!”. This indicates that your cable is properly communicating with the software.
Congratulations! You can now connect the other end of your VAG COM KKL cable to your vehicle’s OBD2 port, turn on the ignition, and begin diagnosing your car.
Step 2: Troubleshooting Connection Issues
If the test is not successful and you don’t see “Interface Status: Found!”, check the following:
- Software or Device Conflicts: Other software or devices using USB ports or the same COM port might be interfering. Try uninstalling any recently installed software or disconnecting USB devices to rule out conflicts.
- Vehicle Compatibility: The VAG COM 409.1 KKL cable does not work with vehicles using CAN-BUS systems. It is primarily compatible with older Audi, Volkswagen, Skoda, and Seat models (typically pre-2004).
- Ignition ON: Ensure the vehicle’s ignition is turned ON when testing the connection.
- COM Port Iteration: Test the cable with each COM port from 1 to 4 in VCDS-Lite’s Options, even if you believe you’ve set it correctly in Device Manager.
- Driver Re-installation: Double-check that the driver is installed correctly as outlined in Step 1 of this guide.
More Troubleshooting Tips:
- Vehicle Brand Support: VAG COM 409.1 KKL cable primarily supports Audi, Volkswagen, Skoda, and Seat vehicles for full diagnostics. Other brands may only support generic OBD-II functions.
- “Can’t Synch Baud Rate” Error: If you encounter the error message “Can’t Synch Baud Rate”, go to Options in VCDS-Lite and adjust the Start Baud rate. Try setting it to 9600, then 4800, and finally 1200, testing the connection after each change. Remember to turn the vehicle’s ignition OFF and back ON after each failed attempt.
- Previous VCDS Installations: If you’ve had previous VCDS installations from other sources, uninstall all versions of VCDS software and delete the “C:Ross-Tech” directory. Then, install the latest version of VCDS-Lite from the official Ross-Tech website: VCDS-Lite Download.
For further assistance and visual instructions, you can refer to video tutorials on installing and registering VCDS-Lite software specifically for your VAG COM 409.1 KKL cable.
Important Considerations and Limitations of VAG COM 409.1 KKL Cable
Keep in mind that the VAG COM 409.1 KKL cable is an entry-level tool with limitations. As mentioned earlier, it mainly supports older vehicles. For newer cars with advanced diagnostic systems, consider upgrading to more advanced interfaces like the VAG-COM 2021 for broader vehicle coverage and enhanced functionality.
By following this guide carefully, you should be able to successfully install the Vag Com Kkl 409.1 Obd2 Usb Cable Driver and start diagnosing your older VAG vehicle. Remember to always prioritize safety and consult your vehicle’s repair manual for specific diagnostic procedures.