For Tesla Model Y owners, accessing vehicle diagnostics and data can sometimes feel like navigating uncharted territory. Unlike traditional vehicles with readily accessible OBD2 ports, Teslas require a slightly different approach. If you’re looking to tap into your Tesla Model Y’s data for performance monitoring, diagnostics, or adding aftermarket accessories, understanding the OBD2 port situation is crucial. This guide will illuminate the Tesla Model Y Obd2 Port Location and how you can easily add this functionality to your vehicle.
Understanding the Need for an OBD2 Port in Your Tesla Model Y
While modern vehicles, including the Tesla Model Y, utilize the OBD2 (On-Board Diagnostics II) system for comprehensive vehicle monitoring, the standard port isn’t always readily available to the user in the same way as in conventional cars. The OBD2 system is the gateway to a wealth of vehicle information, from battery health and temperature to motor performance and diagnostic trouble codes.
Having access to an OBD2 port in your Tesla Model Y opens up a range of possibilities:
- Real-time Diagnostics: Connect an OBD2 scanner to read diagnostic trouble codes, understand vehicle health, and troubleshoot potential issues.
- Performance Monitoring: Utilize OBD2 data to track performance metrics, battery usage, and efficiency.
- Aftermarket Accessories: Power and control aftermarket accessories like auxiliary lights or performance monitoring displays that rely on OBD2 data triggers.
Locating the OBD2 Port in Your Tesla Model Y (with Adapter)
Out of the factory, the Tesla Model Y does not come with a standard, easily accessible OBD2 port in the cabin. However, this doesn’t mean the OBD2 system is absent. Instead, the connection points are located within the car’s internal wiring. This is where an OBD2 adapter for Tesla Model Y becomes essential.
These adapters are designed to bridge the gap, safely tapping into the existing wiring to create a standard OBD2 port. The installation location varies slightly depending on the Model Y’s production year.
For Tesla Model Y (Pre-2024 Models): Center Console Installation
For Model Y vehicles produced before 2024, the OBD2 adapter is typically installed within the center console area, specifically in the rear footwell.
Installation Steps (Pre-2024 Models):
-
Preparation is Key: Powering Down Your Tesla
- Disable Sentry Mode: Turn off Sentry Mode via the Tesla app or touchscreen to prevent unnecessary battery drain during the process (
Controls -> Security -> Sentry Mode = Off). - Complete Power Down: This is crucial for safety and to prevent disrupting the vehicle’s systems.
- Fully open the driver’s side window.
- Close the driver’s door.
- Open a rear door for easy access to the installation area.
- Power off the car via the touchscreen (
Controls -> Safety -> Power Off). - Wait 8-10 minutes: Crucially, wait for the vehicle’s systems to fully shut down. You’ll hear a relay “click” and any humming sounds from the car will cease. This ensures all CAN buses and relays are deactivated.
- Disable Sentry Mode: Turn off Sentry Mode via the Tesla app or touchscreen to prevent unnecessary battery drain during the process (
-
Accessing the Connector:
- Locate the protective cover in the rear footwell (behind the center console).
- Carefully remove the cover. It’s held in place by approximately 5 clips that can be released by gently pulling or prying.
- This will expose the wiring harness and connectors.
-
Installing the OBD2 Adapter:
- Disconnect the existing connector.
- Insert the OBD2 adapter between the disconnected connectors, ensuring a secure and proper connection on both ends.
- Neatly close the protective cover.
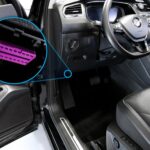
For Tesla Model Y (2024+ Models): Driver’s Footwell Installation
In newer Tesla Model Y vehicles (2024 and onwards), the OBD2 adapter installation location has shifted to the driver’s footwell.
Installation Steps (2024+ Models):
-
Power Down Procedure: Follow the same power-down procedure as outlined for pre-2024 models, ensuring the vehicle is completely off before proceeding.
-
Accessing the Connector:
- Locate the panel on the right side of the driver’s footwell (near the accelerator pedal).
- Remove the panel to access the connector.
-
Installing the OBD2 Adapter:
- Disconnect the connector behind the panel.
- Connect the OBD2 adapter in series with the original connector, ensuring firm connections.
- Reinstall the panel.
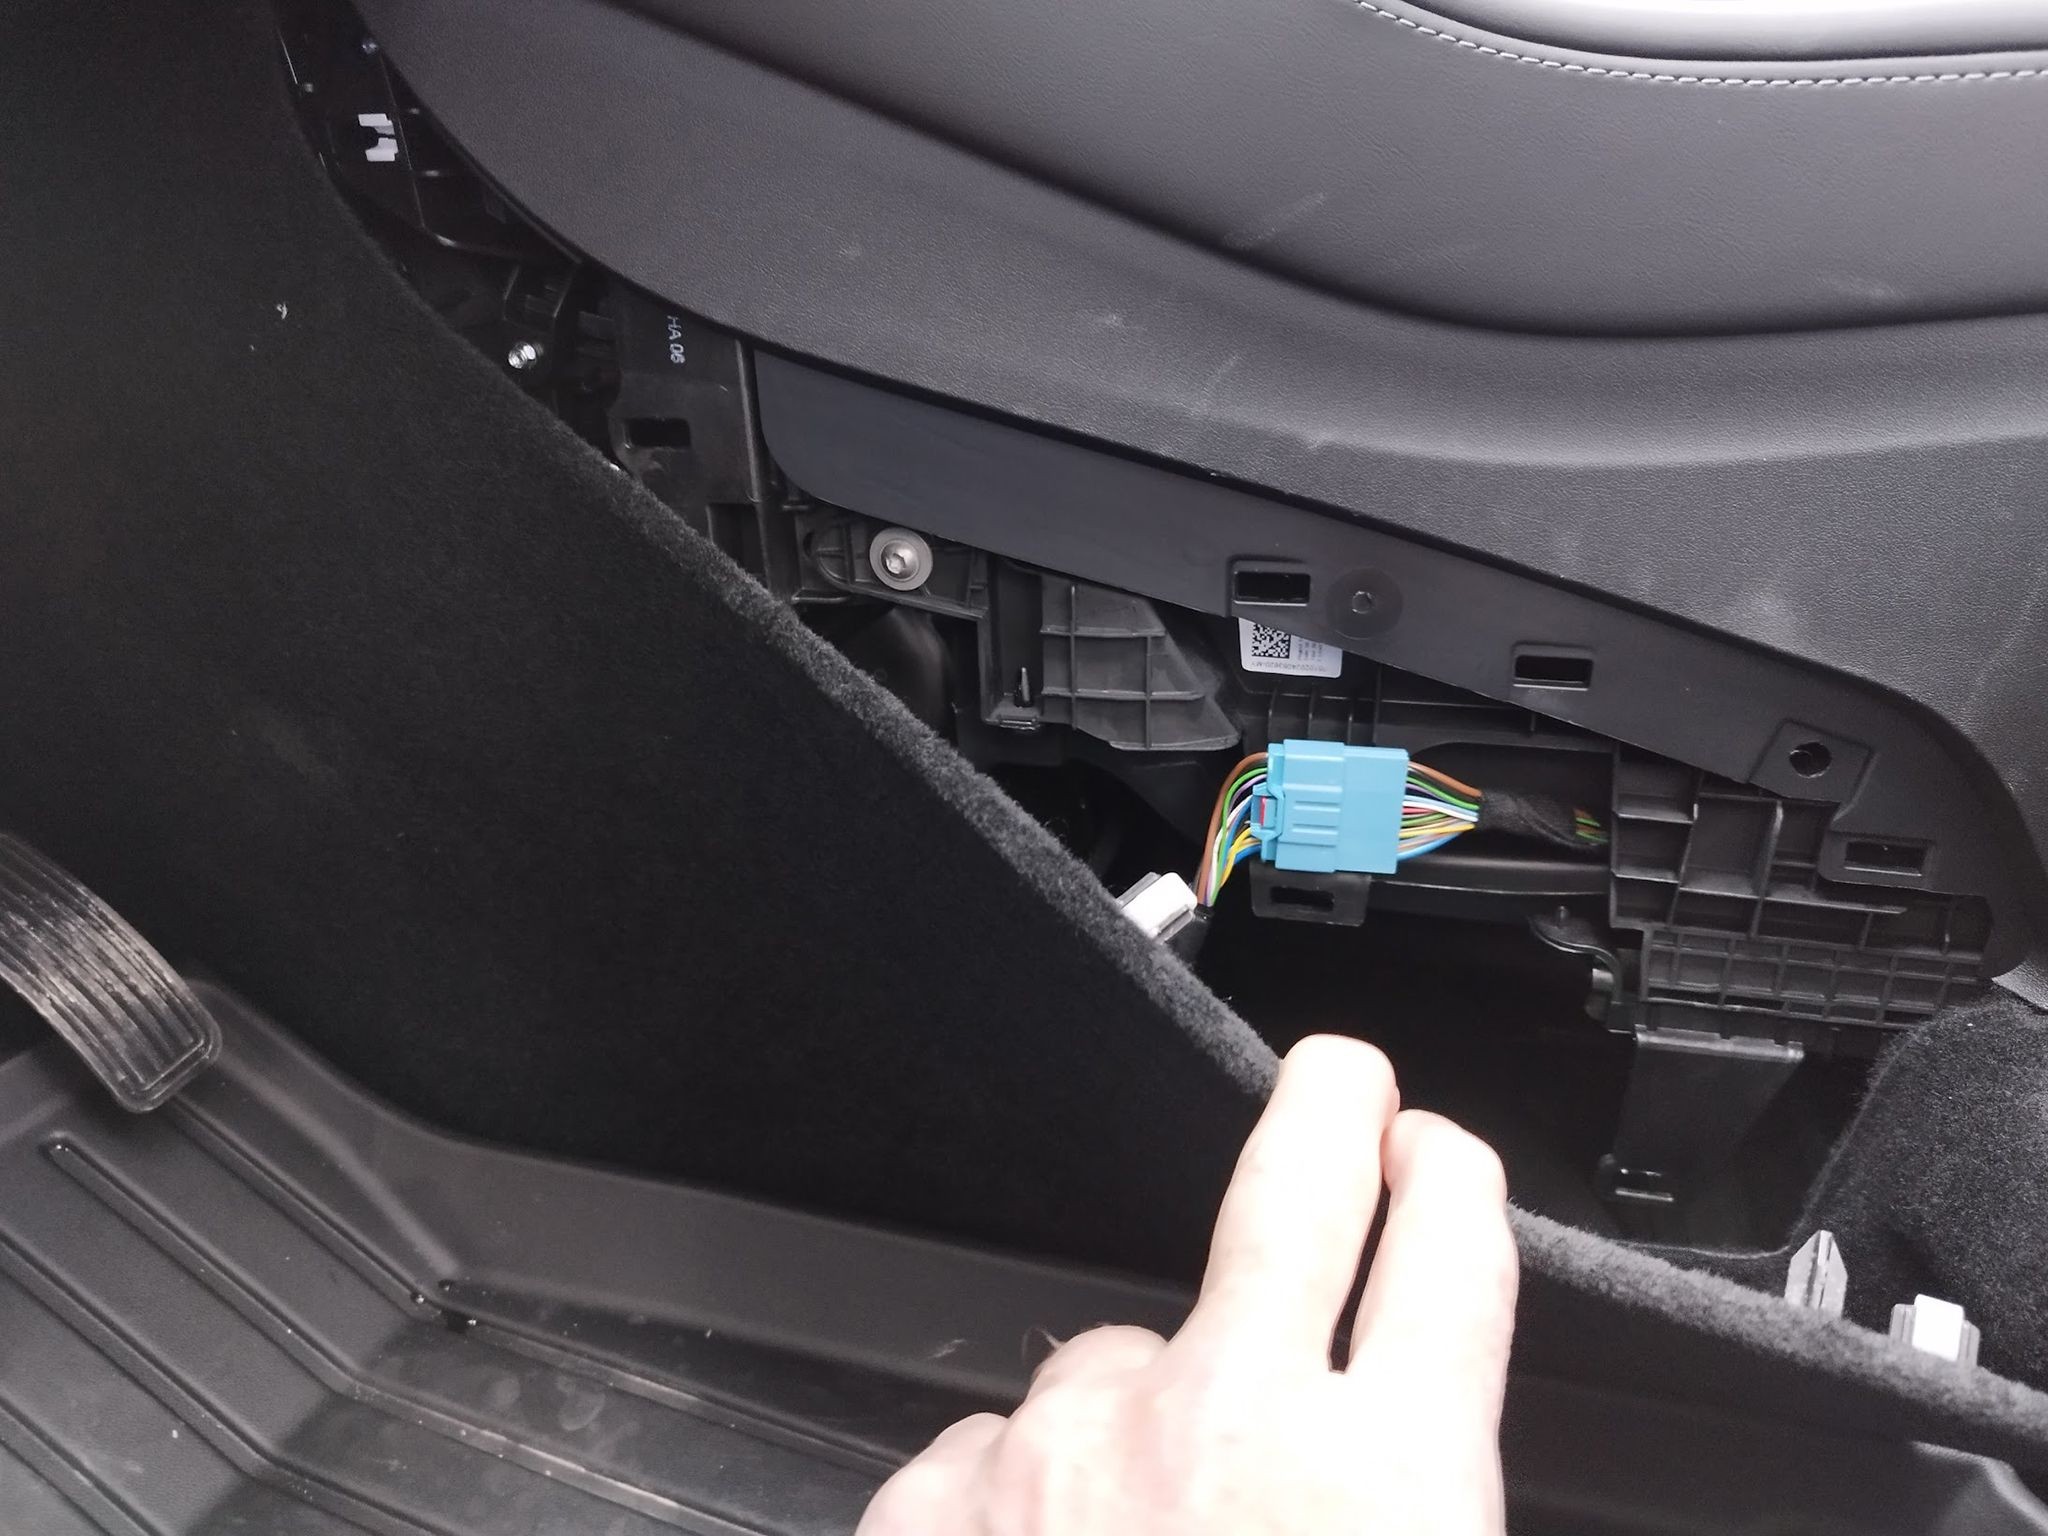 OBD2 port location in a 2024 Tesla Model 3 and Model Y, showing the port behind the panel in the driver's footwell, indicated by a red circle.
Tips and Important Considerations
- Cable Management: Consider routing the OBD2 port cable to a more accessible location, such as under the rear footwell cover or under the front seats. This eliminates the need to reopen the cover every time you want to connect an OBD2 device.
- Safety First: Always prioritize safety by completely powering down the vehicle and waiting the full 8-10 minutes before disconnecting any connectors. This prevents potential damage to the car’s electrical systems.
- Adapter Compatibility: Ensure you are using an OBD2 adapter specifically designed for Tesla Model 3 and Model Y vehicles to guarantee compatibility and proper function.
- Professional Installation: If you are uncomfortable with performing the installation yourself, seek assistance from a qualified automotive technician.
Disclaimer: Incorrect installation can potentially damage your vehicle’s electrical system. Valostore and techcarusa.com are not responsible for any damage resulting from improper installation. Proceed with caution and at your own risk.
By understanding the Tesla Model Y OBD2 port location and utilizing a compatible adapter, you can unlock valuable diagnostic and data access for your vehicle, enhancing your ownership experience and enabling a range of useful functionalities.