Understanding your vehicle’s health is crucial for every car owner. The Oxgord CAN OBD2 scanner is a valuable tool designed to empower you with insights into your car’s performance and potential issues. Whether you’re a seasoned DIY mechanic or a first-time car owner, learning how to use your Oxgord OBD2 scanner effectively can save you time and money. This guide provides comprehensive Oxgord Can Obd2 Instructions to help you diagnose car problems with confidence.
Getting Started with Your Oxgord OBD2 Scanner
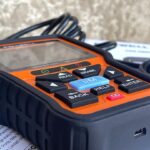
Before diving into diagnostics, let’s ensure you’re set up correctly. Typically, an Oxgord OBD2 scanner package includes the scanner device itself and an instruction manual. While specific models may have slight variations, the basic setup and operation remain consistent.
-
What’s in the Box: Your Oxgord OBD2 scanner package should contain:
- The Oxgord OBD2 scanner unit.
- An OBD2 cable (usually integrated or detachable).
- A user manual – although this guide aims to provide even more detail!
-
Locating the OBD2 Port in Your Car: The OBD2 port, also known as the Diagnostic Link Connector (DLC), is a standardized 16-pin port in your vehicle. It’s usually located under the dashboard on the driver’s side. Common locations include:
- Beneath the steering column.
- Above the pedals.
- Within the glove compartment area.
Refer to your vehicle’s owner’s manual if you have trouble locating the OBD2 port.
-
Connecting the Oxgord OBD2 Scanner:
- Turn off your vehicle’s ignition.
- Locate the OBD2 port in your car.
- Plug the Oxgord OBD2 scanner connector firmly into the OBD2 port. Ensure it clicks into place for a secure connection.
-
Powering On the Scanner:
- Turn your vehicle’s ignition to the “ON” position. Do not start the engine. This provides power to the car’s electrical system and the OBD2 port, allowing the scanner to function.
- The Oxgord OBD2 scanner should power on automatically once connected and the ignition is turned ON. Some models might have a power button if they are battery operated for off-vehicle use, but for in-car diagnostics, ignition ON is usually sufficient.
Reading and Understanding Diagnostic Trouble Codes (DTCs)
Once connected, your Oxgord OBD2 scanner can communicate with your car’s computer and retrieve valuable diagnostic information, primarily in the form of Diagnostic Trouble Codes (DTCs).
-
Performing a Scan:
- With the scanner connected and ignition ON, navigate the scanner’s menu using the buttons on the device.
- Look for options like “Read Codes,” “Scan,” “DTC,” or “Diagnostics.” The exact wording may vary slightly depending on your Oxgord model.
- Select the appropriate option to initiate a scan. The scanner will communicate with your vehicle’s computer and retrieve any stored DTCs.
- The DTCs, if any are present, will be displayed on the scanner’s screen.
-
Understanding DTCs: DTCs are alphanumeric codes that represent specific fault areas within your vehicle’s systems. They follow a standardized format:
- The first character indicates the system:
- P – Powertrain (engine, transmission)
- B – Body (interior, airbags, etc.)
- C – Chassis (brakes, suspension, steering)
- U – Network/Communication
- The second character indicates code type:
- 0 – Generic (SAE standardized codes)
- 1, 2, 3 – Manufacturer-specific codes
- The third character indicates the subsystem:
- 1 – Fuel and Air Metering
- 2 – Fuel and Air Metering (Injector Circuit)
- 3 – Ignition System or Misfire
- 4 – Auxiliary Emission Controls
- 5 – Vehicle Speed Controls and Idle Control System
- 6 – Computer Output Circuit
- 7 – Transmission
- 8 – Transmission
- The last two characters are specific fault numbers.
- The first character indicates the system:
-
Using the Oxgord DTC Lookup: Your Oxgord OBD2 scanner may have a built-in DTC lookup function. If not, you can easily find DTC definitions online.
- Built-in Lookup: Some advanced Oxgord models might have a feature to display the description of the DTC directly on the scanner screen. Refer to your specific model’s manual.
- Online Resources: Websites like OBD-II Codes or RepairPal offer comprehensive databases to look up DTC definitions. Simply enter the code (e.g., P0171) to understand what system is affected and the potential issue.
Clearing Diagnostic Trouble Codes (DTCs)
The Oxgord OBD2 scanner is not only useful for reading codes but also for clearing them after a repair has been made.
-
Steps to Clear Codes:
- After reading the DTCs and addressing the underlying issue, navigate the Oxgord scanner menu to find options like “Erase Codes,” “Clear DTCs,” or “Reset Codes.”
- Select the clear codes option. The scanner will typically ask for confirmation before clearing.
- Confirm the action to clear the codes.
- Turn the ignition OFF and then ON again.
- Rescan to ensure the codes have been cleared and do not reappear immediately.
-
When to Clear Codes and When Not To:
- Clear Codes After Repair: Always clear codes after you have diagnosed and repaired the problem causing the DTC. This will turn off the “Check Engine Light” and allow you to see if the issue is truly resolved and does not return.
- Don’t Clear Codes Without Diagnosis: Avoid clearing codes without understanding and fixing the underlying problem. Clearing codes without repair is like turning off a warning light without fixing the actual issue. The problem will likely return, and you might miss important information for diagnosis.
- For Emissions Testing: In some regions, clearing codes right before an emissions test can be problematic. The car’s computer needs to complete “drive cycles” to confirm emission systems are functioning correctly after codes are cleared. If systems are not ready, your vehicle might fail the emissions test even if the underlying issue is fixed.
Frequently Asked Questions About Oxgord OBD2 Instructions
How to Clear Check Engine Light with Oxgord OBD2 Scanner?
To clear the check engine light, follow the “Clearing Diagnostic Trouble Codes (DTCs)” steps outlined above. Read the codes first to understand the issue, fix the problem, and then use the “Erase Codes” function on your Oxgord scanner.
What Does Error Code P0123 Mean on My Oxgord Scanner?
P0123 is a generic OBD2 code indicating “Throttle/Pedal Position Sensor/Switch A Circuit High Input.” This means the sensor that monitors the throttle position is sending a high voltage signal to the engine computer. Possible causes can range from a faulty sensor to wiring issues. You can use online resources like OBD-II Codes to get more detailed information on P0123 and troubleshooting steps.
Can the Oxgord OBD2 Scanner Display Real-Time Engine Data?
Basic Oxgord OBD2 scanners like the MS300 primarily focus on reading and clearing DTCs and may not display real-time engine data (live data). More advanced Oxgord models might offer live data streaming capabilities. Check the specifications of your specific Oxgord scanner model or the user manual to confirm if it supports live data.
Is the Oxgord OBD2 Scanner Manual Available Online?
Oxgord, as a brand, may have various resellers and distributors. The best place to look for a specific Oxgord OBD2 scanner manual is to check the website where you purchased the device or search online using the specific model number of your Oxgord scanner along with “manual” or “instructions.”
By following these Oxgord can obd2 instructions, you can confidently use your scanner to diagnose and maintain your vehicle. Remember to always consult your vehicle’s repair manual and seek professional help when dealing with complex car issues.