The check engine light. Just the sight of it illuminated on your dashboard can send shivers down any car owner’s spine. It’s that universal signal from your vehicle saying, “Something’s not quite right!” But before you rush to the mechanic and brace yourself for a hefty bill, what if you could understand the problem yourself, right from your driveway? This is where the magic of an OBD2 scanner comes in, your handy tool for deciphering what your car is trying to tell you about that pesky check engine light.
In this comprehensive guide, we’ll walk you through everything you need to know about using an OBD2 scanner to check your check engine light. Whether you’re a seasoned DIY enthusiast or a complete beginner, you’ll learn how to easily connect, read, and interpret the diagnostic codes your car throws, empowering you to take control of your vehicle’s health.
What is an OBD2 Scanner and Why You Need One for Check Engine Light Diagnostics?
An OBD2 scanner, short for On-Board Diagnostics II scanner, is a device that communicates with your car’s computer system. Think of it as a translator between you and your vehicle. Since the mid-1990s, OBD2 has become the standard in most cars, providing a wealth of information about your vehicle’s performance and health.
When your check engine light illuminates, it’s because your car’s computer, also known as the Engine Control Unit (ECU) or Powertrain Control Module (PCM), has detected an issue. This issue could range from something minor like a loose gas cap to a more significant problem with your engine or emissions system. The OBD2 scanner acts as a key to unlock the diagnostic trouble codes (DTCs) stored in your car’s computer, giving you clues about what triggered the light.
Having an OBD2 scanner is invaluable for several reasons:
- Quick Diagnosis: It allows you to quickly identify the potential problem causing the check engine light to come on, saving you time and guesswork.
- Cost Savings: By understanding the issue yourself, you can avoid unnecessary trips to the mechanic for a simple code reading, potentially saving on diagnostic fees.
- Informed Decisions: Knowing the DTCs empowers you to research the problem, understand its severity, and make informed decisions about repairs.
- Preventative Maintenance: Regularly scanning your car with an OBD2 scanner can help you catch minor issues before they escalate into major, costly repairs.
Step-by-Step Guide to Use an OBD2 Scanner to Check Your Check Engine Light
Using an OBD2 scanner is surprisingly straightforward. Here’s a step-by-step guide to help you diagnose your check engine light:
1. Preparation: Safety First
Before you begin, ensure your vehicle is safely parked and the engine is turned off. Engage the parking brake for added safety. Familiarize yourself with your OBD2 scanner’s user manual if it’s your first time using it.
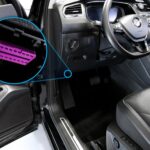
2. Locate the OBD2 Port (DLC)
The OBD2 port, also known as the Data Link Connector (DLC), is usually located under the dashboard on the driver’s side of your vehicle. It’s typically within a foot and a half of the steering wheel. Look for a 16-pin connector, often trapezoidal in shape. If you’re unsure of its exact location, consult your vehicle’s owner’s manual.
3. Connect the OBD2 Scanner
Plug the OBD2 scanner connector into the DLC port. It will only fit in one orientation, so you don’t need to force it. Ensure it’s securely connected.
4. Turn on the Ignition (Key On, Engine Off – KOEO)
Turn your car key to the “ON” position. This provides power to your car’s electrical system and the OBD2 port without starting the engine. You should see the scanner power on.
5. Initiate the Scan for Trouble Codes
Follow the instructions on your OBD2 scanner to initiate a scan. Most scanners have a “Read Codes” or “Diagnostic Scan” option. Select this option to begin the process of retrieving DTCs from your car’s computer. The scanner will communicate with your vehicle’s ECU. Wait for the scan to complete. This usually takes only a few moments.
6. View and Record the Diagnostic Trouble Codes (DTCs)
Once the scan is complete, the OBD2 scanner will display any stored DTCs. Record these codes. They are usually alphanumeric, starting with a letter (P, C, B, or U) followed by four numbers. For example, a common code is P0300, indicating a random misfire.
7. Unplug the Scanner and Turn Off the Ignition
After recording the codes, turn the ignition off and unplug the OBD2 scanner from the DLC port.
Understanding OBD2 Scanner Readings: LEDs and Diagnostic Codes
Many OBD2 scanners, especially basic models, use LEDs to provide a quick visual indication of your vehicle’s system status. These LEDs often follow a color-coded system:
- Green LED (Check Mark): Indicates that all engine systems are functioning correctly and all monitors are active and have completed their diagnostic testing. No DTCs are present. This is the “all clear” signal.
- Yellow LED (Question Mark): Suggests that some monitors haven’t completed their self-testing, or there might be a “pending” DTC. A pending code means an issue has been detected, but it hasn’t occurred frequently enough to trigger the check engine light consistently. In this case, completing a full drive cycle (driving in various conditions) and rescanning may be necessary.
- Red LED (X Mark): Signals a problem. It indicates that one or more of your vehicle’s systems has a fault, and DTCs are present. When the red LED is lit, the check engine light on your dashboard is likely illuminated as well.
Beyond LEDs, the real power of an OBD2 scanner lies in the DTCs it retrieves. These codes are standardized across the automotive industry, allowing mechanics and DIYers alike to understand vehicle problems.
Common OBD2 Code Categories:
- P-Codes (Powertrain): Relate to the engine, transmission, and related components. These are the most common codes associated with the check engine light. Examples include misfire codes (P0300-P0309), oxygen sensor codes (P0130-P0167), and catalytic converter codes (P0420-P0430).
- C-Codes (Chassis): Refer to systems like ABS (Anti-lock Braking System), traction control, and suspension.
- B-Codes (Body): Concern body-related systems like airbags, power windows, and security systems.
- U-Codes (Network/Communication): Indicate communication issues between different computer modules within the vehicle.
Interpreting DTCs:
Once you have the DTCs, you can use online resources or repair manuals to look up their definitions. Websites like OBD-Codes.com or the National Highway Traffic Safety Administration (NHTSA) website are excellent resources. Understanding the code definition is the first step in diagnosing the problem.
For example, if your scanner shows a P0171 code, a quick search will reveal it means “System Too Lean (Bank 1).” This indicates that the engine is receiving too much air or not enough fuel in bank 1 (one side of the engine). This could be caused by a vacuum leak, a faulty oxygen sensor, a fuel delivery issue, or other problems.
Troubleshooting Tips for Using Your OBD2 Scanner
While OBD2 scanners are user-friendly, you might encounter a few hiccups:
- Blank LCD Screen: If the scanner’s screen remains blank when connected, check your vehicle’s fuses. A blown fuse for the DLC or PCM can prevent power from reaching the OBD2 port. Consult your car’s repair manual to locate and check these fuses.
- No Codes Found: If the scanner reports “No Codes Found” but your check engine light is on, the issue might be manufacturer-specific and not covered by generic OBD2 codes. In rare cases, it could also indicate a problem with the scanner itself or the vehicle’s computer communication.
- Connector Fit Issues: In very rare cases, especially with older vehicles predating OBD2 standardization, the connector might not fit. However, most vehicles from the mid-1990s onwards are OBD2 compliant.
Benefits of Regularly Using an OBD2 Scanner
Investing in and regularly using an OBD2 scanner offers numerous benefits:
- Early Problem Detection: Catch potential issues early before they become major breakdowns.
- DIY Car Maintenance: Empowers you to perform basic diagnostics and potentially fix minor issues yourself.
- Mechanic Communication: Provides you with informed questions to ask your mechanic, leading to more efficient and transparent repairs.
- Vehicle Health Awareness: Keeps you informed about your car’s overall health and maintenance needs.
Conclusion: Take Control of Your Check Engine Light with an OBD2 Scanner
Don’t let the check engine light be a source of anxiety. With an OBD2 scanner, you have the power to understand what’s going on under the hood. By following this guide, you can confidently diagnose your check engine light, gain valuable insights into your vehicle’s health, and make informed decisions about maintenance and repairs. Empower yourself to be a more knowledgeable and proactive car owner – start using an OBD2 scanner today!