When your car exhibits electrical problems like dimming headlights or frequent dead battery issues, a faulty alternator often becomes the prime suspect. Before rushing to a mechanic, you might wonder if your OBD2 scanner can offer insights into the alternator’s health.
The answer is yes, with certain important considerations. An OBD2 scanner, especially advanced models like the Foxwell NT1009, can be a valuable tool in assessing your alternator. Let’s delve into how you can use an OBD2 scanner for an effective Obd2 Alternator Test, understand its capabilities and limitations, and learn the steps to determine if your alternator is failing and needs attention.
Decoding the Alternator’s Vital Role in Your Vehicle
The alternator is a critical component of your car’s electrical system. Think of it as the heart of your vehicle’s electrical system, continuously generating power while the engine is running.
It produces electricity to operate numerous electrical components, from your headlights and windshield wipers to the radio and power windows. Crucially, the alternator also recharges your car battery, ensuring it’s ready for the next start.
Alternators are durable but not indestructible. Signs of a failing alternator can manifest in various ways, including flickering or dim headlights, a slow engine crank, repeated battery drain, or unusual noises. If the alternator fails to perform its charging duties, the battery will quickly deplete, potentially leaving you stranded. Early detection of these symptoms can prevent more significant problems and costly repairs down the line.
How Effective is an OBD2 Scanner for Alternator Diagnosis?
An OBD2 scanner, such as the Foxwell NT1009, is an indispensable tool for diagnosing a wide range of vehicle issues, including those related to the alternator. These scanners access your car’s computer system and retrieve diagnostic trouble codes (DTCs) that are stored when the system detects a malfunction.
While an OBD2 scanner won’t directly declare “Your alternator is bad,” it can provide crucial indirect evidence. It can detect electrical system anomalies that are often linked to alternator problems, such as low voltage conditions (indicated by codes like P0562) or malfunctions in the alternator field control circuit (like P0622).
These error codes serve as valuable clues, pointing you towards potential alternator issues and guiding further investigation. By interpreting these codes and utilizing the live data features of an OBD2 scanner, you can gain a clearer picture of your alternator’s performance.
Step-by-Step Guide: Performing an OBD2 Alternator Test
To effectively conduct an OBD2 alternator test, follow these steps using your Foxwell NT1009 scanner:
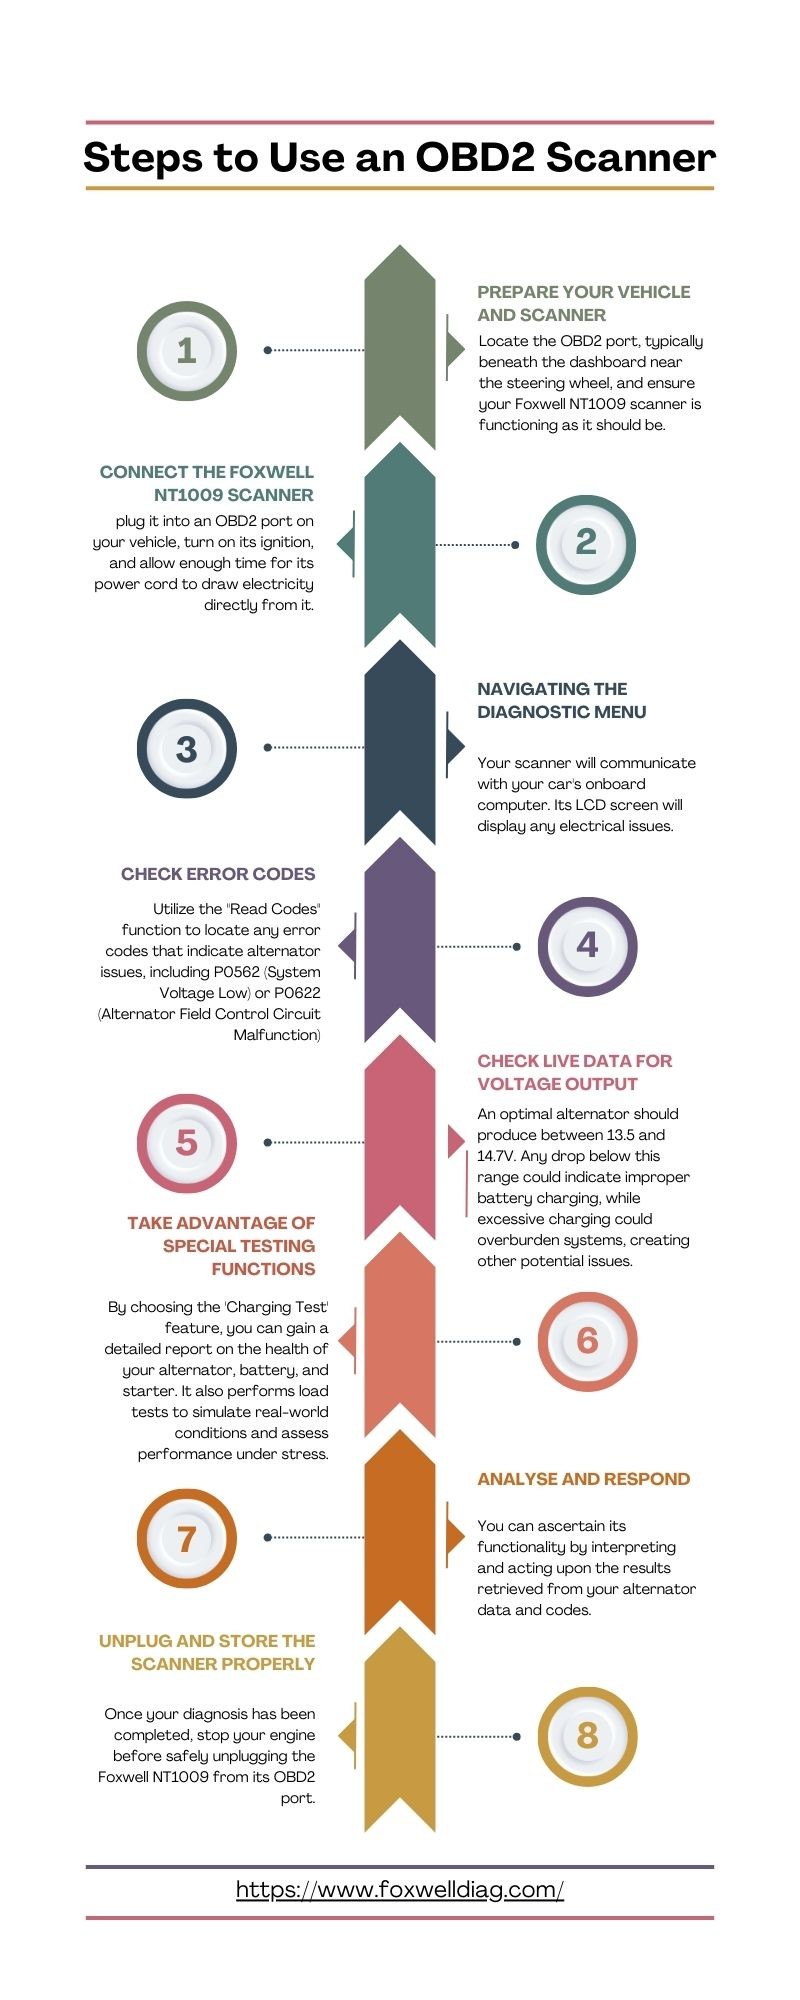
Vehicle and Scanner Preparation
Begin by preparing your vehicle for the test. Turn off all unnecessary electrical loads such as headlights, radio, and air conditioning. This minimizes electrical draw during the initial assessment.
Locate the OBD2 port in your car. It’s usually situated under the dashboard on the driver’s side, near the steering column. Ensure your Foxwell NT1009 scanner is powered on and ready for connection.
Connecting Your Foxwell NT1009 Scanner
Connect the Foxwell NT1009 scanner by firmly plugging it into the OBD2 port. Turn your car’s ignition to the “ON” position, but do not start the engine yet. This allows the scanner to draw power and establish communication with your vehicle’s computer system.
Allow the scanner a few moments to initialize and establish a stable connection with your car’s onboard diagnostics system.
Navigating to the Diagnostic Menu
Once connected, navigate the scanner’s menu to find the “Diagnostic” or “Scan” section. Select this option to initiate the diagnostic process. The scanner may prompt you to enter your vehicle’s make, model, and year for accurate data retrieval.
The scanner will now communicate with your car’s computer, retrieving diagnostic information. The results, including any trouble codes and live data, will be displayed on the scanner’s screen.
Checking for Error Codes Related to Alternator Issues
Use the “Read Codes” or “Trouble Codes” function on your scanner to check for any stored diagnostic trouble codes. Pay close attention to codes that could indicate alternator problems, such as:
- P0562 (System Voltage Low): This code suggests the system voltage is lower than expected, which could be due to a failing alternator not producing enough charge.
- P0622 (Alternator Field Control Circuit Malfunction): This code points to a problem within the alternator’s control circuit, indicating a potential alternator fault.
While these codes don’t definitively confirm a bad alternator, they strongly suggest the need for further investigation into the charging system.
Monitoring Live Data for Voltage Output
A critical aspect of an OBD2 alternator test is monitoring live data, particularly the voltage output. Start your car’s engine and navigate to the “Live Data” or “Data Stream” section on your Foxwell NT1009 scanner. Look for parameters related to voltage, such as “System Voltage” or “Battery Voltage.”
Observe the voltage readings while the engine is idling. A healthy alternator should typically produce a voltage output between 13.5 and 14.7 volts. Readings consistently below this range may indicate the alternator is not charging the battery effectively. Conversely, excessively high voltage can also be problematic, suggesting overcharging.
To further assess the alternator’s performance under load, turn on various electrical accessories, such as headlights, air conditioning, and the radio. Monitor the voltage readings as you add electrical load. A significant drop in voltage under load can indicate a failing alternator struggling to keep up with the demand.
Utilizing Special Charging System Tests
The Foxwell NT1009 scanner often includes specialized testing functions, such as a “Charging System Test” or “Alternator Test.” If your scanner has this feature, utilize it to perform a more comprehensive assessment of the charging system.
This test may provide a detailed report on the health of the alternator, battery, and starter. It might also conduct load tests to simulate real-world driving conditions and evaluate the alternator’s performance under stress.
Analyzing Test Results and Next Steps
Carefully analyze the data and error codes retrieved from your OBD2 alternator test. If the voltage readings are within the normal range (13.5-14.7V) and no relevant error codes are present, your alternator is likely functioning correctly.
However, if you observe low voltage readings, voltage drops under load, or relevant error codes like P0562 or P0622, it strongly suggests a potential alternator problem. In such cases, further testing or professional diagnosis is recommended.
After addressing any identified issues, you can use your scanner to clear any stored error codes.
Disconnecting and Storing the Scanner
Once you have completed your OBD2 alternator test, turn off your car’s engine. Safely disconnect the Foxwell NT1009 scanner from the OBD2 port. Store your scanner in a safe and dry place, ready for future diagnostic needs.
Alternative Methods for Alternator Testing
While an OBD2 scanner is a valuable tool, there are alternative methods to test your alternator, especially if the scanner results are inconclusive or you want to confirm your findings.
A multimeter is a straightforward tool for basic alternator testing. With the engine running, connect the multimeter leads to the battery terminals. A voltage reading between 13.5 and 14.7 volts indicates the alternator is likely charging.
For a more thorough assessment, a load test can be performed. This test measures the alternator’s ability to maintain voltage output under a significant electrical load. Load testing can be done with specialized equipment or by a professional mechanic.
Conclusion: OBD2 Scanners as a First Step in Alternator Diagnosis
An OBD2 scanner, like the Foxwell NT1009, is a highly useful tool for diagnosing potential alternator issues. It provides valuable insights through error codes, live voltage data monitoring, and specialized charging system tests.
However, it’s important to recognize that an OBD2 scanner might not always provide a definitive “bad alternator” diagnosis. It serves as an excellent first step in identifying potential problems within the charging system and guiding further investigation. In some cases, supplementary testing methods, such as multimeter testing or load tests, may be necessary to confirm alternator failure.
By regularly utilizing an OBD2 scanner for vehicle health checks, you can proactively monitor your car’s electrical system, potentially preventing unexpected breakdowns and costly repairs. The Foxwell NT1009 and similar scanners empower car owners to take a more informed approach to vehicle maintenance and troubleshooting.
FAQs About OBD2 Alternator Tests
Can you test an alternator with an OBD2 scanner?
Yes, you can use an OBD2 scanner to test an alternator. It can read relevant trouble codes and monitor live voltage data, providing valuable clues about alternator performance. However, it may not provide a definitive diagnosis alone, and further testing might be needed.
Will a bad alternator show up on a scan?
A bad alternator can trigger error codes detectable by an OBD2 scan, such as codes indicating low system voltage or alternator circuit malfunctions. While the scan might not explicitly say “bad alternator,” these codes are strong indicators of a charging system problem that could stem from a faulty alternator.
Is there an OBD code specifically for the alternator?
While there isn’t a single OBD code that says “alternator failure,” there are codes directly related to alternator issues. Common codes like P0562 (System Voltage Low) and P0622 (Alternator Field Control Circuit Malfunction) are frequently associated with alternator problems and should prompt further investigation of the charging system.