Replacing your Toyota Corolla’s Engine Control Module (ECM) with a used unit can lead to a frustrating no-start situation. This often occurs because the used ECM is still programmed with the key codes from its previous vehicle, which don’t match your car’s keys. The culprit? Toyota’s immobilizer system, a security feature designed to prevent theft. Fortunately, there’s often a do-it-yourself (DIY) solution you can try before seeking professional help: synchronizing your replacement ECM with your car’s immobilizer system using a simple OBD2 jumper. This guide will walk you through the process of performing an immobilizer sync on your Toyota using the OBD2 port, focusing on a paper clip jumper method.
Understanding the Toyota Immobilizer and ECM Replacement
Modern Toyota vehicles, like the Corolla models discussed here, are equipped with an immobilizer system. This system is a crucial anti-theft measure that prevents the engine from starting unless the correct key is present. The ECM communicates with the immobilizer system to verify the key’s legitimacy.
When you install a used ECM, it retains the key codes from its donor vehicle. Consequently, your original keys will no longer be recognized, and the engine will crank but fail to start. This is a classic immobilizer issue.
It’s important to distinguish this “no-start” condition from other potential problems. If your car cranks normally but doesn’t ignite, the immobilizer is likely the issue. However, if the starter motor doesn’t even engage, the problem might stem from an aftermarket alarm system or a different electrical fault altogether. Immobilizer issues typically cut off fuel injection and/or ignition, but allow the starter to function. Alarm system problems can disable the starter as well.
DIY Immobilizer Synchronization: The OBD2 Jumper Method
Before considering professional reprogramming services, attempting an immobilizer synchronization (sync) is a worthwhile first step. This process aims to align the replacement ECM with your Toyota’s immobilizer system. The good news is that for many Toyota Corolla models, this sync can be achieved at home using a simple paper clip to jumper specific pins in the OBD2 diagnostic port.
This DIY sync process is free and, in many cases, successfully resolves the no-start issue after a used ECM replacement. However, it’s essential to understand that this method might not work in all situations. Reasons for failure can include:
- Memory Chip Limitations: The ECM’s memory chip, which stores key codes, has a limited capacity. If it’s full from previous programming, a sync might not be possible.
- Defective ECM Memory: Damage or defects within the ECM’s memory chip can hinder the synchronization process.
- ECM Damage: Pre-existing damage to the replacement ECM itself could prevent successful synchronization.
Despite these potential limitations, the OBD2 jumper sync method is easy to perform and worth trying first due to its simplicity and no cost.
Step-by-Step Guide to Toyota Immobilizer Sync via OBD2 Jumper
This process involves jumping two specific pins in your Toyota’s OBD2 diagnostic port for 30 minutes while the ignition is in the “ON” position. Maintaining consistent voltage is crucial for success, so ensure your battery is fully charged or use a quality battery charger during the procedure.
What You’ll Need:
- A paper clip (or a small jumper wire)
- A fully charged car battery or a reliable battery charger (non-trickle type)
- Your Toyota Corolla keys
Procedure:
A) Locate the OBD2 Diagnostic Port:
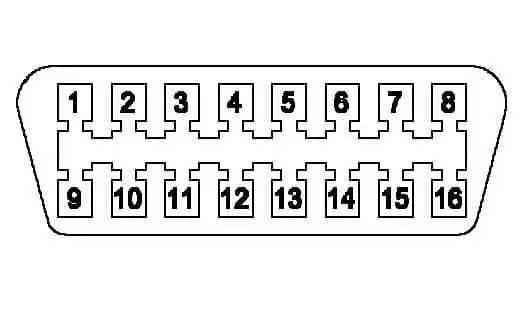
The OBD2 port in your Toyota Corolla is typically located under the dashboard on the driver’s side, near the steering column and hood release lever. It’s a 16-pin connector with two rows of pins. Refer to the images below for visual guidance.
B) Prepare to Jumper Pins #4 and #13:
With the engine off and the key in the “off” position, take your paper clip and carefully bend it into a U-shape to create a jumper. You will be connecting pin #4 and pin #13 of the OBD2 port. Double-check the pinout diagram to ensure you’re identifying the correct pins.
C) Initiate the Synchronization Process:
Insert the paper clip jumper to connect pins #4 and #13. Then, turn your Toyota Corolla key to the “ON” position (ignition on), just before the point of starting the engine. Leave the key in this “ON” position for a full 30 minutes.
During this 30-minute period, you should observe various lights flashing on your dashboard. This indicates that the synchronization process is likely underway. If the lights do not flash, double-check your jumper connection and ensure you’ve correctly identified pins #4 and #13. A poor connection or incorrect pins will prevent the sync process from starting.
Important Battery Note: Since the ignition is on for 30 minutes without the engine running, battery drain is a concern. Ensure your battery is fully charged before starting. For added security, connect a quality battery charger (not a trickle charger) to maintain voltage above 12V throughout the 30-minute sync. Voltage drops below 12V can interrupt the process, requiring you to restart the 30-minute wait. If using a charger, ensure it’s a good quality model to avoid electrical noise that could interfere with the synchronization. If you’re unsure about your charger, it’s safer to fully charge the battery beforehand and perform the sync without the charger connected.
D) Complete and Test the Synchronization:
After 30 minutes, turn the ignition key back to the “off” position and remove the paper clip jumper from the OBD2 port. Now, attempt to start your Toyota Corolla engine. If the ECM synchronization was successful and there are no other underlying issues, the engine should start.
If the car still fails to start after this procedure, the DIY sync method may not have worked in your specific case. It’s possible that one of the limitations mentioned earlier (memory chip full, defective memory, or ECM damage) is preventing synchronization.
Troubleshooting and When to Seek Professional Help
If the DIY OBD2 jumper sync method fails to start your Toyota Corolla after ECM replacement, it doesn’t necessarily mean the replacement ECM is faulty. It might simply require professional reprogramming.
Consider professional services if:
- The DIY sync fails: After carefully following the steps, the car still doesn’t start.
- Dashboard lights don’t flash: No flashing lights during the 30-minute sync period could indicate a problem with the connection, incorrect pins, or a deeper issue.
- You are uncomfortable with DIY car repairs: If you prefer not to work on your car yourself, professional service is always a reliable option.
In such cases, specialized services like Toyota Corolla Immobilizer Reset Service are available. These services can reprogram the immobilizer data in the replacement ECM to match your car’s keys, resolving the no-start issue.
Addressing Alarm System Issues
It’s also important to rule out aftermarket alarm systems as a cause of no-start problems, especially if the starter motor isn’t engaging at all. As mentioned earlier, immobilizers typically don’t disable the starter itself, while alarm systems often do.
If your car is not cranking, and you suspect an aftermarket alarm system, try these troubleshooting steps:
- Alarm Remote: Attempt to arm and disarm the alarm system using its remote control (key fob). Sometimes, a simple arm/disarm cycle can reset the system.
- Security Button Reset: Some Toyota Corolla models have a security light that also functions as a reset button. Try this procedure:
- Insert the key and turn it to the “ON” position (do not start the engine).
- Press the red security button (refer to the image below) twice.
- Attempt to start the engine.
These steps can sometimes reset a triggered aftermarket alarm system that is preventing the starter from engaging.
Conclusion
Performing an immobilizer sync using an OBD2 jumper is a valuable DIY technique for Toyota Corolla owners facing a no-start condition after ECM replacement. It’s a free and straightforward method that often resolves the issue. By carefully following these steps and understanding the potential limitations, you can attempt to synchronize your replacement ECM and potentially save on costly professional services. However, if the DIY sync fails, professional immobilizer reprogramming services are available to ensure your Toyota gets back on the road. Remember to also consider and rule out aftermarket alarm system issues if your car is not cranking at all.

