Getting your ILC OBD2 adapter connected via Wi-Fi is straightforward. This guide will walk you through the simple steps to establish a Wi-Fi connection between your OBD2 adapter and your device, ensuring you can quickly start diagnosing your vehicle using your favorite car scanner app. Let’s get started and get you connected.
Step 1: Plug In and Power On Your OBD2 Adapter
First, ensure your OBDII ELM327 adapter with Wi-Fi capability is correctly plugged into your car’s diagnostic socket, typically known as the OBDII port. This port is usually located under the dashboard on the driver’s side. Once plugged in, turn your car’s ignition to the “ON” position, or start the engine. If your OBD2 adapter has a power button, make sure to press it to power on the device.
Step 2: Connect to the OBD2 Adapter’s Wi-Fi Network
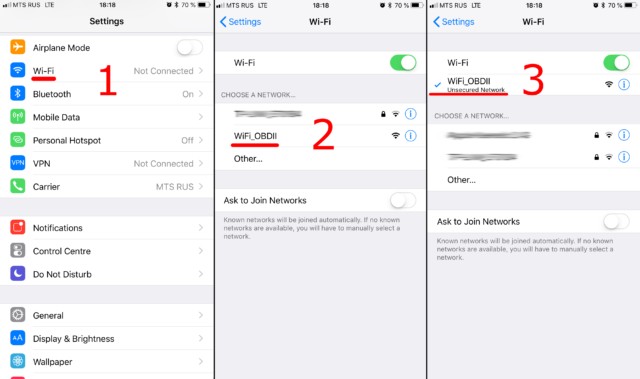
Now, on your smartphone or tablet, navigate to the Wi-Fi settings. It’s crucial to open your device’s Wi-Fi settings, not the settings within your car scanner application at this stage. Turn on Wi-Fi and wait for the list of available networks to populate.
Look for a Wi-Fi network name that corresponds to your ELM327 OBD2 adapter. Common network names include “OBDII”, “OBD2”, or “WIFI_OBDII”. Some brands, like VGate, might use names like “VLINK”. Refer to your adapter’s documentation if you’re unsure. Select the appropriate network to connect.
Most OBD2 Wi-Fi adapters do not require a password. However, if prompted for a password, consult the documentation that came with your specific adapter for the default Wi-Fi password.
Remember, the Wi-Fi network name will be related to your OBD2 adapter, not your car’s brand.
Step 3: Configure the Car Scanner App for Wi-Fi Connection
Open your Car Scanner application and locate the “Settings” menu. This is usually represented by a gear icon, often found in the top-right corner of the app’s main screen. Tap on this icon to access the settings.
Within the settings menu, find and tap on the “Adapter” or “Connection” option. The wording might vary slightly depending on the version of your Car Scanner app.
In the Connection settings, you will see different connection types. Select “Wi-Fi” as your connection method.
Verify that the Adapter IP address and Port settings are correctly configured. For the majority of OBD2 Wi-Fi adapters, the default IP address is 192.168.0.10 and the port is 35000. However, some adapters might use different settings. Double-check your adapter’s documentation to confirm the correct IP address and port number if you encounter connection issues.
Step 4: Connect in Car Scanner App and Start Diagnostics
With the Wi-Fi connection established and the Car Scanner app configured, return to the main screen of the app. You should see a prominent “Connect” button, often green and large, ready to initiate the connection to your OBD2 adapter. Tap this “Connect” button.
The app will now attempt to connect to your OBD2 adapter via Wi-Fi. Once connected, you can start using the Car Scanner app to diagnose your vehicle, read fault codes, monitor live data, and perform other diagnostic functions.
For subsequent connections, simply ensure your device is connected to the OBD2 adapter’s Wi-Fi network and tap the “Connect” button in the Car Scanner app. You are now ready to leverage the power of OBD2 diagnostics with your ILC OBD2 Wi-Fi adapter.
