The Autel MaxiScan MS309 is a popular entry-level OBD2/OBDII scanner designed for diagnosing car problems. If you’re a car owner looking to understand and fix your vehicle’s issues yourself, learning how to use MS309 OBD2 OBDII scanner can save you time and money. This guide will walk you through the process, ensuring you can effectively utilize this tool for your car diagnostics.
Understanding the Autel MaxiScan MS309
Before diving into the “how-to,” let’s understand what the Autel MaxiScan MS309 is and why it’s a valuable tool. The MS309 is a handheld device that plugs into your car’s OBD2 port, typically located under the dashboard. It allows you to communicate with your car’s computer system to:
- Read Diagnostic Trouble Codes (DTCs): These codes pinpoint specific problems within your vehicle’s systems, often triggering the “Check Engine Light.”
- Clear DTCs and Reset Check Engine Light: Once you’ve addressed the issue, the MS309 can clear the codes and turn off the warning light.
- View Live Data Stream: Monitor real-time sensor data from your vehicle, such as engine temperature, RPM, and oxygen sensor readings.
- Retrieve Vehicle Information (VIN): Access important vehicle details directly from the car’s computer.
This tool is designed for ease of use, making it suitable for both beginners and experienced DIYers who need a quick and reliable way to diagnose basic car problems.
Step-by-Step Guide: How to Use the MS309 OBD2 Scanner
Using the Autel MaxiScan MS309 is straightforward. Follow these steps to get started:
1. Locate the OBD2 Port:
First, you need to find the OBD2 port in your vehicle. It’s typically located under the driver’s side dashboard, but the exact location can vary depending on your car’s make and model. Consult your vehicle’s owner’s manual if you’re unsure.
(Alt: OBD2 port location under dashboard in a car)
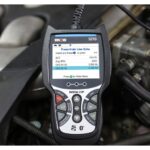
2. Connect the MS309 Scanner:
With your vehicle turned off, plug the OBD2 connector of the MS309 into the OBD2 port. Ensure it’s firmly connected.
(Alt: Hand plugging Autel MS309 scanner into car OBD2 port)
3. Turn the Ignition ON (Engine OFF):
Turn your car key to the “ON” position. This powers up the car’s electrical system and the diagnostic port, but do not start the engine. Having the ignition on allows the scanner to communicate with the vehicle’s computer.
4. Scanner Initialization:
The MS309 will power on automatically once connected and the ignition is on. It will display “Linking to Vehicle…” and “Waiting for vehicle to respond…”. This process may take a few seconds as the scanner establishes communication with your car’s computer.
5. Navigating the Menu and Reading Codes:
Once connected, you’ll see the main menu on the MS309 screen. To read diagnostic trouble codes, use the “SCROLL” buttons to navigate to “Read Codes” and press the “ENTER/EXIT” button to select it.
(Alt: Autel MS309 screen displaying Read Codes menu option)
The scanner will then retrieve any stored DTCs. If codes are found, they will be displayed on the screen along with a brief description. Use the “SCROLL” buttons to view all codes if there are multiple.
If no codes are found, the scanner will display “No codes are stored in the module!”.
6. Interpreting Diagnostic Trouble Codes (DTCs):
DTCs are alphanumeric codes that identify specific problem areas. For example, a code like “P0301” indicates a cylinder 1 misfire. The MS309 has a built-in DTC library to help you understand these codes. You can also consult online resources or repair manuals for more detailed explanations.
(Alt: Autel MS309 screen showing a diagnostic trouble code)
7. Clearing Diagnostic Trouble Codes (DTCs):
After you have diagnosed and repaired the issue causing the DTC, you can clear the codes using the MS309. From the main menu, navigate to “Erase Codes” and press “ENTER/EXIT”.
Caution: Clearing codes without fixing the underlying problem will only turn off the Check Engine Light temporarily. The light will likely reappear if the issue persists.
8. Viewing Live Data (Data Stream):
To monitor real-time data, select “Live Data” from the main menu. This feature allows you to observe various parameters such as engine RPM, coolant temperature, vehicle speed, and sensor readings as your car is running (engine started). This can be helpful for diagnosing intermittent issues or monitoring sensor performance.
(Alt: Autel MS309 screen showing Live Data menu option)
9. Disconnecting the MS309 Scanner:
Once you are finished with your diagnostics, turn off the ignition and disconnect the MS309 scanner from the OBD2 port. Store the scanner in a safe place for future use.
Troubleshooting Common Issues with MS309
Users sometimes encounter issues while using the MS309. Here are solutions to some common problems based on user questions:
Problem 1: “Linking to vehicle…” and “Waiting for vehicle to respond…” issue.
- Solution: Ensure the ignition is turned to the “ON” position (engine off). Double-check that the MS309 is securely connected to the OBD2 port. Make sure all auxiliary devices are turned off as they might interfere with the diagnostic process. If the problem persists, try turning the ignition off and on again, and reconnect the scanner.
Problem 2: Display Contrast Too High/Screen Too Bright.
- Solution: Unfortunately, the MS309 has a basic interface and may not offer user-adjustable contrast settings directly. If the contrast is accidentally set too high, and you cannot see the menu, try to navigate blindly using the buttons. Consult the manual for the default menu navigation to reset display settings if possible, or try cycling power to the device by disconnecting and reconnecting it. If this fails, you may need to seek technical support from Autel.
Problem 3: Scanner shows codes found but then says “No codes on scanner.”
- Solution: This could be a communication glitch. Try disconnecting and reconnecting the scanner, and repeat the “Read Codes” process. Ensure you are selecting the correct module to scan if prompted (though MS309 is typically basic and auto-scans). If the issue continues, there might be an intermittent electrical connection problem, or in rare cases, a fault with the scanner itself or the vehicle’s computer communication.
Problem 4: Scanner Not Powering On.
- Solution: The MS309 is powered by the OBD2 port. Ensure the connection to the OBD2 port is secure and that your vehicle’s ignition is in the “ON” position. If it still doesn’t power on, check your vehicle’s fuses related to the OBD2 port or auxiliary power. A blown fuse could prevent the port from powering the scanner.
Tips for Effective Use of Your MS309 Scanner
- Consult Your Vehicle’s Manual: Always refer to your vehicle’s owner’s manual for the exact location of the OBD2 port and any specific diagnostic procedures recommended by the manufacturer.
- Understand DTCs: Don’t just clear codes without understanding the underlying issue. Research the meaning of each DTC to properly diagnose and repair the problem.
- Use Live Data Wisely: The live data stream is a powerful feature. Learn what normal ranges are for your vehicle’s sensors to effectively diagnose issues based on abnormal readings.
- Keep the Scanner Updated (If Possible): While the MS309 is a basic scanner, check Autel’s website for any firmware updates that might improve compatibility or add features (though updates are less common for entry-level tools).
- Handle with Care: The MS309 is a relatively robust tool, but avoid dropping it or exposing it to extreme temperatures or moisture to prolong its lifespan.
Conclusion
Learning how to use MS309 OBD2 OBDII scanner is a valuable skill for any car owner. The Autel MaxiScan MS309 provides a user-friendly and cost-effective way to diagnose car problems, read and clear fault codes, and monitor live data. By following this guide and understanding the basics of OBD2 diagnostics, you can confidently use your MS309 scanner to maintain your vehicle and potentially save on costly mechanic visits. Remember to always diagnose problems thoroughly before clearing codes and consult repair manuals or professionals when dealing with complex issues.