Modern vehicles are marvels of engineering, packed with sensors and computer systems that constantly monitor their health. On-Board Diagnostics II (OBD2) systems are integral to this, acting as a car’s self-reporting mechanism. While dedicated OBD2 scanners are useful, your laptop can be transformed into an equally powerful, and often more versatile, diagnostic tool. This guide will walk you through exactly How To Use Laptop As Obd2 Scanner, empowering you to understand your vehicle’s condition and potentially save on costly mechanic visits.
What You Will Need to Turn Your Laptop into an OBD2 Scanner
Before diving into the process of using your laptop as an OBD2 scanner, you’ll need a few essential components. These are readily available online and at auto parts stores.
-
OBD2 Adapter: This is the hardware interface that bridges your vehicle’s OBD2 port and your laptop. You have two main types to choose from:
- Bluetooth OBD2 Adapters: These offer wireless connectivity to your laptop, providing flexibility and ease of use. Ensure the adapter is compatible with your vehicle’s OBD2 protocol and your laptop’s Bluetooth version.
- USB OBD2 Adapters: These adapters connect to your laptop via a USB cable, offering a stable and often faster connection. USB adapters are generally straightforward to set up and are a reliable option.
Alt: Bluetooth OBD2 adapter connected to vehicle diagnostic port.
-
Laptop or PC: The good news is that you likely already own this! Most laptops running Windows, macOS, or even Linux can be used as OBD2 scanners. Ensure your laptop has:
- Bluetooth: If you opt for a Bluetooth OBD2 adapter.
- USB Port: Essential for connecting a USB OBD2 adapter.
- Sufficient Processing Power: While OBD2 software isn’t demanding, a reasonably modern laptop will ensure smooth operation.
-
OBD2 Diagnostic Software: This is the software application that interprets the data from your vehicle’s OBD2 system and displays it in a user-friendly format on your laptop. Numerous options are available, ranging from free to professional-grade paid software. Popular choices include:
- Torque Pro (Android, some Windows compatibility via emulators): A feature-rich and popular app, often used with Bluetooth adapters.
- FORScan (Windows): Specifically designed for Ford, Lincoln, and Mercury vehicles, offering advanced diagnostics and customization options.
- ScanMaster ELM (Windows): A comprehensive OBD2 software compatible with a wide range of vehicles and adapters.
- OBD Auto Doctor (Windows, macOS, Linux, Android, iOS): A versatile option supporting multiple platforms and offering both free and paid versions.
- DashCommand (Windows, iOS, Android): Known for its customizable dashboards and real-time data displays.
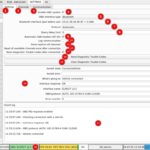
Alt: Laptop screen showing OBD2 diagnostic software interface with car sensor data.
Step-by-Step Guide: Using Your Laptop as an OBD2 Scanner
Once you have gathered the necessary hardware and software, follow these steps to effectively use your laptop as an OBD2 scanner:
1. Locate Your Vehicle’s OBD2 Port
The OBD2 port is a standardized diagnostic port found in virtually all cars and light trucks manufactured after 1996. It’s usually located within the passenger compartment, typically under the dashboard on the driver’s side. Common locations include:
- Beneath the steering column.
- Above the pedals.
- Inside the glove compartment.
- In the center console.
Refer to your vehicle’s owner’s manual if you have difficulty locating the OBD2 port.
2. Connect the OBD2 Adapter
With the ignition turned off, firmly plug the OBD2 adapter into the OBD2 port. You should feel it click into place, ensuring a secure connection. A loose connection can lead to communication errors.
3. Turn On the Vehicle’s Ignition
Turn your vehicle’s ignition key to the “ON” position. This provides power to the OBD2 system and the adapter. Do not start the engine yet unless specifically instructed by your OBD2 adapter or software documentation. Some advanced functions might require the engine to be running, but for basic diagnostics, “ignition ON” is usually sufficient.
4. Establish Connection Between Adapter and Laptop
This step varies depending on whether you are using a Bluetooth or USB adapter:
- Bluetooth Adapter:
- Enable Bluetooth on your laptop.
- Put the OBD2 adapter into pairing mode (refer to the adapter’s instructions).
- Search for Bluetooth devices on your laptop and select your OBD2 adapter from the list.
- Pair the devices if prompted for a PIN (often “1234” or “0000”, or check the adapter’s manual).
- USB Adapter:
- Simply plug the USB cable from the OBD2 adapter into an available USB port on your laptop.
- Your laptop should automatically recognize the new hardware. You might need to install drivers if prompted (usually provided with the adapter or downloadable from the manufacturer’s website).
5. Install and Configure OBD2 Software
If you haven’t already, download and install your chosen OBD2 diagnostic software on your laptop. Follow the software’s installation instructions. Once installed, launch the software.
You’ll typically need to configure the software to communicate with your OBD2 adapter. This usually involves:
- Selecting the Connection Type: Choose Bluetooth or USB depending on your adapter.
- Selecting the COM Port (for USB) or Bluetooth Device (for Bluetooth): The software will usually list available COM ports or Bluetooth devices. Select the one corresponding to your OBD2 adapter. Refer to your adapter’s documentation or device manager on your laptop if you are unsure which port to select.
- Vehicle Profile (Optional): Some software allows you to create a vehicle profile by entering your car’s make, model, and year. This can help the software interpret data more accurately.
6. Read Diagnostic Information
With the connection established and software configured, you can now start reading diagnostic information from your vehicle. The software interface will typically have options to:
- Read Fault Codes (Diagnostic Trouble Codes – DTCs): This will retrieve any stored trouble codes from your vehicle’s computer, indicating potential issues.
- Clear Fault Codes: Allows you to erase stored trouble codes after addressing the underlying problem. Use this function with caution and only after understanding the implications.
- View Live Data/Sensor Readings: Displays real-time data from various sensors in your vehicle, such as engine temperature, RPM, speed, oxygen sensor readings, and more. This is invaluable for diagnosing intermittent issues or monitoring engine performance.
- Freeze Frame Data: Captures sensor readings at the moment a fault code was triggered, providing a snapshot of the conditions when the problem occurred.
- Vehicle Information (VIN, Calibration IDs, etc.): Retrieves vehicle identification number and other identifying information.
7. Interpret the Diagnostic Results
If your scan reveals fault codes, the software will usually provide a brief description of each code. However, these descriptions are often generic. To properly understand and address the issue, you should:
- Research the Fault Codes: Use online resources like websites dedicated to OBD2 codes, repair manuals, or automotive forums to get detailed information about the specific fault codes you found.
- Consult a Repair Manual: A repair manual specific to your vehicle model will provide in-depth troubleshooting steps and repair procedures related to each fault code.
- Seek Professional Advice: If you are unsure about interpreting the results or performing repairs, it’s always best to consult a qualified mechanic.
8. Optional Actions (Use with Caution)
Some OBD2 software offers advanced features that should be used with caution and only if you are confident in your understanding:
- Clearing Fault Codes: As mentioned, you can clear fault codes, but this does not fix the underlying problem. Codes may reappear if the issue persists. Clearing codes is useful after repairs are made to turn off the check engine light, but should not be used to mask problems.
- Advanced Configuration/Programming (Professional Software): More advanced (and often paid) software might allow for ECU programming, sensor adjustments, and other modifications. These features are for experienced users and can potentially damage your vehicle if used incorrectly.
9. Disconnect Safely
Once you have finished your diagnostic session, safely disconnect the OBD2 adapter from your vehicle’s OBD2 port and close the software on your laptop. Store your adapter and software for future use.
Tips for Using Your Laptop as an OBD2 Scanner Effectively
- Ensure Compatibility: Double-check that your OBD2 adapter and software are compatible with your vehicle’s make, model, and year, as well as your laptop’s operating system.
- Start with Reliable Software: Begin with reputable and user-friendly OBD2 software. Free or trial versions can be a good starting point to explore basic functionality.
- Update Software Regularly: Keep your OBD2 software updated to ensure you have the latest features, bug fixes, and vehicle support.
- Safety First: Always prioritize safety when working with vehicle diagnostics. Avoid making changes you don’t understand and consult a professional when in doubt.
- Learn and Explore: Using your laptop as an OBD2 scanner is a great way to learn more about your vehicle’s systems. Explore the software’s features and gradually expand your diagnostic skills.
By following these steps, you can effectively use your laptop as an OBD2 scanner, gaining valuable insights into your vehicle’s health, diagnosing potential problems, and empowering yourself with automotive knowledge. This can save you money on basic diagnostics and help you communicate more effectively with mechanics when professional repairs are needed.