The NEXPEAK NX501 OBD2 scanner is a valuable tool for diagnosing car problems, whether you’re a seasoned mechanic or a car owner looking to understand your vehicle better. This user-friendly device helps you read error codes, understand what they mean, and even clear them, potentially saving you time and money on car repairs. This guide will walk you through how to use the NX501 OBD2 scanner effectively to diagnose your car’s health.
Getting Started with Your NX501
Before you start diagnosing your vehicle, it’s important to get acquainted with your new NX501 scanner. The device is designed for ease of use, but understanding the basic setup will make the process smoother.
Unboxing and Initial Setup
When you unpack your NEXPEAK NX501, you’ll find the scanner itself and likely a user manual and USB cable. While there’s no complex setup, familiarizing yourself with the device’s layout and buttons is a good first step. The NX501 boasts a color display and a straightforward keypad, including the unique One-Click I/M Readiness Key. Take a moment to locate the OBD2 port in your vehicle; it’s usually located under the dashboard on the driver’s side.
Connecting to Your Vehicle
Using the NX501 is straightforward. First, ensure your vehicle is turned off. Locate the OBD2 port in your car. Plug the NX501 scanner cable into this port. Once securely connected, turn your car’s ignition to the “ON” position, but do not start the engine. The NX501 scanner will power on automatically and begin to communicate with your vehicle’s computer system.
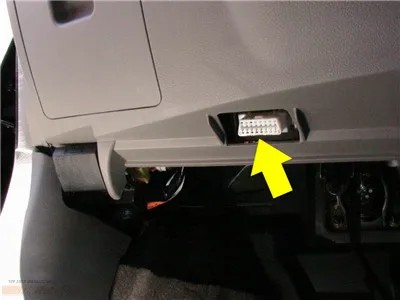 Standard OBD2 16-pin diagnostic port location in a vehicle, typically under the dashboard.
Navigating the NX501 Interface
Once connected, the NX501 will display its main menu on the color screen. Navigating this menu is intuitive thanks to the keypad.
Understanding the Main Menu
The main menu provides access to the NX501’s core functions. You’ll typically find options like:
- Diagnose: This is where you’ll go to read and clear trouble codes.
- Read Data Stream: Allows you to view live sensor data from your vehicle.
- View Freeze Frame: Shows data recorded when a trouble code was triggered.
- O2 Sensor Test: Specifically tests your vehicle’s oxygen sensors.
- On-Board Monitor Test: Checks the on-board diagnostic system.
- I/M Readiness: Quickly checks emissions readiness.
- Vehicle Info: Displays your car’s VIN, CIN, and CVN.
- Setup: For device settings like language.
Use the arrow keys to move through the menu options and the “OK” button to select your choice. The “ESC” button will typically take you back to the previous screen.
Using the One-Click I/M Readiness Key
A standout feature of the NX501 is its patented One-Click I/M Readiness Key. “I/M Readiness” refers to Inspection and Maintenance readiness, crucial for emissions testing. Pressing this key provides a quick way to check if your vehicle is ready for an emissions test. The color-coded LEDs and built-in speaker will give you visual and audible cues about your vehicle’s readiness status. Green LEDs indicate readiness, while red suggests problems.
)
Key Functions and How to Use Them
The NX501 is packed with features to help you diagnose your car. Here’s how to use some of the most important ones:
Reading and Clearing Error Codes
When your check engine light comes on, the first thing you’ll want to do is read the error codes. Select “Diagnose” from the main menu and follow the prompts. The NX501 will retrieve generic (P0, P2, P3, U0) and manufacturer-specific (P1, P3, U1) codes, as well as pending codes.
Once the codes are displayed, you can use the built-in DTC lookup library to understand what each code means. The NX501 will display a definition for each code, helping you pinpoint the potential issue.
To clear codes after addressing the problem (or for diagnostic purposes), navigate to the “Clear Codes” option within the “Diagnose” menu. Be cautious when clearing codes, as this will also reset your vehicle’s monitors, and it may take some driving for them to become ready again for emissions testing.
Viewing Live Data Streams
The “Read Data Stream” function is invaluable for real-time monitoring of your vehicle’s sensors. Select this option to see parameters like engine RPM, coolant temperature, oxygen sensor readings, and more, displayed in text and graph formats (on 1996 and newer vehicles). This live data can help you identify intermittent issues or confirm sensor malfunctions.
Performing O2 Sensor and EVAP Tests
The NX501 allows you to perform specific tests on your O2 sensors and EVAP (Evaporative Emission Control System). These tests are accessible from the main menu. The O2 Sensor Test reads live O2 sensor test data, while the EVAP System Test checks for leaks in your vehicle’s evaporative emissions system. These tests are crucial for diagnosing emission-related problems.
Using Freeze Frame Data
Freeze frame data is a snapshot of sensor values recorded at the moment a trouble code was triggered. Access “View Freeze Frame” from the main menu to see this data. It provides valuable context for understanding the conditions when a fault occurred, aiding in diagnosis.
Advanced Features and Tips
Beyond the basic diagnostic functions, the NX501 offers additional features that enhance its usability.
Multilingual Support
The NX501 supports multiple languages, including English, Spanish, French, and more. You can change the language in the “Setup” menu, making it accessible to a wider range of users.
Data Logging and Printing
The NX501 can store diagnostic data, including trouble codes and live data streams. This is helpful for reviewing data later or sharing it with a mechanic. You can also print data via a USB connection to a computer, allowing you to keep records of your vehicle’s diagnostic history.
Software Updates
Keeping your NX501 scanner updated is important for optimal performance and compatibility with newer vehicles. The device is internet upgradable via a USB port, ensuring you have the latest features and vehicle coverage.
)
Conclusion
The NEXPEAK NX501 OBD2 scanner is a powerful yet user-friendly tool for anyone wanting to understand and maintain their vehicle. By following this guide, you can effectively use its features to diagnose problems, monitor your car’s health, and potentially save on repair costs. Whether you are reading and clearing codes, checking live data, or performing emissions readiness tests, the NX501 provides the functionality you need in a compact and easy-to-use device.