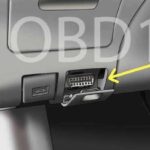
The On-Board Diagnostics II (OBD2) port in your car is more than just a place where you plug in for a quick scan. It’s a vital interface that allows mechanics and car owners to communicate with the vehicle’s computer system, diagnose issues, and monitor performance. While designed to be robust, the OBD2 port can sometimes become damaged or faulty, necessitating replacement. Thinking about tackling this yourself? You’ve come to the right place. This guide will walk you through understanding your OBD2 port and how to replace it effectively, ensuring you maintain this crucial diagnostic link for your vehicle.
Understanding the OBD2 Port and Why Replacement Matters
Every car manufactured from 1996 onwards is equipped with a standardized 16-pin OBD2 connector. This standardization is a boon, allowing universal OBD2 scanners to access essential vehicle data across different makes and models. It’s important to note that while the standard dictates certain data accessibility, automakers often include proprietary data beyond the OBD2 standard, which might require specialized tools to read.
Let’s look at the pin layout of a typical OBD2 port:
- Pin 1: Manufacturer Discretion
- Pins 2 & 10: SAE J1850 (network communication)
- Pin 3: Manufacturer Discretion
- Pin 4: Chassis Ground
- Pin 5: Signal Ground
- Pins 6 & 14: CAN Bus High and Low (network communication)
- Pins 7 & 15: ISO9140 K-Line (network communication)
- Pins 8, 9, 11, 12, 13: Manufacturer Discretion
- Pin 16: Battery Positive (constant power supply)
A damaged OBD2 port can prevent proper communication with diagnostic tools, hindering your ability to identify and fix car problems. Common issues range from bent or broken pins to physical damage to the connector itself. Replacing a faulty OBD2 port ensures you can once again utilize diagnostic scanners, essential for modern vehicle maintenance and repair.
Common Causes of OBD2 Port Damage
Pin 16, the battery positive pin, is frequently the culprit in OBD2 port damage. There are a couple of primary reasons for this:
Firstly, the fuse protecting pin 16 can blow. This might be triggered by poorly designed aftermarket accessories drawing power from the port or an overload on a shared circuit. While a blown fuse itself won’t harm the terminal, improper testing methods can. Amateur probing with incompatible tools, attempting to force connections where they don’t belong, can easily damage the terminal and the connector housing. In fact, damage from careless testing is a leading cause for OBD2 connector repairs.
Secondly, aftermarket devices that utilize the OBD2 port, such as insurance tracking dongles, performance gauges, or data loggers, can contribute to damage. While these devices offer convenience or enhanced features, their quality control and engineering aren’t always on par with original equipment. Oversized male pins on these devices can stretch and deform the delicate female terminals within the OBD2 connector. Furthermore, some devices may draw excessive and continuous current from pin 16, exceeding the port’s intended design. The OBD2 port is designed to supply intermittent power to scan tools, not to constantly power demanding devices.
Navigating the Replacement Part Maze: Not All OBD2 Ports Are Created Equal
Despite the OBD2 standard aiming for uniformity, replacement connectors aren’t universally interchangeable. While any standard male OBD2 connector will physically plug into any female OBD2 port, the method of attachment to the vehicle and the terminal installation within the connector vary considerably across car manufacturers and models. The market offers a vast array of OBD2 connectors and terminals, highlighting the lack of true standardization in the physical parts themselves.
You might find seemingly inexpensive OBD2 connectors online marketplaces. While these budget-friendly options might seem appealing, be cautious. Often, these universal connectors lack precise fitment for your vehicle’s original mounting bracket. This can lead to makeshift, less secure installations using self-tapping screws, which may not be durable long-term.
However, the more significant issue with these cheap connectors often lies in the quality of the terminals. The metal used in substandard terminals can be too soft and lack the necessary springiness of original equipment terminals. While such a connector might initially restore functionality, its longevity and reliability are questionable. Considering the labor involved in replacing an OBD2 port, opting for subpar parts can be a false economy.
Let’s break down the labor aspect. Replacing an OBD2 connector typically involves:
- Terminal installation onto pigtails (approximately 3 minutes per terminal).
- Lower dash removal and reinstallation for wiring access (at least 15 minutes).
- Soldering and heat shrinking wires (around 5 minutes per wire).
Even with efficient work, a replacement can easily take over an hour and a half. At typical labor rates, this translates to a significant cost. Therefore, investing in quality replacement parts is crucial to avoid repeat repairs and ensure lasting functionality.
Sourcing Quality Replacement Parts: OEM vs. Aftermarket
Ideally, obtaining replacement parts from the original equipment manufacturer (OEM), like your car’s dealer, is the best route. However, this isn’t always straightforward. Taking Toyota as an example, while they might not list a complete OBD2 connector assembly in their parts catalog, individual components are often available.
To find the correct OEM part numbers, consult your vehicle’s electrical wiring diagrams, often accessible through manufacturer-specific service information websites. For Toyota, accessing their Technical Information System (TIS) and navigating to the wiring diagrams, clicking on the OBD2 connector, and then selecting the information box can reveal the part number for the plastic connector housing.
This method can also be applied to older Toyota service information predating electronic diagrams. Searching for “part number of connectors” on TIS can lead to documents listing connector part numbers by wiring diagram code.
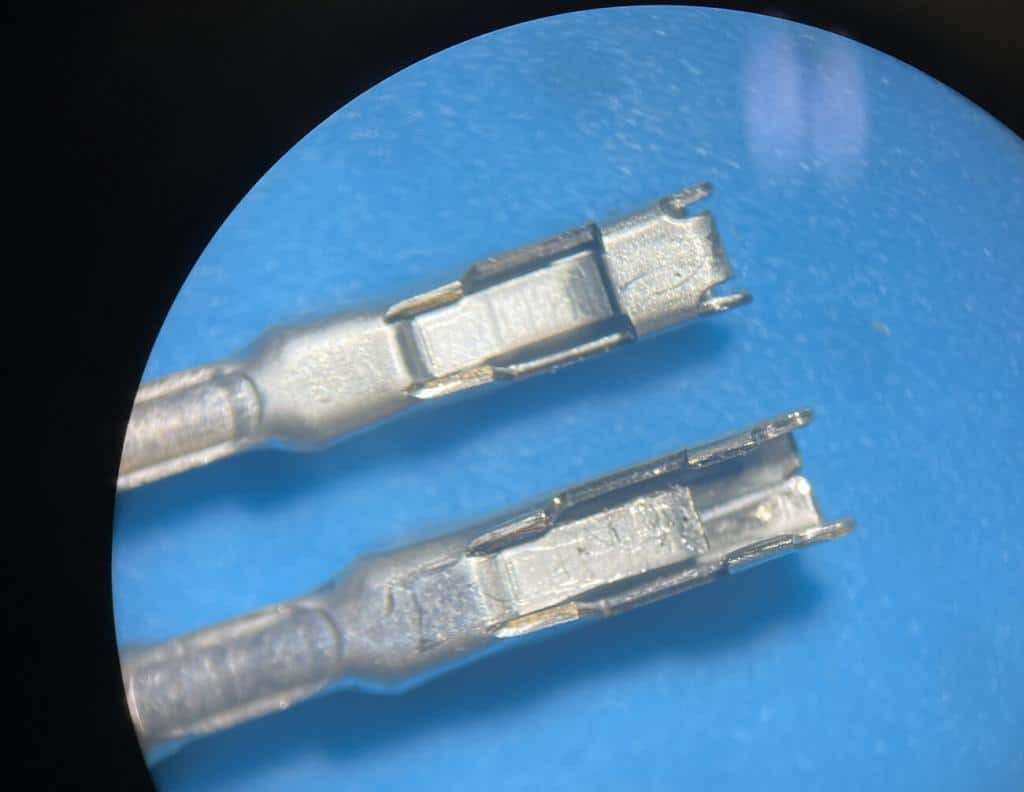
However, identifying the connector housing is only half the battle. Securing the correct metal terminals can be more challenging. Even dealerships may struggle to pinpoint the exact terminal part number. In some cases, resourceful dealership personnel, like shop foremen who might have accumulated spare terminals, can be invaluable in sourcing these small but crucial components.
In the case of Toyota terminals, part number 82998-05010 is a known compatible terminal, at least for models like the Gen3 Prius and likely other Toyota vehicles. However, OEM terminals can be surprisingly expensive, especially considering their size and manufacturing cost.
For more cost-effective alternatives without compromising quality, consider specialized connector suppliers like Connector Experts. These companies often offer reproductions of OEM connectors and terminals. For instance, Connector Experts’ terminal part number TERM86 has been identified as a compatible and high-quality alternative to OEM Toyota terminals, at a significantly lower price point. Online electronics component retailers like Mouser also carry a wide range of automotive connectors and terminals, though navigating their extensive catalog to find the exact part can be more demanding.
Step-by-Step Guide: Replacing Your OBD2 Port
Before starting any electrical work on your vehicle, always disconnect the negative battery terminal for safety.
Tools and Materials You’ll Need:
- New OBD2 connector and terminals (ensure compatibility and quality)
- Wire crimpers for small, open-barrel terminals (Engineer brand recommended for factory-quality crimps)
- Wire stripper
- Soldering iron and solder (optional, for enhanced connection reliability)
- Heat shrink tubing
- Multimeter
- Basic hand tools (screwdrivers, pliers, etc.)
Steps:
- Access the OBD2 Port Wiring: Locate your OBD2 port, typically found under the dashboard on the driver’s side. You may need to remove lower dash panels to gain access to the wiring harness connected to the port.
- Disconnect the Old Connector: Carefully disconnect the wiring harness from the back of the old OBD2 connector.
- Remove the Old Connector: Depending on your vehicle, the OBD2 port might be held in place by screws or clips. Remove these to detach the old connector from its mounting bracket.
- Prepare the Wires: One wire at a time, carefully cut the wires connected to the old terminals, leaving enough length to work with. Strip a small amount of insulation from the end of each wire. Note the wire colors and their corresponding pin positions on the old connector – take pictures or make a diagram to ensure correct reconnection.
- Crimp or Solder New Terminals: Crimp new terminals onto the stripped ends of each wire using quality wire crimpers. For enhanced reliability, you can also solder the terminals to the wires and then apply heat shrink tubing for insulation and strain relief.
- Install New Terminals into the New Connector: Referencing your notes or diagram, insert each terminal into the correct pin location in the new OBD2 connector housing until it clicks into place.
- Mount the New Connector: Secure the new OBD2 connector into the original mounting bracket in your vehicle. If using a universal connector, ensure it is mounted securely and doesn’t interfere with dash panel reinstallation.
- Reconnect Wiring Harness: Plug the wiring harness back into the new OBD2 connector.
- Reconnect Battery and Test: Reconnect the negative battery terminal. Use an OBD2 scanner to test the functionality of the new port. Ensure you can establish a connection and read vehicle data.
- Reassemble Dash Panels: If you removed any dash panels, carefully reinstall them.
Best Practices for OBD2 Port Replacement
- Prioritize Quality Parts: Always opt for high-quality replacement connectors and terminals, ideally OEM or reputable aftermarket brands like Connector Experts or parts from suppliers like Mouser. Avoid cheap, generic parts that may lead to premature failure.
- Accurate Wiring is Crucial: Double-check your wiring diagram and pin assignments to ensure each wire is connected to the correct pin in the new connector. Incorrect wiring can cause serious electrical problems.
- Proper Crimping and Soldering: Invest in quality crimping tools designed for small, open-barrel terminals. If soldering, ensure clean solder joints for good electrical conductivity.
- Test Thoroughly: After replacement, thoroughly test the new OBD2 port with a scan tool to confirm proper functionality before considering the job complete.
Conclusion: Restoring Your Diagnostic Link
Replacing an OBD2 port, while seemingly straightforward, requires attention to detail and the use of quality components. By understanding the OBD2 system, identifying the right parts, and following a careful replacement procedure, you can effectively restore this essential diagnostic interface in your vehicle. While DIY replacement is possible, if you’re uncomfortable with automotive electrical work, seeking professional assistance from a qualified mechanic is always a prudent choice. Ensure you maintain your vehicle’s diagnostic capabilities for optimal performance and longevity. For more automotive repair insights and guides, explore other articles on techcarusa.com.