Seeing the check engine light illuminate on your dashboard can be an unsettling experience for any car owner. It’s a signal from your vehicle’s onboard computer indicating that something is amiss, and it’s natural to feel a mix of confusion and concern. Driving with the check engine light on isn’t advisable as it could point to issues that might affect your car’s performance, fuel efficiency, or even lead to more significant damage.
Fortunately, there’s a way to take control and understand what’s happening under the hood without immediately rushing to a mechanic. Using an OBD2 scanner, you can not only read and understand the error codes triggering the light, but also clear the check engine light yourself. This article will guide you through the simple steps of using an OBD2 scanner to turn off that persistent light, potentially saving you time and money while empowering you with a better understanding of your vehicle’s health. Let’s dive into how you can easily tackle this task.
Understanding the Check Engine Light and OBD2 Scanners
Before we jump into the process, it’s helpful to understand what the check engine light is and how an OBD2 scanner works. The check engine light is part of your car’s onboard diagnostics system (OBD), which monitors various aspects of your vehicle’s performance, from engine emissions to sensor readings. When the system detects a problem outside of normal parameters, it illuminates the check engine light to alert you.
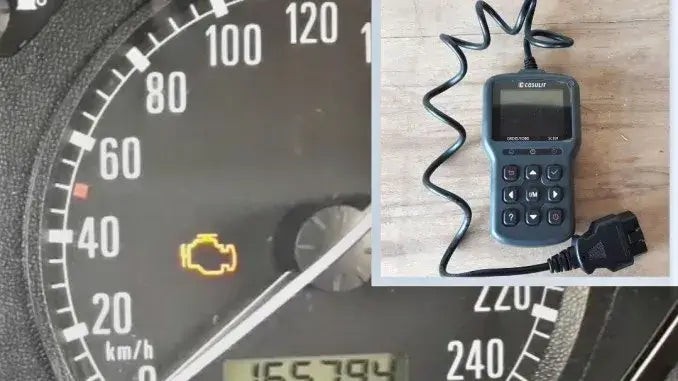
An OBD2 scanner is a handheld device that communicates with your car’s computer system. It plugs into a standardized port in your vehicle, allowing you to read the diagnostic trouble codes (DTCs) that triggered the check engine light. Crucially, many OBD2 scanners also have the capability to clear these codes, effectively turning off the check engine light. While some basic code readers can only read codes, for the purpose of clearing the light, you’ll need a scanner that offers both read and erase functionalities.
A popular and reliable option is the CGSULIT SC301 OBD2 scanner, known for its user-friendliness and comprehensive features. This type of tool puts the power of automotive diagnostics right in your hands.
Step-by-Step Guide: Clearing Your Check Engine Light
Clearing the check engine light with an OBD2 scanner is a straightforward process. While prior experience with these devices can be beneficial, it’s certainly not a prerequisite. Even if you’re a first-time user, these steps will guide you through it.
1. Locate the OBD2 Port in Your Vehicle
The first step is to find the OBD2 port in your car. This port is a standardized connector that’s usually located within a couple of feet of the steering wheel. Common locations include under the dashboard on the driver’s side, beneath the steering column, or sometimes in the center console area. Refer to your vehicle’s owner’s manual if you’re having trouble locating it. The port is typically trapezoidal in shape with 16 pins.
2. Connect the OBD2 Scanner to the Port
Once you’ve found the OBD2 port, take your OBD2 scanner and firmly plug the connector into the port. You should feel it click into place. Ensure it’s securely connected to establish proper communication between the scanner and your vehicle’s computer.
3. Turn On the Ignition to the ‘Key On, Engine Off’ Position
Now, you need to turn on your car’s ignition. This means turning the key to the position just before you would start the engine. In most vehicles, this is the second key position, often referred to as the “ON” position. This activates the car’s electrical system and allows the OBD2 scanner to draw power and communicate with the computer, without starting the engine itself.
4. Allow the OBD2 Scanner to Scan for Error Codes
With the scanner connected and the ignition on, power on your OBD2 scanner. Most scanners will automatically begin the scanning process or require you to press a button, often labeled “Read” or “Scan.” The scanner will then communicate with your car’s computer to retrieve any stored error codes. This process might take a few moments.
5. Read and Interpret the Diagnostic Trouble Codes (DTCs)
Once the scan is complete, the OBD2 scanner will display a list of error codes, if any were found. There could be one or multiple codes. It’s crucial to note these codes down. Next, you need to understand what these codes mean. Your OBD2 scanner may have a built-in DTC lookup library, allowing you to view code definitions directly on the device. Alternatively, you can use online resources or consult your vehicle’s repair manual to interpret the codes.
Understanding the error code is vital because it tells you the nature and severity of the problem. Some codes might indicate minor issues, while others can point to more serious problems that need immediate attention. Knowing the meaning of the code will guide your next steps.
6. Navigate the Scanner Menu to Clear the Check Engine Light
After reviewing and understanding the error codes, and if you’ve addressed the underlying issue or deem it appropriate to clear the light (for example, after a minor sensor glitch), navigate your OBD2 scanner’s menu to find the option for clearing codes. This option is often found under menus like “Tools,” “Fault Codes,” or “Erase Codes.” Select the option to clear the codes. The scanner may ask for confirmation before proceeding. Confirm your decision to clear the codes.
7. Return to the Main Menu of the OBD2 Scanner
Once you’ve cleared the codes, navigate back to the main or start menu of your OBD2 scanner. This ensures you’re ready for the next steps and that the code clearing command has been fully processed.
8. Disconnect the OBD2 Scanner from the Port
With the codes cleared, you can now disconnect the OBD2 scanner from the port. Gently pull the connector straight out from the OBD2 port, being careful not to damage either the scanner connector or the vehicle’s port. If your OBD2 scanner has a power button, turn it off before disconnecting.
9. Turn Off the Ignition
Turn the car ignition off completely by turning the key back to the “LOCK” or “OFF” position and removing it. This will fully power down the vehicle’s systems and finalize the reset process.
10. Start the Engine and Check if the Check Engine Light is Off
Finally, start your car’s engine as you normally would. Check the dashboard to see if the check engine light has turned off. In most cases, if the code clearing was successful and the underlying issue was minor or resolved, the light should now be off. It’s a good idea to start and stop the engine a few times to confirm the light remains off, especially after the engine reaches its normal operating temperature.
Important Considerations After Clearing the Light
While clearing the check engine light can be a quick fix, it’s crucial to understand that it’s not a permanent solution if the underlying problem persists. If the check engine light comes back on shortly after you’ve cleared it, this indicates that the issue that triggered the code is still present.
In such cases, it’s important to reinvestigate the error codes and address the root cause of the problem. Ignoring a recurring check engine light can potentially lead to more serious mechanical issues and costly repairs down the line. Consider seeking professional advice from a qualified mechanic to diagnose and fix the problem, especially if you are unsure about the interpretation of the error codes or the necessary repairs.
Conclusion
Learning how to clear your check engine light with an OBD2 scanner is a valuable skill for any car owner. It’s a simple process that can be completed in minutes, saving you a trip to the mechanic for a simple light reset. More importantly, it empowers you to understand your vehicle better and take proactive steps in its maintenance.
However, remember that clearing the check engine light is just one part of the process. The real benefit of using an OBD2 scanner lies in its diagnostic capabilities. By reading and understanding the error codes, you can gain insights into potential issues and make informed decisions about your car’s repair and maintenance needs. Embrace the power of DIY car diagnostics with an OBD2 scanner, and take control of your vehicle’s health.