The sudden appearance of a check engine light can be unsettling, flashing on your dashboard and sparking immediate concern. While it might signal a minor issue like a loose gas cap, it could also indicate something more significant within your vehicle’s engine, transmission, or emissions system. Fortunately, modern cars are equipped with an onboard diagnostics system, or OBD2, which can help you understand what’s causing that light to illuminate. Knowing How To Check Obd2 systems is a valuable skill for any car owner, allowing you to quickly assess the situation and take appropriate action.
Since the 1980s, OBD systems have been standard in vehicles, designed to monitor and report on your car’s health. These systems generate diagnostic trouble codes (DTCs) when they detect an issue. By learning how to check OBD2 codes, you can gain crucial insights into your car’s problems and decide on the best course of action, whether it’s a simple fix or a trip to a professional mechanic.
Decoding Your Check Engine Light: Colors and Severity
Before you delve into how to check OBD2 codes, understanding the signals your check engine light is sending is crucial. The color and behavior of the light can give you an initial indication of the problem’s severity.
Solid Yellow or Orange: A steady yellow or orange check engine light usually means the OBD system has detected a malfunction in a system or component. While it’s not an emergency, it does require attention. You can typically drive with a solid yellow light, but it’s advisable to investigate the issue within a reasonable timeframe, ideally within 100 miles, by learning how to check OBD2 system with a scanner.
Solid Red: A solid red check engine light signals a more urgent issue that needs prompt attention. While not necessarily catastrophic, it indicates a problem that should be addressed soon. In this case, it’s recommended to drive to a qualified mechanic or repair shop to get a professional diagnosis after you initially check OBD2 yourself.
Flashing Check Engine Light: A flashing check engine light is a serious warning, often indicating an engine misfire. This can cause significant damage if ignored. If your check engine light is flashing, it’s best to pull over safely as soon as possible and seek professional assistance. Do not attempt to continue driving without first learning how to check OBD2 for the error code and understanding its implications.
How to Check OBD2 Codes: Step-by-Step Guide
The easiest and most effective way to check OBD2 codes is by using an OBD2 scanner. These scanners are readily available at auto parts stores and online retailers. Many auto parts stores even offer free OBD2 scans. These devices plug into your car’s OBD2 port and retrieve the diagnostic trouble codes stored by your vehicle’s computer.
Here’s a step-by-step guide on how to check OBD2 codes using a scanner:
Step 1: Locate the OBD2 Port. The OBD2 port is typically located on the driver’s side of your car, underneath the dashboard. It’s usually easily accessible and not hidden behind any panels. Consult your car’s manual if you’re unsure of its exact location.
Step 2: Plug in the OBD2 Scanner. With your car turned off, firmly plug the OBD2 scanner into the OBD2 port. Ensure it’s securely connected.
Step 3: Turn on the Ignition. Turn your car’s ignition to the “on” position. This means turning the key to the point where the dashboard lights illuminate, but without starting the engine. Some scanners may require the engine to be running – refer to your scanner’s instructions.
Step 4: Follow Scanner Prompts. Most OBD2 scanners are user-friendly and will guide you through the process. You may need to enter your vehicle’s information, such as the Vehicle Identification Number (VIN), which is often found on your dashboard or driver’s side doorjamb.
Step 5: Initiate the Scan. Once you’ve followed the prompts, select the “scan” or “read codes” option on your scanner. The scanner will communicate with your car’s computer and retrieve any stored diagnostic trouble codes.
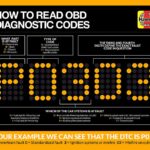
Step 6: Record the Trouble Codes. The OBD2 scanner will display the trouble codes, usually starting with a letter followed by four numbers (e.g., P0123). Record these codes. Many scanners will also provide a brief description of the code, giving you an initial idea of the problem.
Step 7: Research the Codes. Once you have the codes, you can research them online or consult a repair manual to understand what they mean specifically for your vehicle’s make and model. Websites like OBD-Codes.com and similar resources offer comprehensive databases of OBD2 codes and their possible causes. Understanding the meaning of these codes is crucial after you check OBD2.
Clearing OBD2 Codes (With Caution)
Many OBD2 scanners also offer the option to clear or erase trouble codes. After addressing the issue that triggered the check engine light, you can use this function to reset the light. To clear codes, navigate to the “erase” or “clear codes” option on your scanner and follow the prompts.
However, it’s important to use this function with caution. Clearing codes without fixing the underlying problem will only temporarily turn off the check engine light. If the issue persists, the light will reappear, and you may have lost valuable diagnostic information by clearing the code prematurely. Only clear codes after you have properly diagnosed and repaired the problem, or if you are directed to do so by a qualified mechanic as part of the diagnostic process. Knowing how to check OBD2 is just the first step; understanding and resolving the issue is the real goal.
Alternative Methods to Check Engine Codes (Without a Scanner)
While using an OBD2 scanner is the most straightforward method to check OBD2 codes, there are alternative methods that might work for older vehicles or in situations where a scanner isn’t available. These methods are less reliable and may not work for all vehicles, but they can sometimes provide basic diagnostic information.
Using the Odometer or Ignition Key: Some older vehicles allow you to retrieve basic trouble codes by using a combination of actions with the odometer reset button, trip button, and ignition key. These methods typically involve specific sequences of pressing and holding buttons and turning the ignition on and off. The trouble codes, if accessible, may appear in the odometer display or as flashes of the check engine light itself. These methods are vehicle-specific, and you’ll need to consult your car’s repair manual or online resources for instructions for your particular make and model.
The Paperclip Method (OBD1): For vehicles with older OBD1 systems (pre-1996), a very basic method involves using a paperclip or jumper wire to bridge specific terminals in the OBD1 diagnostic connector. This can trigger the system to flash the check engine light in patterns that represent trouble codes. This method is more complex and carries a risk of damaging your vehicle’s electrical system if not done correctly. It’s generally not recommended unless you have specific instructions for your vehicle and a good understanding of automotive electrical systems.
Important Note: These alternative methods are less accurate and less informative than using an OBD2 scanner. They may not retrieve all the codes, and interpreting the codes (especially from light flashes) can be challenging. For reliable and comprehensive diagnostics, an OBD2 scanner is always the preferred tool to check OBD2.
When to Consult a Professional Mechanic
While learning how to check OBD2 codes empowers you to understand your car better, it’s essential to recognize when to seek professional help. If you are uncomfortable working on your car, if the OBD2 codes indicate a serious or complex issue, or if you are unsure how to interpret the codes or perform the necessary repairs, it’s always best to consult a qualified mechanic.
A certified mechanic has the expertise, specialized tools, and diagnostic equipment to accurately diagnose and repair a wide range of automotive problems. They can go beyond simply reading codes and perform thorough inspections and tests to pinpoint the root cause of the issue and ensure proper repairs.
Conclusion: Empower Yourself with OBD2 Knowledge
Understanding how to check OBD2 is a valuable skill for any car owner. It allows you to quickly assess the situation when the check engine light comes on, gain insights into potential problems, and make informed decisions about car maintenance and repair. While OBD2 scanners provide a user-friendly way to access diagnostic information, remember that they are tools for diagnosis, not repair. For complex issues or if you lack mechanical experience, always consult a qualified professional to ensure your vehicle is properly diagnosed and repaired, keeping you safe on the road.