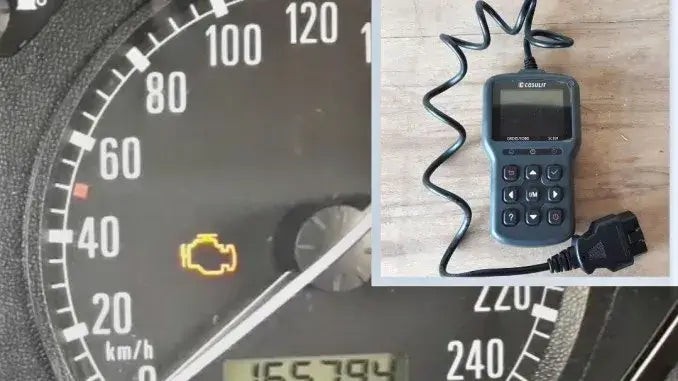
The sudden appearance of a check engine light can be unsettling for any car owner. It’s a clear signal that something might be amiss under the hood, and ignoring it is definitely not advisable. But what if it’s just a minor glitch, a temporary sensor hiccup? This is where understanding how to use an OBD2 scanner to clear diagnostic trouble codes becomes incredibly useful, allowing you to investigate further and see if the fault persists.
This guide from techcarusa.com, your trusted auto repair resource, will walk you through the simple steps of clearing OBD2 codes using a scanner. We’ll show you how this process can be the first step in diagnosing potential issues and help you decide if it’s a minor concern or a sign of a more significant problem that needs professional attention. Using an OBD2 scanner isn’t as daunting as it may seem; in fact, it’s as straightforward as using your smartphone, and it can save you time and potentially costly trips to the mechanic for issues you might be able to assess yourself.
To embark on this process of clearing OBD2 codes and checking for faults, you’ll need one essential tool: an OBD2 scanner. It’s important to note that not all code readers are created equal. Some basic models can only read the diagnostic codes, but to effectively clear the check engine light and see if the fault returns, you need a scanner that has the functionality to erase trouble codes. Investing in a scanner that offers both read and clear capabilities is a smart move for any car owner interested in basic DIY diagnostics.
A reliable option for an OBD2 scanner is the CGSULIT SC301. This tool is known for its user-friendliness and capability to both read and clear codes effectively. If you’re interested in a more in-depth look at this device, you can find detailed reviews online. Many resources, including video reviews on platforms like YouTube, can provide further insights into its features and performance.
Step-by-Step Guide: Clearing OBD2 Codes to Check for Faults
While prior experience with an OBD2 scanner can be beneficial, it’s certainly not a prerequisite. If you’re a complete beginner, don’t worry. The process is designed to be user-friendly. For those who prefer a more detailed introduction to using a scanner, there are numerous resources available, including articles and video tutorials that can guide you through the basics of OBD2 scanner operation.
Let’s break down the process into simple, manageable steps:
1. Locate the OBD2 Port
The first step is to find your vehicle’s OBD2 port. This port is the gateway for communicating with your car’s computer system. Typically, it’s located under the dashboard on the driver’s side. You might find it near the steering column or in the vicinity of the pedals. Refer to your car’s owner’s manual if you’re having trouble locating it, as the exact position can vary slightly between car models.
2. Connect the OBD Code Reader
Once you’ve located the OBD2 port, take your OBD2 scanner and firmly plug the connector into the port. Ensure it’s securely connected to establish a proper communication link between the scanner and your vehicle’s computer. You should feel a click or some resistance to know it is properly inserted.
3. Turn On the Ignition (Key On, Engine Off)
Now, you need to turn on your car’s ignition. This means turning the key to the “on” position, which powers up the car’s electrical systems, including the computer. However, it’s crucial not to start the engine at this stage. The position you need is often referred to as “Key On, Engine Off” (KOEO). This allows the OBD2 scanner to access the vehicle’s computer without the engine running.
4. Initiate the Code Scan
With the scanner connected and the ignition turned on, follow the instructions on your OBD2 scanner to initiate a scan. Usually, this involves navigating through the scanner’s menu using buttons or a touchscreen and selecting an option like “Scan” or “Read Codes.” The scanner will then communicate with your car’s computer to retrieve any stored diagnostic trouble codes. This process might take a few moments as the scanner gathers information.
5. Read and Understand the Error Codes
After the scan is complete, the OBD2 scanner will display a list of error codes. There could be just one code, or multiple, depending on the issues your vehicle has detected. This is a critical step: you need to understand what these codes mean.
Interpreting the error codes is vital because it tells you about the nature of the problem. Is it a minor sensor issue, or is it something more serious? Most OBD2 scanners have a built-in code library that allows you to look up the meaning of the codes directly on the device. Alternatively, you can use online resources or smartphone apps to search for the code definitions. Understanding the codes is key to deciding your next course of action.
It’s important to remember that clearing the codes without understanding them is like turning off a warning light without knowing why it came on. If the underlying issue is significant, the check engine light will likely reappear soon after you clear it.
6. Clear the Check Engine Light
Once you’ve reviewed the error codes and made an informed decision to proceed with clearing them (perhaps because you believe it was a minor, resolved issue, or you want to see if the code returns), navigate through your OBD2 scanner’s menu again. Look for an option like “Clear Codes,” “Erase Codes,” or “Reset Codes,” usually found within a “Tools” or similar menu.
Select the clear codes option and confirm your choice if prompted. The scanner will send a command to your car’s computer to clear the stored trouble codes and turn off the check engine light.
7. Return to the Main Menu
After successfully clearing the codes, use the “Escape” or “Return” button on your scanner to go back to the main menu. This is typically the initial screen you see when the scanner powers on. Ensuring you return to the main menu before disconnecting is a good practice.
8. Disconnect the OBD Code Reader
Carefully disconnect the OBD2 scanner from the OBD2 port. Gently pull the connector straight out to avoid damaging the port or the scanner’s connector. If your OBD2 scanner has a power button, it’s advisable to turn it off before disconnecting.
9. Turn Off the Ignition
Turn the ignition key back to the “off” position, removing power from the car’s systems and the OBD2 port.
10. Start the Engine and Check If the Light is Gone
Finally, start your car’s engine as you normally would. Check the dashboard: the check engine light should now be off. Let the engine run for a few minutes to reach operating temperature, and then you can start and stop the engine a few more times to monitor if the check engine light reappears.
Clearing Codes: Just the First Step in Diagnosing Faults
As you’ve seen, clearing OBD2 codes with a scanner is a relatively simple procedure. It’s a quick way to turn off the check engine light. However, it’s crucial to understand that clearing the code is often just the first step in a proper diagnostic process.
If the check engine light comes back on shortly after you’ve cleared it, this indicates that the underlying issue that triggered the code is still present. In such cases, it’s essential to investigate further. Refer back to the error codes you initially read. Use online resources, repair manuals, or consult with a professional mechanic to understand the potential causes associated with those specific codes.
Clearing the codes can be helpful to see if a fault was temporary or if it’s persistent. If the light stays off after clearing, it might have been a minor, transient issue. However, always be vigilant and monitor your car’s performance. If you notice any unusual symptoms, even without the check engine light, it’s wise to have your vehicle inspected.
Conclusion
Learning how to clear OBD2 codes is a valuable skill for any car owner. It empowers you to take a proactive role in vehicle maintenance and understand your car’s health better. The process is quick, usually taking just 5 to 10 minutes, and the tool is affordable and readily available.
However, always remember that clearing codes is not a substitute for proper diagnosis and repair. Use the ability to clear codes as a tool to investigate potential issues, monitor if faults are persistent, and make informed decisions about your car’s maintenance. Addressing the root cause of any error code is paramount to ensuring your vehicle’s long-term health and reliability. Being able to clear OBD2 codes to see if a fault returns is a smart way to approach vehicle maintenance, but it should always be coupled with responsible diagnostics and repair when necessary.

