For car tech enthusiasts and developers diving into车载信息娱乐系统 (in-car infotainment systems), accessing real-time engine data is undeniably captivating. Imagine displaying your car’s vital signs on a custom dashboard, all powered by your own code. This is where the magic of OBD2 and C# comes into play. Building upon the foundation of retrieving On-Board Diagnostics II (OBD2) data, this guide will walk you through leveraging C# and the ELM327 adapter to tap into your vehicle’s wealth of information.
The original article touched upon the excitement of integrating engine data into a CARPC project. While pre-built front-end applications offer a quick start, true customization and deeper understanding require getting your hands dirty with code. This is where C# .NET excels, providing a robust platform for crafting your own car interface. While multimedia and navigation aspects are relatively straightforward, interfacing with your car’s OBD2 port opens up a new dimension of possibilities.
Initially, off-the-shelf OBD2 software like ScanTool.NET and OBDView might seem like the only option. However, for those seeking granular control and integration within custom applications, understanding the underlying communication protocols becomes essential. Let’s explore how to achieve this using C# and the readily available ELM327 adapter.
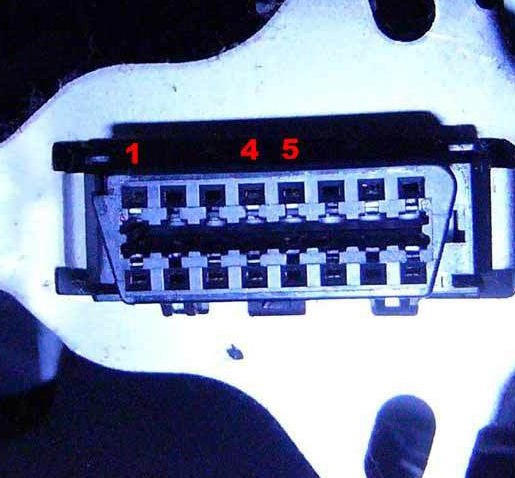
Understanding the Physical Connection: The OBD2 Port
Modern vehicles are equipped with a standardized 16-pin OBD2 port, typically located within the driver’s cabin. This port serves as the gateway for technicians to diagnose vehicle issues, but it’s also your entry point to accessing a wealth of engine and vehicle data.
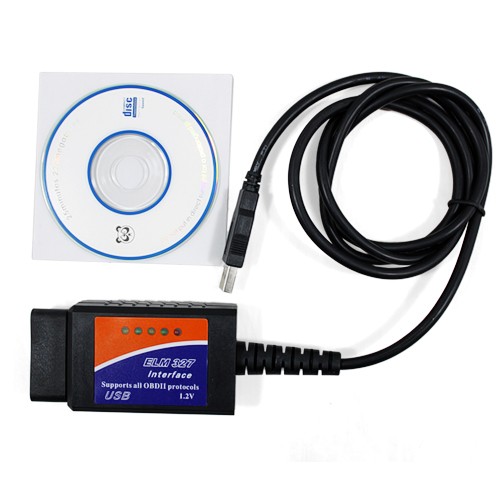
Bridging the Gap: ELM327 Adapters
The ELM327 adapter is a popular and cost-effective interface that simplifies OBD2 communication. These adapters act as a translator, converting the complex OBD2 protocols into a simpler serial communication format accessible via USB. Think of it as a bridge connecting your computer to your car’s diagnostic network. Once connected via USB, the ELM327 creates a virtual COM port on your computer, allowing you to communicate with your car using simple serial commands, much like interacting with a modem using AT commands.
This virtual COM port functionality is key. You can use terminal programs like HyperTerminal or PuTTY to directly interact with the ELM327 and send commands. This direct interaction is invaluable for testing, troubleshooting, and understanding the communication flow before integrating it into your C# application. The beauty of this approach is that with a basic grasp of serial communication, you can bypass the need for expensive diagnostic software and build your own solution.
Initializing the ELM327 and Establishing Communication
To begin retrieving data, you need to initialize the ELM327 adapter for your specific vehicle. OBD2 protocols can vary slightly between manufacturers and models, so proper initialization is crucial for successful communication.
The initialization process involves sending a series of AT commands to the ELM327. These commands configure the adapter and establish the correct communication protocol for your car. Here’s a breakdown of common initialization commands and their functions:
ATZ: Resets the ELM327 adapter, ensuring a clean starting state.ATE0: Disables command echo. This simplifies parsing responses programmatically by removing redundant echoed commands from the data stream.ATL0: Turns off linefeeds. Similar toATE0, this helps in cleaner data processing by removing unnecessary line feed characters.ATH1: Enables header responses. Including headers in responses is beneficial as it allows you to identify the data type being returned, making data interpretation easier.ATSP <protocol number>: Sets the communication protocol. This is crucial as different vehicles use different OBD2 protocols. Protocol5is used in the example, but you might need to experiment with protocols1through5to find the correct one for your vehicle. PuTTY or a similar terminal program is ideal for testing different protocols. If the selected protocol is incompatible, you’ll likely receive “ERROR” or “NO DATA” responses.01 00: A generic OBD2 command used to test the connection and check for supported PIDs (Parameter IDs). A successful response indicates that communication has been established.
The following C# .NET code snippet demonstrates the initialization sequence, incorporating threading for managing communication timing:
serialPort1.PortName = comPort;
try { serialPort1.Open(); }
catch (System.Exception excep) {}

send_data("ATZ");
System.Threading.Thread.Sleep(2000);
send_data("ATE0");
System.Threading.Thread.Sleep(1000);
send_data("ATL0");
System.Threading.Thread.Sleep(500);
send_data("ATH1");
System.Threading.Thread.Sleep(500);
send_data("ATSP 5");
System.Threading.Thread.Sleep(500);
send_data("01 00");
System.Threading.Thread.Sleep(500);
This code sets the COM port, attempts to open it, and then sends the initialization commands sequentially, with pauses (Thread.Sleep) to allow the ELM327 time to process each command. The ATSP 5 command is highlighted as protocol 5 worked for the original author’s car, but experimentation might be needed for different vehicles.
Decoding OBD2 PIDs: Requesting and Interpreting Data
Once the ELM327 is initialized, you can start requesting specific data parameters using OBD2 PIDs (Parameter IDs). Each piece of engine data, such as RPM, speed, or temperature, is associated with a unique PID, typically represented by a 4-digit hexadecimal number.
To request data, you send the PID as a command to the ELM327. The adapter then queries the vehicle’s computer and responds with the requested data, along with the PID for identification.
For example, to request engine RPM (PID 010C), you would send the command “010C”. A typical response might be “010C001B”. Here, “010C” is the PID confirming the data type, and “001B” represents the data in hexadecimal format.
To convert this hexadecimal data into a meaningful RPM value, you need to apply a specific formula based on the PID. For RPM (PID 010C), the formula is:
RPM = ((A * 256) + B) / 4
Where A and B are the two bytes of hexadecimal data (in this example, A = 00 and B = 1B).
Similarly, to retrieve vehicle speed (PID 010D), you would send “010D”. The response data (a single byte in this case) directly represents the speed in km/h.
A comprehensive list of OBD2 PIDs and their corresponding formulas can be found on the Wikipedia page for OBD-II PIDs: http://en.wikipedia.org/wiki/OBD-II_PIDs. However, it’s important to note that not all vehicles support every PID. Standard PIDs like speed and RPM are widely supported, while others might be vehicle-specific.
| Service 01 | PID | Bytes | Description | Min Value | Max Value | Units | Formula |
|---|---|---|---|---|---|---|---|
| 01 | 0C | 2 | Engine RPM | 0 | 16,383.75 | rpm | ((A*256)+B)/4 |
| 01 | 0D | 1 | Vehicle speed | 0 | 255 | km/h | A |
In the author’s experience, common PIDs like speed, RPM, engine temperature, engine load, and air flow rate are readily accessible. Retrieving battery voltage might require vehicle-specific commands beyond standard OBD2 PIDs.
Advanced Considerations: Threading and Simulation
Threading: When working with serial communication and real-time data, threading becomes crucial. The ELM327 adapter requires a small processing time between commands. Implementing delays using Thread.Sleep(200) after each command ensures reliable communication and prevents overwhelming the adapter.
OBD2 Simulation: Testing and developing your C# Obd2 application doesn’t always require being physically connected to a car. OBDSim Windows is a valuable simulation tool that creates a virtual OBD2 port on your computer. This allows you to test your code, practice parsing data, and refine your application logic without needing a vehicle or ELM327 adapter connected. This simulator was mentioned in the mp3car forum: http://www.mp3car.com/engine-management-obd-ii-engine-diagnostics-etc/137428-free-software-obd-ii-simulator-redux.html.
Conclusion: Your Journey into OBD2 and C# Begins
This guide provides a foundational understanding of accessing OBD2 data using C