Diagnosing electrical issues in your Mini Cooper can sometimes feel like navigating a maze. One crucial area to investigate when facing problems, especially those potentially linked to your OBD2 system, is the fuse box. Understanding the fuse locations, particularly for the OBD2 port and related systems, is essential for effective troubleshooting and maintenance. This guide focuses on helping you pinpoint the Best Mini Cooper Obd2 Fuse Location and address potential issues like corrosion that can impact your vehicle’s performance.
When dealing with electrical malfunctions in your Mini Cooper, the fuse box often becomes the first point of inspection. Specifically, if you’re experiencing issues with diagnostics or systems connected to the OBD2 port, checking the relevant fuses is a logical initial step. The original discussion highlighted a problem potentially stemming from corrosion affecting fuse F5 and connector X15. Fuse F5, a 5 amp fuse, is linked to the instrument cluster and is powered when the ignition key is turned on. It plays a role in circuits connecting the immobilizer unit to the instrument cluster and the starter motor diode.
Locating the best Mini Cooper OBD2 fuse location might involve more than just finding a single fuse labeled “OBD2”. Instead, it requires understanding the circuit layout. As indicated in the diagrams, Fuse 36 is connected to pin 1 of the Diagnostic Link Connector (DLC), which is another term for the OBD2 port. Additionally, Fuse 3 is linked to pin 16 of the DLC. These fuses are critical for the OBD2 port to function correctly, allowing communication with diagnostic tools.
Alt text: Mini Cooper fuse box diagram 1 showing electrical connections and fuse locations for troubleshooting.
Corrosion is a significant enemy in automotive electrical systems. The original problem description points to severe corrosion in connector X15 and potentially within the fuse panel itself. Cleaning corroded connectors can sometimes worsen the problem if the corrosion has penetrated deeper into the wiring or spread further into the fuse panel’s layered construction. If fuse F5 lacks power, it could prevent the car from starting, as it is integrated with the security system.
It’s crucial to carefully inspect the fuse panel and connectors for signs of corrosion and ensure that no pins are bent or spread apart during cleaning. Corrosion can weaken and even break pins, leading to intermittent or complete electrical failures. Vehicles with water intrusion issues are particularly susceptible to this type of problem.
Alt text: Detailed view of Mini Cooper connector X15 highlighting potential corrosion points in automotive wiring.
To ensure the entire fuse panel receives power, it’s important to trace the power supply. Connector X10178, pin number 1, supplies power to the fuse panel via a Red/Yellow wire, which is connected to Fuse FL2, a 50 amp fuse located in the engine compartment fuse panel. This high-gauge wire and fuse indicate that FL2 is a main power supply fuse for the entire fuse box.
Alt text: Mini Cooper fuse box power supply diagram showing Fuse FL2 and connector X10178 for electrical system analysis.
For systems related to the immobilizer and instrument cluster, connectors X10199 and X10200 are relevant. Connector X10199 links the immobilizer unit to Fuse F5, while X10200 connects Fuse F5 to the instrument cluster. Understanding these connections is vital when diagnosing issues related to security systems or dashboard functionality.
Alt text: Wiring diagram for Mini Cooper immobilizer and instrument cluster circuits, important for electrical repairs.
Alt text: Diagram pinpointing Mini Cooper OBD2 port fuse locations, Fuse 36 and Fuse 3 for diagnostic troubleshooting.
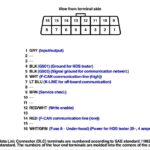
Alt text: Mini Cooper DLC connector pinout diagram showing fuse connections to OBD2 port pins for vehicle diagnostics.
Alt text: Overview diagram of Mini Cooper fuse panel connectors illustrating the complexity of automotive electrical systems.
In conclusion, finding the best Mini Cooper OBD2 fuse location involves checking not just fuses directly labeled for OBD2, but also understanding the fuses that power related systems like the instrument cluster and the DLC itself (Fuses 3 and 36). Corrosion is a serious concern and requires careful inspection of the fuse panel and connectors. By systematically checking these fuse locations and connections, you can effectively troubleshoot electrical issues in your Mini Cooper and potentially avoid costly repairs. If you’re uncomfortable working with electrical systems, it’s always best to consult a qualified mechanic to diagnose and repair the problem.