Experiencing trouble connecting to your vehicle’s computer with your auto drive OBD2 or EOBD code reader can be frustrating. These devices are invaluable tools for diagnosing car issues, from simple check engine lights to more complex problems affecting performance. When your code reader fails to connect or function correctly, it halts your diagnostic process and leaves you in the dark about your vehicle’s health. Let’s explore common reasons why your OBD2/EOBD code reader might not be working and how to troubleshoot these issues effectively.
Common Reasons Why Your OBD2 Code Reader Might Not Be Working
Several factors can prevent your OBD2 code reader from functioning as expected. Understanding these potential culprits is the first step in diagnosing the problem.
- Faulty OBD2 Port: The OBD2 port in your car is the gateway for communication. Damage, corrosion, or loose connections within the port can disrupt the signal, preventing your reader from connecting.
- Code Reader Malfunction: Like any electronic device, your OBD2 code reader itself could be faulty. Internal hardware issues, software glitches, or even simple power problems can render it inoperable.
- Incorrect Usage: Sometimes, the issue isn’t the equipment but the procedure. Improper connection, incorrect settings, or lack of vehicle compatibility can lead to connection failures.
- Vehicle Electrical Issues: The OBD2 port relies on your car’s electrical system for power and signal transmission. Problems like blown fuses, wiring harness damage, or a low battery can affect the port’s functionality.
- Software or Compatibility Issues: Certain advanced features or specific vehicle models might require software updates for your code reader or might simply be incompatible with your particular device.
Step-by-Step OBD2 Port Diagnostic Checks
Before assuming your code reader is broken, it’s wise to verify the integrity of your OBD2 port. Here’s a simplified diagnostic approach you can take, similar to the initial investigation process:
-
Visual Inspection: Begin by visually inspecting your OBD2 port, typically located under the dashboard on the driver’s side. Look for any signs of physical damage, bent pins, debris, or corrosion.
 Close-up of a car's OBD2 port, highlighting the pins and surrounding area for visual inspection
 -
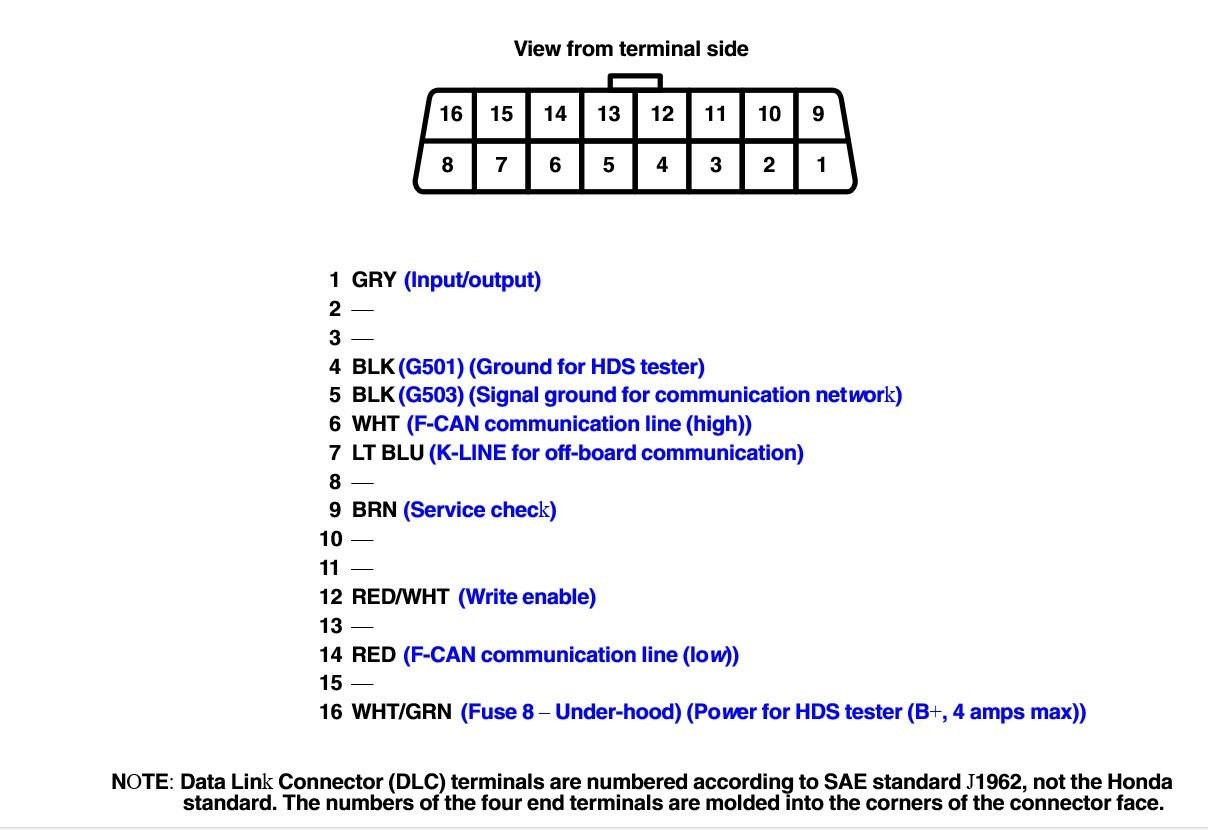
Ground Continuity Test: Using a multimeter, check for continuity between pin 4 and a known vehicle ground (like a metal part of the car chassis). Repeat this test for pin 5 and vehicle ground. A solid connection is expected for both pins, indicating proper grounding for the OBD2 port.
-
Voltage Check (Pins 4 & 5): Measure the voltage between pins 4 and 5. This reading should be very low, ideally less than 2V. A higher voltage might suggest a ground loop issue. In the original example, a reading of 0.5 mV is considered good.
-
Power Supply Check (Pin 16): Test the voltage between pin 16 and a vehicle ground. Pin 16 should receive battery voltage (approximately 12V when the car is off, and slightly higher when running). A reading close to your battery voltage (e.g., 12.23V as in the original case) confirms that the port is receiving power.
-
Combined Voltage Checks (Pins 4 & 16, Pins 5 & 16): Measure the voltage between pins 4 and 16, and then between pins 5 and 16. Both readings should be close to your battery voltage (e.g., 12.26V). These checks further validate the power and ground circuits of the OBD2 port.
If all these tests indicate a healthy OBD2 port, as they did in the initial investigation, the issue might lie elsewhere.
Further Troubleshooting Steps
If your OBD2 port seems functional based on voltage and continuity tests, consider these additional troubleshooting steps:
- Test with Another Vehicle: Try your OBD2 code reader on a different vehicle known to have a working OBD2 system. This will help determine if the problem is with your reader or your car.
- Check the Code Reader’s Power: Ensure your code reader is powering on correctly. Some readers have indicator lights or screens that should illuminate when connected to a power source (either the OBD2 port or batteries).
- Examine the Connection Firmness: A loose connection can prevent data transfer. As noted in the original post, sometimes firmly pressing the reader into the port helps establish a temporary connection. Compare the connection feel to another vehicle’s OBD2 port to identify potential looseness or wear in your car’s port.
- Consult Your Code Reader’s Manual: Review the user manual for your specific OBD2 code reader. It might contain troubleshooting tips, compatibility information, or specific instructions for your device.
- Software and Updates: Check if there are any software updates available for your code reader. Outdated software can sometimes cause connectivity issues, especially with newer vehicles.
- Check Vehicle Fuses: Locate the fuse box diagram for your vehicle (usually in the owner’s manual or online). Identify and check the fuse related to the OBD2 port or auxiliary power outlets, as they might share a circuit. A blown fuse can cut power to the port.
Conclusion
Diagnosing why your auto drive OBD2/EOBD code reader is not working requires a systematic approach. Start by verifying the OBD2 port’s basic functionality with voltage and continuity tests. If the port seems fine, broaden your troubleshooting to include the code reader itself, connection issues, vehicle electrical problems, and software considerations. By methodically eliminating potential causes, you can pinpoint the source of the problem and get your diagnostic process back on track. If you remain unsure after these steps, seeking assistance from a professional mechanic might be the most effective next step.