Understanding your 1999 Acura CL’s onboard diagnostics system is crucial for modern car maintenance. The OBD2 (On-Board Diagnostics II) port is your gateway to accessing valuable information about your vehicle’s health. If you’re looking to read trouble codes, diagnose a check engine light, or use a scan tool, the first step is locating this essential port. This guide will clearly show you where to find the OBD2 port in your 1999 Acura CL.
Locating the OBD2 Port in Your 1999 Acura CL
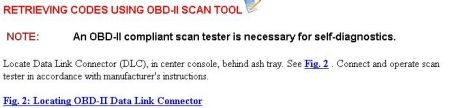
Finding the OBD2 port is usually a straightforward process. For the 1999 Acura CL, as with many vehicles of that era, the diagnostic port is typically located inside the cabin, within easy reach of the driver.
Here’s a step-by-step guide to pinpointing the OBD2 port:
- Driver’s Side Under the Dashboard: The most common location for the OBD2 port is beneath the dashboard on the driver’s side. You’ll want to look in the area below the steering wheel and above the pedals.
- Kneel and Look Upwards: Get down on your knees outside the driver’s side door and look upwards under the dash. You might need a flashlight to get a better view in the shadowed area.
- Search for a 16-Pin Connector: The OBD2 port is a standardized 16-pin connector, usually trapezoidal in shape. It’s designed to be easily accessible for plugging in diagnostic scanners.
- Common Location – Near the Steering Column: In many Acura models, including those from the late 1990s and early 2000s, the OBD2 port is often found to the left or right of the steering column, integrated into the lower dashboard paneling.
To give you a visual idea, while we don’t have images specifically of a 1999 Acura CL, the location is very similar to other Honda and Acura vehicles of that period. For example, in a similar era Acura TL (as shown in the images below), you can see the OBD2 port is clearly positioned under the dash, making it easily accessible.
Confirmation and Potential Variations:
While the location described above is the most typical for a 1999 Acura CL, there can be minor variations depending on the exact trim and manufacturing nuances. If you are having difficulty locating it immediately:
- Check your owner’s manual: Your 1999 Acura CL owner’s manual should contain information about the OBD2 port location. Look in the sections about maintenance or diagnostics.
- Feel around: Carefully run your hand along the underside of the dashboard in the driver’s side footwell. You should be able to feel the distinct shape of the OBD2 port.
- Use a bright flashlight: Ensure you have good lighting to help you see clearly in the often-dark area under the dashboard.
Why is Finding the OBD2 Port Important?
The OBD2 port is a vital component for modern car diagnostics and maintenance. Here’s why knowing its location is important:
- Reading Trouble Codes: When your check engine light illuminates, the OBD2 port allows you to connect a scan tool or code reader to retrieve the diagnostic trouble codes (DTCs). These codes provide valuable clues about what might be causing the issue.
- Diagnosing Check Engine Lights: By accessing the trouble codes, you can start the process of diagnosing why your check engine light is on. This can range from minor issues like a loose gas cap to more significant problems requiring professional attention.
- Using Scan Tools and Code Readers: Whether you’re a DIY enthusiast or a professional mechanic, the OBD2 port is the interface for connecting scan tools and code readers. These tools can not only read codes but also clear them, monitor live engine data, and perform other diagnostic functions.
- Emissions Testing: In many areas, OBD2 system checks are part of emissions testing. Knowing the port location is necessary for these tests.
Conclusion
Locating the OBD2 port in your 1999 Acura CL is usually a simple task. By following the steps outlined in this guide and using the visual references, you should be able to quickly find this important diagnostic connection point. Once located, you’ll have the key to unlocking valuable insights into your vehicle’s health, empowering you to perform maintenance, diagnose issues, and keep your Acura CL running smoothly.
For more repair guides and information on maintaining your Acura and other vehicles, be sure to explore the rest of techcarusa.com!