Diagnosing issues in your 2008 Honda Civic NGV can sometimes feel like navigating a complex maze. Before you reach for your OBD2 scanner, especially for dashboard-related concerns, your Honda Civic offers a built-in self-diagnostic function for the gauge assembly. This initial step can provide valuable insights without immediately needing to plug into the OBD2 port.
Understanding and utilizing this self-diagnostic function can save you time and potentially pinpoint problems related to your instrument panel. This guide will walk you through the process of performing a self-diagnosis on your 2008 Honda Civic NGV, helping you to check the functionality of your gauges and indicators right from your dashboard.
Step-by-Step Guide to Initiate the Self-Diagnostic Function
Before starting the self-diagnostic test, ensure that the No. 9 (10A) fuse in the under-hood fuse/relay box and No. 10 (7.5A) fuse in the under-dash fuse/relay box are in good condition. These fuses are crucial for the gauge assembly’s operation.
Here’s how to enter the self-diagnosis mode:
- Push and Hold: Press and hold the trip/reset button located on your instrument panel.
- Lighting Switch ON: Turn the headlight switch to the ON position.
- Ignition ON: Turn the ignition switch to the ON (II) position. Do not start the engine.
- Lighting Switch Sequence: Within 5 seconds of turning the ignition ON, cycle the headlight switch OFF, then ON, and then OFF again.
- Release and Push: Within 5 seconds of the last lighting switch operation, release the trip/reset button. Then, immediately push and release the trip/reset button four times repeatedly.
Performing the initial steps to enter the self-diagnostic mode on a Honda Civic gauge assembly.
Once these steps are completed correctly, your Honda Civic will enter the self-diagnostic mode, initiating a series of checks.
Decoding the Self-Diagnostic Checks
Upon entering the self-diagnostic mode, your instrument panel will perform several checks to assess its functionality:
- Beeper Drive Circuit Check: You should hear the beeper sound five times. This confirms the beeper circuit is operational.
- Indicator Drive Circuit Check: Several indicators on your dashboard will blink. These typically include the seat belt indicator, door/trunk indicator, brake system light, low fuel indicator, maintenance required indicator (for USA models), washer fluid level indicator light (for Canada models), oil pressure light, and the A/T gear position indicator (excluding P, R, N). Observe which indicators blink to ensure they are functioning.
- LCD Segment Check: The odometer/trip segment on the LCD display will blink five times. This verifies the functionality of the LCD segments.
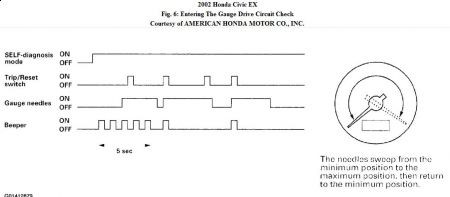
- Gauge Drive Circuit Check: The speedometer, tachometer, fuel gauge, and coolant temperature gauge needles will sweep from their minimum positions to their maximum positions and then return to minimum. This crucial step checks the movement and responsiveness of the gauges themselves.
Gauge needles performing a full sweep during the gauge drive circuit check in Honda Civic self-diagnosis.
Communication Line Check: Following the LCD segment check, the system initiates a communication line check.
- All Segments On (OK): If all LCD segments illuminate, the communication line between the gauge assembly, multiplex control unit, and ECM/PCM is functioning correctly.
- “Error” Indication: If the word “Error” appears on the display, it indicates a malfunction in the communication line between these components. This could suggest a more complex issue requiring further diagnosis, possibly involving OBD2 scanning and professional intervention.
An “Error” message displayed on the Honda Civic instrument panel, indicating a communication line problem during self-diagnosis.
Ending the Self-Diagnosis Function
To exit the self-diagnostic mode, simply turn the ignition switch to the OFF position. The self-diagnosis mode will also automatically terminate if the vehicle speed exceeds 1.2 mph (2 km/h).
Interpreting the Results and Next Steps
If all checks function as described, your gauge assembly is likely operating correctly. However, if any of the checks fail to perform as specified, particularly the gauge sweep or communication line check resulting in an “Error”, it might suggest a problem with the gauge assembly itself. In such cases, replacement of the gauge assembly might be necessary.
While this self-diagnostic test is helpful for instrument panel issues, remember that for engine or emissions related problems in your 2008 Honda Civic NGV, using an OBD2 scanner via the OBD2 plug is essential for retrieving diagnostic trouble codes and further troubleshooting. This self-test is a valuable first step in diagnosing dashboard related issues before moving on to more in-depth diagnostics using OBD2 tools if needed.