Encountering a check engine light can be unsettling for any driver, and when it happened in my 1998 Jeep Wrangler while driving around town, it definitely caught my attention. It wasn’t the first time I’d seen this light, but previous occurrences were usually during off-road adventures and under unusual circumstances. This time, however, the engine seemed to be running smoothly, with no noticeable drop in performance. Despite trying a quick battery disconnect to reset the system, the light stubbornly remained. It was clear – it was time to delve deeper and equip myself with the right tools for diagnosing my 1998 Jeep Wrangler’s issue. This led me down the path of exploring OBD2 scanners, a vital tool for any owner of a 1998 Jeep Wrangler Obd2 system and similar vehicles.
The idea of using a laptop-based OBD2 scanner had been on my mind for a while. Having already installed a Panasonic Toughbook in my Jeep last year, the most significant investment was already in place. It felt like the perfect moment to acquire an OBD2 interface. My ’98 TJ, while reliable, is not getting any younger, and I knew that eventually, other issues would likely trigger the check engine light. Investing in a scanner seemed like a proactive step towards maintaining my 1998 Jeep Wrangler and understanding its diagnostic system.
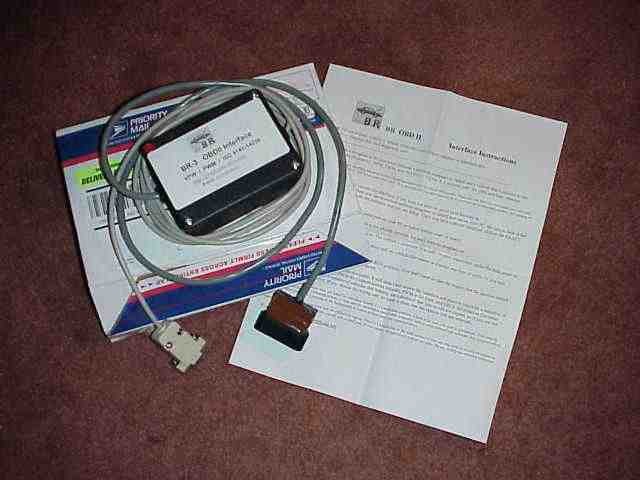
After researching various OBDII interfaces and PC software options online, I decided to purchase the BR-3 interface from obddiagnostics.com. This particular unit connects to a PC via a 9-pin serial cable, which is conveniently attached to the interface box. The cable is approximately 6 feet long, providing ample reach. On the other end of the interface box, a 2-foot cable terminates in the OBDII connector. Software for the interface is readily downloadable from their website, with versions available for Windows, DOS, and even Linux, although Linux support appeared to be less direct from the manufacturer. The price was reasonable at $98, including USPS Priority Mail delivery. For those inclined, the interface is also offered in kit form, with more details available on their website. For anyone looking to diagnose issues with their 1998 Jeep Wrangler OBD2 system, this type of tool is invaluable.
The OBDII connector on my 1998 TJ Jeep Wrangler is conveniently located in the driver’s side footwell, near the left knee, just beneath the dashboard. This easily accessible location makes connecting and disconnecting the scanner straightforward.
Connecting the OBDII cable to the port, and then linking the 9-pin serial cable to my laptop, I was ready to begin the diagnostic process. While the unit functioned perfectly, I did observe that the connector’s attachment to the cable seemed somewhat basic, with tape used in its construction. For occasional use, like troubleshooting the check engine light on my 1998 Jeep Wrangler, this likely wouldn’t be an issue. However, for daily, heavy-duty use involving frequent plugging and unplugging, I had slight reservations about its long-term durability. It’s possible it could last indefinitely, but the construction quality did raise a minor concern.
According to the manufacturer’s website, this OBDII interface and software combination is designed to:
“Read out trouble codes when your “check engine” light comes on. You can also clear these codes. You can retrieve pretty much any piece of OBDII mandated diagnostic data from your vehicle. The interface supports OBDII protocols commonly used in US vehicles: VPW (General Motors), PWM (Ford), and ISO9141 (Chrysler, Asian, and European), and ISO 14230 protocol (also called Keyword 2000).”
Returning to the check engine light issue on my 1998 Jeep Wrangler, I loaded the software onto my Toughbook and connected the interface cables. I selected the appropriate vehicle interface protocol from the software menu – ISO9141 is the correct protocol for Jeep vehicles like my ’98 Wrangler. From there, navigating the software was intuitive, primarily involving pointing and clicking to explore the various screens and diagnostic options. I proceeded to check the trouble codes and, with the aid of my Factory Service Manual (FSM) and some online research, I narrowed down the problem to the downstream O2 sensor. The sensor reading was displaying a flat line instead of the typical sine wave pattern expected from O2 sensors. In contrast, the upstream sensor appeared to be functioning correctly, showing a healthy sine wave. Based on my understanding of the FSM, the downstream sensor should exhibit a similar pattern, albeit with less fluctuation, assuming the catalytic converter is operating efficiently. This initial diagnosis using the OBD2 scanner was proving to be incredibly helpful in understanding the issue with my 1998 Jeep Wrangler OBD2 system.
The next Saturday morning, I reconnected the OBD2 interface, booted up the Toughbook, and re-examined the sensor readings before heading to the auto parts store for a replacement. The readings were consistent with the previous diagnosis – the downstream O2 sensor was still flatlining. There was no overnight miracle fix.
Being somewhat skeptical of relying solely on auto parts store recommendations, I decided it would be best to physically remove the suspect sensor and take it with me for comparison. This would at least allow me to visually compare the new sensor to the old one before purchasing. Sliding under the TJ with wrenches in hand, I located the sensor and prepared to remove it from the exhaust pipe. However, before even putting a wrench on it, I noticed a small, shiny copper-colored spot on the wiring harness. Upon closer inspection, it became clear that the sensor’s wiring pigtail had been making contact with the backside of the transfer case’s rear output yoke. The rotating yoke had just barely nicked the wire, enough to sever it. In fact, the insulation was still intact, holding the wire together, but there was a definite break in the copper wire itself. This was the real culprit behind the check engine light on my 1998 Jeep Wrangler!
Repairing the wire turned out to be a straightforward fix. A soldering iron and some heat shrink tubing were used to mend the broken connection. I applied sensor-safe anti-seize compound to the sensor threads and reinstalled it into the exhaust pipe. After reconnecting the wiring harness connector, I was ready for another test with the OBD2 scanner.
The results were positive. The sensor display now indicated that the downstream sensor was active and functioning correctly. It was no longer flatlining, and its display pattern mirrored the upstream sensor, albeit with a reduced amplitude, which, according to the FSM, is indicative of normal operation.
In conclusion, I was very pleased with the outcome. While I likely would have eventually discovered the broken wire, the OBD2 scanner significantly expedited the diagnostic process. While taking my 1998 Jeep Wrangler to AutoZone or a similar store for a free code reading might have pointed me in the general direction, having the OBD2 interface and software provided invaluable real-time data and deeper insights into the vehicle’s systems. The ability to monitor live engine parameters while driving is a significant advantage. With the Toughbook already mounted in my Jeep, incorporating the OBD2 interface and software as another tool in my diagnostic arsenal just makes perfect sense for maintaining my 1998 Jeep Wrangler and tackling any future check engine light scenarios. For any 1998 Jeep Wrangler owner, an OBD2 scanner is an investment well worth considering.