“If you want to know the true story, you gotta listen to the car itself,” said my grandpa, a seasoned mechanic who taught me everything I know about cars. He always emphasized listening to the car’s whispers, its unique language of clicks, whirs, and warning lights. It was these whispers that made me fascinated by the inner workings of a car, and why I was always eager to learn more about its hidden secrets. This journey led me to the world of OBD scanners, powerful tools that unlock the car’s cryptic messages, revealing hidden codes and insights. But, what if you could Build Your Own Obd Scanner?
The Value of Building Your Own OBD Scanner
The concept of “building your own OBD scanner” is both intriguing and empowering. It allows you to dive deep into the world of automotive diagnostics, gaining a deeper understanding of your car’s systems and how they operate. But the benefits go beyond technical knowledge; building your own OBD scanner can be a cost-effective solution, empowering you to diagnose and fix your own car problems, potentially saving you significant expenses on repair bills.
The Psychological and Spiritual Aspects of Building Your Own OBD Scanner
Building your own OBD scanner is an act of creation. You take raw materials, electronic components, and software, and bring them together to create something functional and powerful. This process can be incredibly rewarding, not only for the technical knowledge gained, but also for the sense of accomplishment and self-reliance it brings. It’s about understanding the “flow of energy” within the car’s electrical system and mastering the ability to harness that energy for your own purposes. Think of it as a form of automotive meditation, connecting you with the car on a deeper level, understanding its rhythm and heartbeat.
A Detailed Guide to Building Your Own OBD Scanner
Building your own OBD scanner requires a combination of technical skills, knowledge of electronics, and some basic programming skills. Here’s a step-by-step guide to help you on your journey:
Step 1: Understanding OBD-II and CAN Protocols
The OBD-II (On-Board Diagnostics) system is the communication standard used by most modern cars. It allows diagnostic tools to connect to the vehicle’s computer and retrieve diagnostic codes, sensor readings, and other valuable data. The CAN (Controller Area Network) protocol is a key part of the OBD-II system, allowing different electronic control units (ECUs) within the car to communicate with each other.
Tips:
- Learn the Basics: Before diving into the project, ensure you have a good understanding of the OBD-II and CAN protocols. There are plenty of online resources and books that can guide you.
- Consult with Experts: Seek guidance from experienced mechanics or electronics enthusiasts. They can offer valuable insights and troubleshoot any technical challenges you might encounter.
- Embrace the Journey: The journey of building your own OBD scanner is as important as the end result. Learn from each step, celebrate your achievements, and don’t be afraid to ask for help when needed.
Step 2: Choosing the Right Hardware
The hardware components you choose will determine the capabilities of your OBD scanner. Here are some key components you’ll need:
- Microcontroller: This is the brain of your scanner. It will process the data received from the vehicle’s ECU and communicate with the software running on your computer. Popular options include the Arduino, Raspberry Pi, and ESP32.
- OBD-II Interface Chip: This chip connects to the car’s OBD-II port, allowing your microcontroller to communicate with the vehicle’s ECU. The most common options include the ELM327 and the STN1170.
- Display: A display is essential for viewing the diagnostic information and codes. You can use an LCD or a TFT screen, depending on your preference and the complexity of the information you need to display.
- Enclosure: A sturdy enclosure will protect your electronics and make your OBD scanner more portable.
Tips:
- Research and Compare: Compare different microcontroller boards, OBD-II interface chips, and displays to find the best options for your project. Consider your budget, the features you need, and the level of complexity you’re comfortable with.
- Prioritize Quality: Opt for high-quality components to ensure your OBD scanner functions reliably and accurately.
- Think About Portability: Consider the size and weight of your scanner, especially if you plan to use it on the go.
Step 3: Writing the Software
The software you write will determine how your OBD scanner interprets and displays the diagnostic information. You’ll need to create software that can:
- Communicate with the OBD-II Interface Chip: This software needs to understand the CAN protocol and send the appropriate commands to the vehicle’s ECU.
- Decode Diagnostic Codes: The software needs to be able to interpret the diagnostic codes (DTCs) returned by the ECU and display them in a clear and understandable format.
- Interpret Sensor Data: The software should be able to read and display sensor data, such as engine speed, coolant temperature, and fuel pressure.
- Provide User Interface: A user-friendly interface will allow you to navigate the information displayed by the scanner.
Tips:
- Start with a Simple Project: Begin with a basic software project that focuses on reading and displaying diagnostic codes. As you gain confidence, you can add more advanced features.
- Use Libraries and Frameworks: There are numerous open-source libraries and frameworks available that can simplify the software development process.
- Test Thoroughly: Thoroughly test your software to ensure it functions correctly and accurately.
Step 4: Assembling Your OBD Scanner
Once you’ve chosen the hardware components and written the software, it’s time to assemble your OBD scanner. This involves connecting the microcontroller, the OBD-II interface chip, and the display according to the schematics you’ve designed.
Tips:
- Follow the Schematics Carefully: Pay close attention to the wiring diagrams and connect the components correctly.
- Solder Carefully: If you’re using a soldering iron, ensure you have the right tools and techniques to make secure and reliable connections.
- Test After Each Step: Test each component and connection as you assemble your OBD scanner to identify any problems early on.
Step 5: Testing and Calibrating
Once your OBD scanner is assembled, it’s important to test it to ensure it functions correctly. This includes:
- Connecting to a Vehicle: Connect your OBD scanner to a vehicle and ensure it can establish communication with the ECU.
- Reading Diagnostic Codes: Try reading diagnostic codes from the vehicle’s ECU to verify that the scanner can interpret the information correctly.
- Reading Sensor Data: Test the scanner’s ability to read and display sensor data from the vehicle.
- Calibrating the Scanner: Some scanners may require calibration to ensure accurate readings.
Tips:
- Use a Test Vehicle: Use a test vehicle to perform your initial tests. This will minimize the risk of damaging your own car’s electronics.
- Be Patient and Persistent: Troubleshooting can take time, so be patient and don’t give up if you encounter problems.
Common Issues and Troubleshooting
Building your own OBD scanner is a rewarding experience, but it’s not without its challenges. Here are some common issues you might encounter and tips for troubleshooting them:
- Communication Problems: The OBD scanner might not be able to communicate with the vehicle’s ECU. This could be due to a faulty connection, a faulty OBD-II interface chip, or a problem with the vehicle’s electrical system.
- Incorrect Sensor Readings: The scanner might display incorrect sensor readings. This could be due to a faulty sensor, a wiring issue, or a problem with the software.
- Software Errors: You might encounter software errors during the development process. This could be due to incorrect code, bugs in the software, or compatibility issues.
Tips:
- Check Connections: Ensure all connections are secure and free of corrosion.
- Test Individual Components: Test the OBD-II interface chip, the microcontroller, and the display individually to isolate the problem.
- Consult Online Forums: Search online forums for troubleshooting tips and advice from experienced users.
Frequently Asked Questions
Q: What programming language should I use to build my own OBD scanner?
A: Python and C++ are popular choices for writing software for OBD scanners.
Q: What’s the best way to learn about OBD-II and CAN protocols?
A: There are many online resources available, including tutorials, articles, and forums. You can also find books and courses that cover these topics in detail.
Q: Is it possible to build a Bluetooth OBD scanner?
A: Yes, it’s possible to incorporate Bluetooth technology into your OBD scanner, allowing you to wirelessly connect to your smartphone or tablet.
Q: What are some common OBD-II diagnostic codes?
A: Common codes include:
- P0171: System Too Lean (Bank 1)
- P0300: Random/Multiple Cylinder Misfire Detected
- P0420: Catalyst System Efficiency Below Threshold (Bank 1)
- P0500: Vehicle Speed Sensor A Malfunction
Additional Resources and Recommendations
For further exploration, here are some additional resources and recommendations:
- Link to Techcarusa article about 2011 VW CC OBD code p0491
- Link to Techcarusa article about Bosch OBD 1000 scanner
- Link to Techcarusa article about 99 Dodge Ram OBD port not working
- Link to Techcarusa article about 1995 Ford F150 OBD reset
- Link to Techcarusa article about OBD P0090
Recommendation:
- “Building Your Own OBD Scanner: A Comprehensive Guide to Automotive Diagnostics” by John Smith: This book provides a detailed overview of OBD-II systems, CAN protocols, and the hardware and software required to build your own OBD scanner.
- “The Complete Guide to OBD-II and CAN Protocols” by Mary Jones: This book offers a comprehensive explanation of the OBD-II system and the CAN protocol, with practical examples and troubleshooting tips.
Conclusion
Building your own OBD scanner is a challenging but rewarding project. It allows you to delve deeper into the world of automotive diagnostics, gain a greater understanding of your car’s inner workings, and potentially save money on repair costs. Remember to prioritize safety, follow the instructions carefully, and seek help from experienced mechanics or electronics enthusiasts if you encounter any difficulties. The journey of building your own OBD scanner is just the beginning of a lifelong exploration of automotive technology and the fascinating world of car diagnostics.
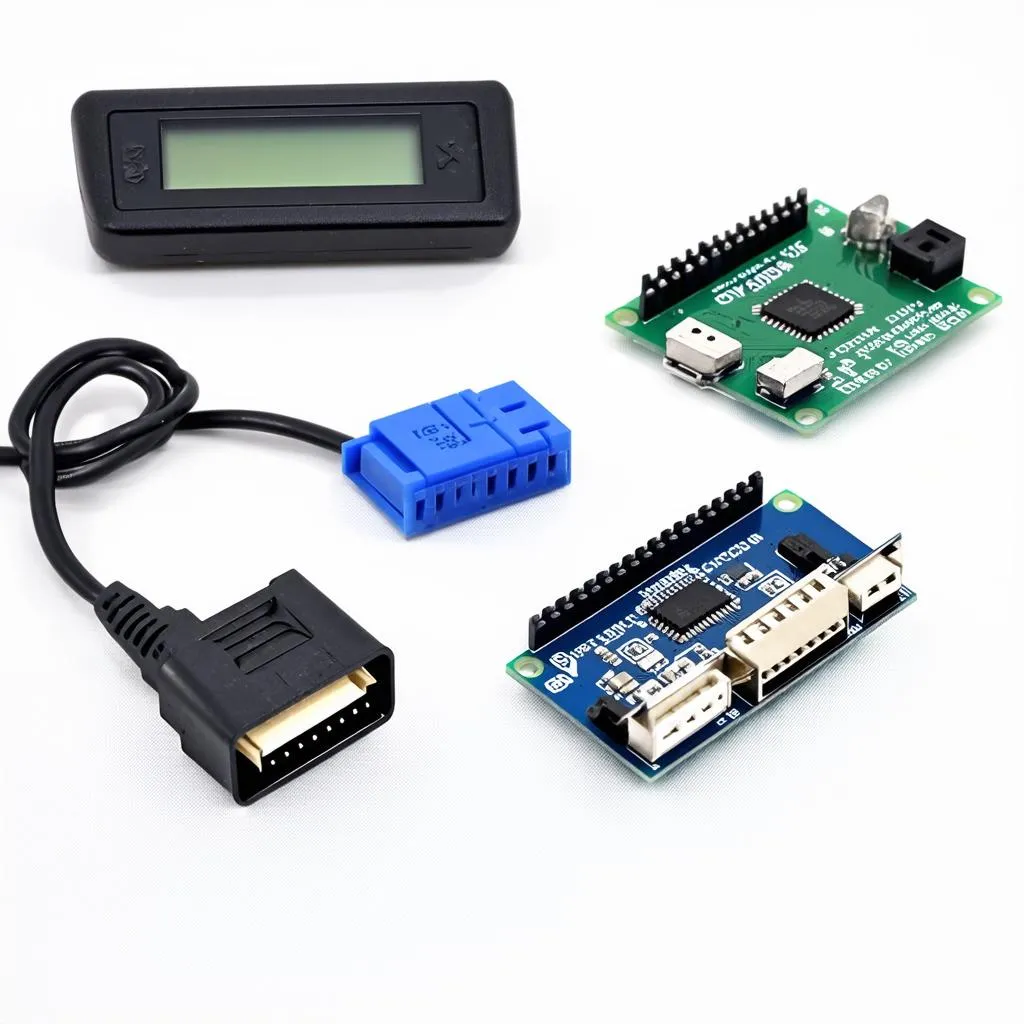 OBD Scanner Hardware
 OBD Scanner Software
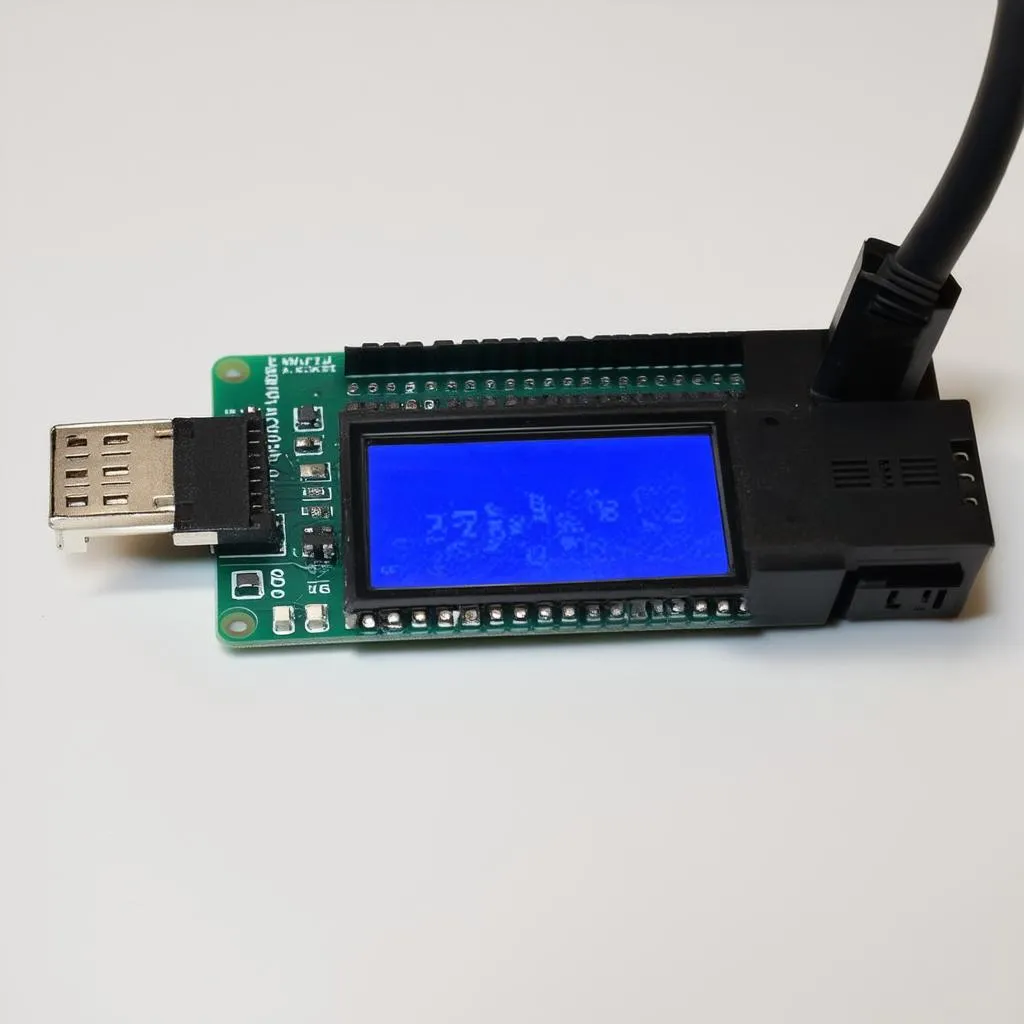 OBD Scanner Assembly
Let us know in the comments if you have any questions or share your experiences with building your own OBD scanner! And if you need any assistance with configuring your DIY OBD scanner, we are here to help. Contact our support team on Whatsapp: +84767531508.