For BL5 Subaru Legacy owners looking to enhance their vehicle’s performance monitoring, installing vent gauges is a popular and effective modification. These gauges provide real-time data on critical engine parameters, allowing you to keep a close eye on your Subaru’s health and performance. While the installation process might seem daunting, understanding your vehicle’s fuse box and OBD2 port is crucial for a successful and safe setup.
This guide will walk you through the essentials of your 2005 Subaru Legacy fuse box, its relevance to installing aftermarket vent gauges, and how it connects with your OBD2 system. Whether you’re adding a boost gauge, oil pressure gauge, or any other performance monitor, knowing your fuse box layout and OBD2 integration is key.
Your 2005 Subaru Legacy, like other models in the BL/BP generation, is equipped with two main fuse boxes. These fuse boxes are strategically located to protect your vehicle’s electrical circuits and ensure the proper functioning of various components.
The first fuse box is situated in the passenger compartment. This panel primarily manages circuits for interior functions, including your car’s entertainment system, lighting, and crucial systems that might be tapped into for vent gauge installations. For instance, you might consider using a fuse from this box to power your new gauges, ensuring they receive a clean and protected power supply.
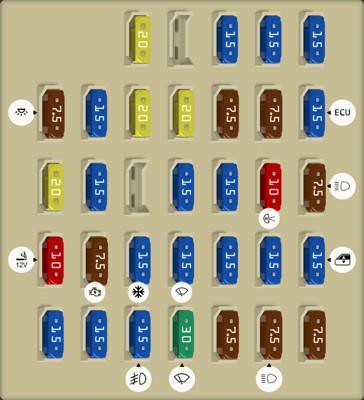
Here’s a detailed diagram of the passenger compartment fuse box:
| Type | No. | Description |
|---|---|---|
| Fuse MINI 20A | 1 | Cargo fan, Trailer hitch connector |
| Fuse MINI 15A | 3 | Door locking |
| Fuse MINI 15A | 4 | Front wiper deicer relay, Moonroof |
| Fuse MINI 15A | 5 | Combination meter |
| Fuse MINI 7.5A | 6 | Remote control rear view mirrors, Seat heater relay, Vanity mirror light |
| Fuse MINI 15A | 7 | Combination meter, Integrated unit |
| Fuse MINI 20A | 8 | Stop light |
| Fuse MINI 20A | 9 | Mirror heater, Front wiper deicer |
| Fuse MINI 7.5A | 10 | Power supply (Battery) |
| Fuse MINI 7.5A | 11 | Turn signal unit Clock |
| Fuse MINI 15A | 12 | Automatic transmission unit, SRS airbag system (Sub), Engine control unit, Integrated unit |
| Fuse MINI 20A | 13 | Cargo socket |
| Fuse MINI 15A | 14 | Position light, Tail light, Rear combination light |
| Fuse MINI 15A | 16 | Illumination |
| Fuse MINI 15A | 17 | Seat heaters |
| Fuse MINI 10A | 18 | Backup light |
| Fuse MINI 7.5A | 19 | Headlight right side relay |
| Fuse MINI 10A | 20 | Cigarette lighter socket |
| Fuse MINI 7.5A | 21 | Starter relay |
| Fuse MINI 15A | 22 | Air conditioner, Rear window defogger relay coil |
| Fuse MINI 15A | 23 | Rear wiper, Rear window washer |
| Fuse MINI 15A | 24 | Audio unit, Clock |
| Fuse MINI 15A | 25 | SRS airbag system (Main) |
| Fuse MINI 15A | 26 | Power window relay |
| Fuse MINI 15A | 27 | Blower fan |
| Fuse MINI 15A | 28 | Blower fan |
| Fuse MINI 15A | 29 | Fog light |
| Fuse MINI 30A | 30 | Front wiper, Front wiper washer |
| Fuse MINI 7.5A | 31 | Auto air conditioner unit, Integrated unit |
| Fuse MINI 7.5A | 32 | Headlight left side relay |
| Fuse MINI 7.5A | 33 | ABS/Vehicle dynamics control unit |
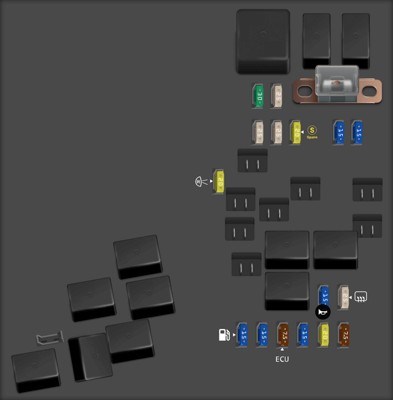
The second location is the engine compartment fuse box. This panel protects circuits vital for engine operation and other critical vehicle systems. While less directly involved in powering interior gauges, understanding this fuse box is still important for overall vehicle electrical system knowledge.
Here’s the layout for the engine compartment fuse box:
| Type | No. | Description |
|---|---|---|
| Fuse MINI 30A | 1 | ABS unit, Vehicle dynamics control unit |
| Fuse MINI 25A | 2 | Main fan |
| Fuse MINI 25A | 3 | Sub fan [Except 3.0-liter models] |
| Fuse MINI 25A | 4 | Main fan [3.0-liter models] |
| Fuse MINI 20A | 5 | Spare |
| Fuse MINI 15A | 6 | Headlight (right side) |
| Fuse MINI 15A | 7 | Headlight (left side) |
| Fuse MINI 20A | 8 | Backup light |
| Fuse MINI 15A | 9 | Horn |
| Fuse MINI 25A | 10 | Rear window defogger |
| Fuse MINI 15A | 11 | Fuel pump |
| Fuse MINI 15A | 12 | Automatic transmission control unit |
| Fuse MINI 7.5A | 13 | Engine control unit |
| Fuse MINI 15A | 14 | Turn and hazard warning flasher |
| Fuse MINI 20A | 15 | Parking switch |
| Fuse MINI 7.5A | 16 | Alternator |
| Fuse FLD/PAL 283 A | U4 | Main fuse |
| Fuse MINI | U22 | FWD socket [AT vehicles – except Turbo models and 3.0-liter models] |
When installing vent gauges, particularly OBD2-connected gauges, you’re primarily interested in tapping into a reliable 12V power source and accessing the OBD2 port. The OBD2 port, usually located under the dashboard on the driver’s side, is your gateway to reading engine data for display on your new gauges.
While the fuse box provides the necessary power, the OBD2 port allows your vent gauges to communicate with your car’s computer. This connection enables you to monitor parameters like boost pressure, coolant temperature, air/fuel ratio, and more, depending on the type of gauges you choose.
In conclusion, upgrading your BL5 Subaru Legacy with vent gauges is a fantastic way to stay informed about your vehicle’s performance. By understanding your 2005 Subaru Legacy fuse box diagrams and how they relate to powering your gauges, alongside utilizing the OBD2 port for data, you can ensure a smooth and effective installation. Always consult your vent gauge manufacturer’s instructions and consider professional installation if you’re not comfortable working with automotive electrical systems.