For Toyota 4Runner owners, especially those with models from 2004 onwards, checking the transmission fluid level can be a unique challenge. These models often come with sealed transmissions, lacking the traditional dipstick for easy fluid checks. Maintaining the correct transmission fluid level is crucial for the longevity and performance of your vehicle, and it needs to be done within a specific temperature range. For instance, my 2007 4Runner’s Factory Service Manual (FSM) specifies a temperature range of 115°F to 130°F for A750E and A750F transmissions. It’s vital to consult your vehicle’s specific manual to determine the correct temperature range for your model before proceeding.
So, how do you accurately monitor your transmission fluid temperature to ensure you’re within the correct range for a fluid level check? While methods like infrared thermometers exist, they are often considered less accurate and not ideal for this precise task. This guide will delve into two reliable methods for monitoring your 4Runner’s transmission fluid temperature, focusing on accuracy and ease of use, especially when using tools like a BAFX OBD2 adapter.
Method 1: The Paper Clip Trick – Utilizing Your 4Runner’s On-Board Diagnostics
The most economical method, requiring little more than a paper clip, is detailed in the Toyota Factory Service Manual. This approach involves using a jumper wire or a simple paper clip to bridge specific terminals in your 4Runner’s OBD port to initiate a Transmission Temperature Check Mode. This method relies on observing dashboard indicator lights to signal when the transmission fluid temperature reaches the correct range. It’s essential to start with a cold transmission for this method to work effectively, as you’ll be monitoring the temperature rise from a cold start.
Here’s a step-by-step breakdown based on the Factory Service Manual for a 2007 4Runner, which is generally applicable to other Gen 4 (and Gen 5*) models:
Consult your Factory Service Manual for the precise instructions and temperature ranges for your specific Toyota 4Runner model.
Step-by-Step Guide to the Paper Clip Method:
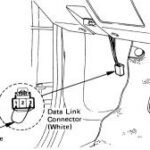
- Locate the OBDII Port: Find the OBDII port in your 4Runner, typically located under the dashboard on the driver’s side.
- Identify Terminals 4 and 13: Refer to the diagram from your Factory Service Manual (or the image above) to identify terminals 4 and 13 in the OBDII port. Note that the orientation might appear upside down compared to the manual’s illustration, but the pin positions remain the same.
- Insert the Jumper: Using a paper clip or jumper wire, carefully bridge terminals 4 and 13 in the OBDII port.
A simple paper clip can be used as a jumper wire to initiate the Transmission Temperature Check Mode.
- Start the Engine: With the jumper in place, start your 4Runner’s engine. Observe the dashboard lights – they will likely start flashing, which is normal at this stage.
- Engage Transmission Temperature Check Mode: Shift the gear selector between Neutral (N) and Drive (D) every 1.5 seconds for a total of 6 seconds. After this sequence, the ‘D’ drive indicator or the ‘A/T Oil Temp’ light on your dash should illuminate for approximately 2 seconds and then turn off. This indicates that your vehicle has successfully entered Toyota’s Transmission Temperature Check Mode. In some models, like my 2007 4Runner Limited, it’s the ‘A/T Oil Temp’ light that serves as the indicator.
The ‘A/T Oil Temp’ light illuminating confirms entry into Transmission Temperature Check Mode.
- Remove the Jumper: Once the indicator light confirms you’re in the check mode, remove the paper clip or jumper wire from the OBDII port.
- Monitor the Indicator Light: Allow the engine to idle, and watch for the ‘D’ or ‘A/T Oil Temp’ light to illuminate steadily again. This steady light signals that the transmission fluid has reached the minimum temperature required for a fluid level check.
- Perform Fluid Level Check: Be prepared with your tools and a catch pan. As soon as the light stays on, you have a window of opportunity to perform the transmission fluid level check by opening the overflow plug. Allow the excess fluid to drain until it trickles out. If the indicator light starts flashing, it means the temperature has exceeded the maximum limit, and you may need to let the transmission cool down before re-checking.
This method, while cost-effective, might require a bit of practice and is often easier with two people – one to monitor the dashboard lights and another to perform the fluid level check underneath the vehicle.
Method 2: Utilizing an OBD2 Bluetooth Adapter and Torque Pro App
For a more user-friendly and versatile approach, especially if you want to monitor transmission temperatures while driving (useful for towing or heavy loads), using an OBD2 Bluetooth adapter and a smartphone app like Torque Pro is an excellent option. While it involves a small investment, the convenience and real-time data monitoring capabilities are significant advantages.
You’ll need two key components for this method:
-
(a) An ELM327 Compliant OBD2 Bluetooth Dongle: These adapters are widely available online, with models like the BAFX Products Android Wireless Bluetooth OBD2 Scanner being a popular and reliable choice. Prices typically start around $15-$20.
-
(b) Torque Pro App for Android: This powerful OBD2 app is available on the Google Play Store for a small fee (around $5).
Setting up Torque Pro with a BAFX OBD2 Adapter for Transmission Temperature Monitoring:
-
Pair the OBD2 Adapter: Plug the BAFX OBD2 adapter into your 4Runner’s OBDII port. Turn your vehicle’s ignition to the “ON” position (without starting the engine). On your Android device, go to Bluetooth settings and pair with the OBD2 adapter. Refer to the adapter’s instructions for the specific device name if needed.
-
Vehicle Profile Setup in Torque Pro: Open the Torque Pro app and set up your vehicle profile if you haven’t already. This usually involves entering your vehicle’s make, model, and year.
-
Adding Custom PID for Transmission Temperature (Gen 4 4Runner – 2004-2009): To monitor transmission temperature, you’ll need to add a custom PID (Parameter ID) in Torque Pro.
- From the main screen, tap the gear icon (menu button) > “Settings” > “Manage extra PIDs/Sensors”.
- On the next screen, tap the menu button > “Add custom PID” > “OK”.
- Enter the following details for 4th Gen 4Runners (2004-2009):
- OBD2 Mode and PID:
21d9 - Long Name: (e.g.,
Transmission Temp) – Choose any descriptive name. - Short Name: (e.g.,
Trans Temp) – Choose a shorter name for display. - Minimum Value:
0 - Maximum Value:
300 - Scale Factor:
x1 - Unit Type:
F - Equation:
(((((G*256)+H)*(7/100))-400)/10)(Ensure you have five opening parentheses and no spaces in the equation.)
-
Adding Custom PID for Transmission Temperature (Gen 5 4Runner – 2010 onwards): For Gen 5 4Runners (2010 and newer), use the following PID data:
- OBD2 Mode and PID:
2182 - Equation:
((((A*256)+B)*(7/100)-400)/10)
- OBD2 Mode and PID:
-
Add Gauge to Realtime Information Display:
- From the Torque Pro main screen, select “Realtime Information”.
- Tap the gear/menu icon > “Add display”.
- Choose a display style (e.g., “Digital display”).
- Select your newly created sensor (e.g., “Transmission Temp”).
- Choose a widget size and place it on your dashboard display.
Now you can start your 4Runner, and Torque Pro, using your BAFX OBD2 adapter, will display the real-time transmission fluid temperature. This allows you to accurately monitor the temperature while warming up your vehicle for a fluid level check, or even while driving under various conditions.
Alternative OBD2 Apps:
Besides Torque Pro, other OBD2 apps like OBD Fusion are also compatible with ELM327 adapters and can monitor Toyota transmission temperatures. OBD Fusion may require an additional in-app purchase for enhanced diagnostics to unlock transmission temperature monitoring for specific models, but some users find its setup process more intuitive than manually entering custom PIDs.
Conclusion:
Both the paper clip method and the OBD2 adapter with Torque Pro app offer effective ways to monitor your Toyota 4Runner’s transmission fluid temperature for accurate fluid level checks. The paper clip method is a budget-friendly option, while the OBD2 adapter provides enhanced convenience, real-time monitoring, and broader diagnostic capabilities. Choosing the best method depends on your needs and preferences, but both will help you maintain your 4Runner’s transmission health and performance.