Swapping engines in your 92-00 Honda Civic can significantly boost performance, and the B16 VTEC engine is a popular choice. However, integrating a B16, especially an OBD2 variant, into an older Civic chassis can present wiring challenges, particularly concerning the Intake Air Temperature (IAT) sensor. This guide, tailored for techcarusa.com readers, provides expert insights into navigating these challenges, focusing on the “B16 Iat Obd2” keyword and ensuring a smooth engine swap.
Understanding the B16 IAT OBD2 Challenge
When performing an engine swap involving a B16 engine and dealing with OBD2 (On-Board Diagnostics II) systems, a common issue arises with the Intake Air Temperature (IAT) sensor. Unlike some older Honda engines, the OBD2 B16 engines, such as the B16A2, typically do not have an IAT sensor directly mounted on the intake manifold. This difference in sensor location becomes a point of concern when swapping these engines into vehicles that expect an IAT sensor in a different location or when using an ECU (Engine Control Unit) that requires this sensor information.
This guide addresses the common scenarios you might encounter when dealing with the B16 IAT sensor in OBD2 engine swaps, offering practical solutions to ensure your engine runs optimally and your ECU receives accurate temperature readings. Whether you are aiming for an OBD2 compliant setup or converting to OBD1 for tuning flexibility, understanding the IAT sensor is crucial.
OBD2 B16 Swaps and IAT Sensor Relocation
For those swapping an OBD2 B16 engine (like the B16A2) into a 96-00 Civic (OBD2 vehicle) or even an older 92-95 Civic (OBD1 vehicle), the absence of the IAT sensor on the intake manifold necessitates a relocation strategy.
Scenario 1: OBD2 B16 into OBD2 Civic
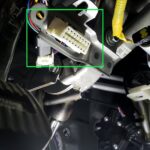
When installing an OBD2 B16 into a 96-00 Civic, you are generally working within the same OBD generation. However, the factory location for the IAT sensor on the original Civic engine might differ from the B16. In this case, the most common solution is to relocate the IAT sensor to the intake arm, as illustrated in Figure 8.
Figure 8: Relocating the OBD2 IAT sensor to the intake arm. This is a common practice when the B16 intake manifold lacks a designated IAT sensor port. The sensor is placed in the intake stream to accurately measure the incoming air temperature.
This relocation ensures the ECU receives accurate intake air temperature readings, which are vital for fuel mixture calculations and optimal engine performance. By placing the IAT sensor in the intake arm, you are measuring the air temperature after it has passed through the air filter and entered the intake system, providing a more relevant reading for the ECU.
Scenario 2: OBD2 B16 into OBD1 Civic (Using OBD1 ECU)
Swapping an OBD2 B16 into a 92-95 Civic and opting for an OBD1 ECU (like the P28 or P30) is a popular choice for those seeking greater tuning capabilities. In this scenario, you still need to address the IAT sensor. Again, relocating the IAT sensor to the intake arm (as shown in Figure 3) is a viable solution.
Figure 3: OBD1 IAT sensor placement in the intake arm. When using an OBD1 ECU with an OBD2 B16 engine, this relocation method remains effective for providing the necessary IAT signal to the ECU. The “alt” text is updated to be more descriptive and SEO-friendly, focusing on the keyword.
Alternatively, you could consider rewiring to an OBD1 style IAT sensor, which often uses a round connector, as shown in Figure 9.
Figure 9: Example of a round style IAT connector commonly found in OBD1 Honda applications. Converting to this style might be necessary when adapting an OBD2 engine to an OBD1 wiring harness and ECU, ensuring sensor compatibility.
Wiring Considerations for IAT Sensor Relocation
Regardless of whether you relocate the IAT sensor to the intake arm or opt for an OBD1 style sensor, you will likely need to extend the IAT sensor wiring to reach the new location. Ensure you use proper wiring techniques, including soldering and heat shrinking, to create durable and reliable connections.
When wiring the IAT sensor, refer to wiring diagrams for your specific ECU and engine harness. Figure 1 (for OBD1 ECU wiring) and Figures 6 & 7 (for OBD2A and OBD2B hybrid pinouts respectively) provide valuable references for understanding the pinouts and wiring configurations you may encounter.
Figure 1: OBD1 ECU wiring diagram. This diagram illustrates the pinouts for common OBD1 ECU connections, including those relevant to sensor wiring. Understanding these diagrams is essential for correctly wiring in components like the IAT sensor during an engine swap.
Figure 6: OBD2A hybrid pinouts diagram for 96-98 Civics. This diagram details the wiring configurations specific to OBD2A systems, important for swaps in these model years. It highlights pin locations for various sensors and control systems.
Figure 7: OBD2B hybrid pinouts diagram for 99-01 Civics. Similar to Figure 6, this diagram provides the pinout information for OBD2B systems, crucial for accurate wiring during engine swaps in these later OBD2 Civic models.
B16 Swap Specifics and Other Sensor Considerations
While the IAT sensor is a key consideration, a successful B16 OBD2 swap involves other wiring aspects. The original article provides comprehensive guidance on various scenarios, and it’s crucial to consult the relevant sections based on your specific swap combination.
For instance, when swapping a B16A2 into a 92-95 Civic DX/LX/CX model and using a chipped P28 ECU, you’ll need to address VTEC wiring (as your model originally had a non-VTEC engine). Figure 1 shows the necessary wiring for VTEC solenoid and pressure switch.
Figure 1 (cropped to highlight VTEC wiring): Detail from the OBD1 ECU wiring diagram focusing on VTEC solenoid and pressure switch wiring. For non-VTEC Civic models upgrading to a VTEC engine like the B16, this wiring is essential for activating the VTEC system.
Additionally, consider the distributor. OBD2 distributors might require adapter harnesses when used with OBD1 ECUs. The article mentions using OBD2A or OBD2B to OBD1 adapter harnesses in several scenarios.
Conclusion: Mastering the B16 IAT OBD2 Swap
Successfully navigating the “b16 iat obd2” engine swap hinges on understanding the nuances of the Intake Air Temperature sensor and its integration with your chosen ECU and vehicle wiring. By relocating the IAT sensor appropriately and paying attention to the specific wiring needs of your B16 engine and Civic model, you can ensure a smooth and performance-enhancing engine swap.
This guide, drawing upon expert knowledge and detailed figures, aims to equip you with the information needed to tackle the IAT sensor challenge and other wiring aspects of your B16 OBD2 swap. Always double-check wiring diagrams and consult reliable resources like techcarusa.com for accurate and up-to-date information. Happy swapping!