Are you developing an OBD2 scanner or application and tired of the constant trips to your garage to test it on your car? For those working on Arduino-based OBD2 projects, repeatedly uploading code and testing in a vehicle can be a significant inconvenience. Imagine the frustration of tweaking your Arduino Nano, connected to an LCD and ELM327 scanner, only to run to your car and find a minor code adjustment is needed. This iterative process can be time-consuming and disrupt your workflow.
The ideal solution is to bring the testing environment into your home. What if you could simulate OBD2 communication right on your workbench? The search for a readily available, DIY-friendly Arduino OBD2 simulator reveals a gap. While some commercial options exist, like the FreeMatics product at a hefty price, the open-source community’s needs often go unmet. The spirit of DIY and accessible technology should extend to OBD2 development tools as well. Why spend $169 when that could be reinvested into multiple Arduino boards for even more projects?
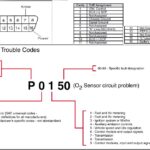
This challenge, while initially frustrating, presents a valuable opportunity. The need for a personal OBD2 simulator necessitates a deeper dive into understanding OBD2 protocols and PID codes. This exploration, born out of necessity, leads to a rewarding outcome: the ability to create your own Arduino OBD2 simulator. By focusing on how to transmit PIDs in the standard OBD2 format, you can effectively mimic vehicle communication. This allows you to test your OBD2 applications and scanners using readily available software, such as FreeOBD Scanner, commonly bundled with ELM327 scanners.
To embark on this DIY journey, you will need a few key components:
- Arduino UNO: The microcontroller brain of your simulator, providing the processing power and flexibility for customization.
- CAN-BUS Shield: Essential for enabling your Arduino to communicate over the Controller Area Network (CAN) bus, the backbone of OBD2 communication in most modern vehicles.
- ELM327 Interface (USB, Bluetooth, or WiFi): This acts as the bridge between your simulator and your OBD2 diagnostic software. The connection type is flexible, as long as it establishes a communication port for your computer.
With these components and a bit of ingenuity, you can create a convenient and cost-effective Arduino OBD2 simulator, streamlining your development process and bringing the automotive testing environment right to your desk.