Have you ever wished you could understand your car better, just like a mechanic plugs into its brain? Well, with a little help from an Arduino and the magic of OBD-II, that wish can become reality! Today, we’re diving deep into the world of “Arduino How To Connect Obd” and unlocking the secrets hidden within your vehicle’s data stream.
Decoding the Mystery: What Does “Arduino How To Connect Obd” Even Mean?
Before we embark on our journey, let’s demystify the jargon. OBD-II, short for On-Board Diagnostics, is a standardized system present in most cars manufactured after 1996. Think of it as your car’s communication hub, constantly monitoring its health and performance. Now, imagine tapping into this treasure trove of information using an Arduino, a tiny but mighty microcontroller capable of processing data and controlling electronics.
For the mechanically inclined, this is like having a direct line to your car’s inner thoughts. For the tech enthusiasts, it’s an open invitation to experiment and create innovative automotive projects. And let’s not forget the budget-conscious drivers; understanding your car’s data can help you diagnose problems early, potentially saving you costly repairs down the line.
Connecting the Dots: Your Step-by-Step Guide to Arduino OBD-II Integration
1. Gather Your Tools:
- An Arduino Board: The Arduino Uno is a great starting point.
- An OBD-II to UART Converter: This acts as the bridge between your car and Arduino, translating the OBD-II signals into something the Arduino can understand.
- Jumper Wires: For making the electrical connections.
- A Breadboard (optional): Useful for prototyping and organizing your circuit.
2. The Connection:
- Connect the OBD-II converter to your car’s OBD-II port, usually located under the steering wheel.
- Connect the converter to your Arduino using jumper wires, following the converter’s specific pinout diagram.
3. The Code:
- Download and install the Arduino IDE (Integrated Development Environment) from the official Arduino website.
- You’ll need an OBD-II library for Arduino. A popular choice is the “OBD-II library by Stanley Huang.”
- Write a simple sketch (Arduino code) to initialize the OBD-II communication and request data from your car.
4. Data, Data Everywhere:
- Once the code is uploaded to your Arduino, you can use the Serial Monitor in the Arduino IDE to view the raw data streaming from your car’s OBD-II system.
5. From Data to Insights:
- This is where things get interesting! You can now process this raw data to extract meaningful insights like:
- Engine RPM
- Vehicle Speed
- Coolant Temperature
- Fuel Level
- And much more!
6. Level Up Your Project:
- Connect an LCD display to your Arduino to visualize the data in real-time.
- Build a custom dashboard for your car with gauges and indicators.
- Log data to an SD card for later analysis.
- Send data to the cloud for remote monitoring.
Troubleshooting Tips and FAQs
-
My Arduino isn’t connecting to my car’s OBD-II port. What could be wrong?
- Double-check your connections: Ensure all wires are securely connected according to the pinout diagram.
- OBD-II Protocol Compatibility: Some older cars might use a different OBD-II protocol. Verify that your converter and Arduino library support your car’s specific protocol.
-
I’m getting garbage data on the Serial Monitor. Help!
- Baud Rate Mismatch: Make sure the baud rate settings in your Arduino code match the baud rate of your OBD-II converter.
-
Can I damage my car by connecting an Arduino to the OBD-II port?
- Connecting an Arduino to the OBD-II port is generally safe as long as you follow proper wiring and coding practices. Avoid shorting any pins, and always double-check your connections before powering on your Arduino.
Unlocking More Than Just Mechanics
Beyond the technical aspects, connecting an Arduino to your car’s OBD-II system can be a rewarding experience. It’s a journey of exploration, learning, and pushing the boundaries of what’s possible with a little ingenuity.
In a world where technology often feels opaque and inaccessible, this project offers a refreshing sense of empowerment. It allows you to peek behind the curtain, understand how your car works at a deeper level, and even customize its behavior to suit your needs.
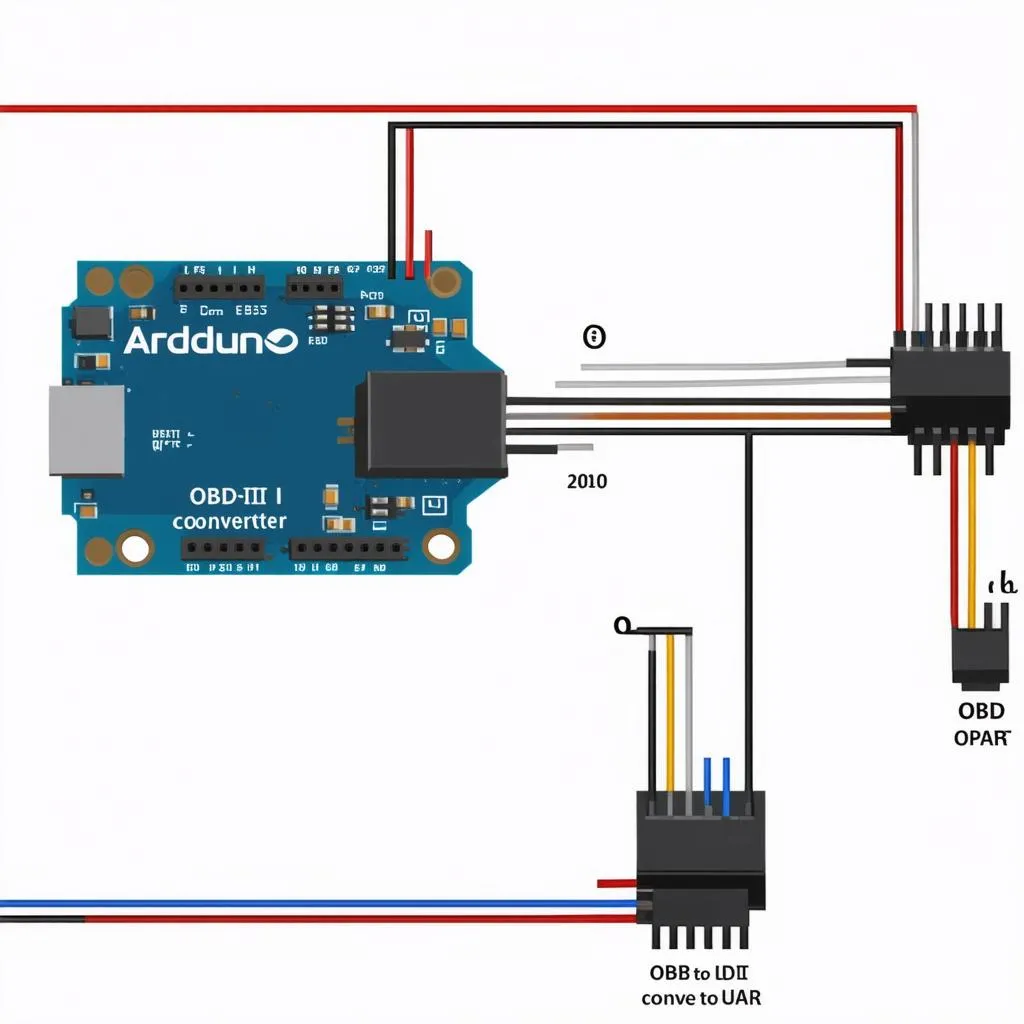 Arduino OBD-II Connection Diagram
 Custom Arduino OBD-II Dashboard
Need a Helping Hand?
We understand that embarking on this technological adventure might seem daunting at first. But fret not! Our team of automotive and tech experts is here to guide you every step of the way. Whether you’re facing technical difficulties, need help choosing the right components, or simply want to brainstorm project ideas, don’t hesitate to reach out.
Contact us on WhatsApp at +84767531508 for 24/7 support.
Let’s turn your “Arduino how to connect OBD” curiosity into a roaring success story!