For car enthusiasts and everyday drivers alike, understanding your vehicle’s health is crucial. Modern cars are equipped with sophisticated onboard diagnostic systems, and accessing this data can empower you to identify issues early, perform preventative maintenance, and even save money on repairs. This guide focuses on how to leverage the power of your Android device to read OBD2 (On-Board Diagnostics II) data, providing practical examples using the user-friendly OBDLink® app.
The OBDLink app, paired with an OBD2 adapter, opens up a world of enhanced diagnostics beyond the standard OBD-II parameters. Imagine being able to read and clear codes not just for your engine, but also for systems like ABS (anti-lock braking system), SRS (supplemental restraint system/airbags), and TPMS (tire pressure monitoring system). This article will walk you through the process using the latest OBDLink app, ensuring you can effectively monitor your vehicle’s condition right from your Android smartphone or tablet.
Note: The OBDLink app interface has been recently updated with a fresh look, featuring yellow accents on the home screen icons (previously green on Android). Make sure you have the latest version from the Google Play Store to follow along seamlessly.
The following steps will guide you through downloading enhanced diagnostics and accessing your vehicle’s data:
Note: Enhanced OEM (Original Equipment Manufacturer) Add-Ons are primarily available for North American vehicles. If you’re unsure about compatibility for your specific car, consult the OBDLink support resources for detailed vehicle coverage information.
Note: While this guide applies to all OBDLink adapters, it particularly highlights the OBDLink® MX+ adapter. This is because the MX+ often includes enhanced diagnostics for many vehicle brands at no extra cost within the OBDLink app. These exclusive add-ons for MX+ users include brands like GM, Honda/Acura, and Hyundai/Kia. Users with other OBDLink adapter models can still purchase add-on diagnostics, but full access to all OEM-specific data (PIDs and DTCs) may not be guaranteed, especially for network-specific parameters like those on Ford’s MS-CAN network when using an OBDLink LX.
Getting Started: Download Enhanced Diagnostics on Android
Before proceeding, ensure these prerequisites are met:
- Your vehicle’s engine is running.
- Your Android phone or tablet is connected to your OBDLink adapter via Bluetooth.
- Ensure no other Bluetooth devices are actively streaming from your Android device to avoid connection conflicts.
-
Upon the initial connection of your OBDLink adapter to the app, a prompt will appear. This dialog offers options to configure your vehicle settings and download enhanced OEM add-ons. Tap on Get Enhanced OEM Add-Ons.
Note: If you don’t see this option, it indicates that enhanced diagnostics aren’t supported for your specific vehicle. However, standard OBD-II diagnostics will still be available. In this case, skip ahead to the View diagnostics section.
Android Android OBDLink app initial connection screen, highlighting the ‘Get Enhanced OEM Add-Ons’ option for accessing advanced vehicle diagnostics. 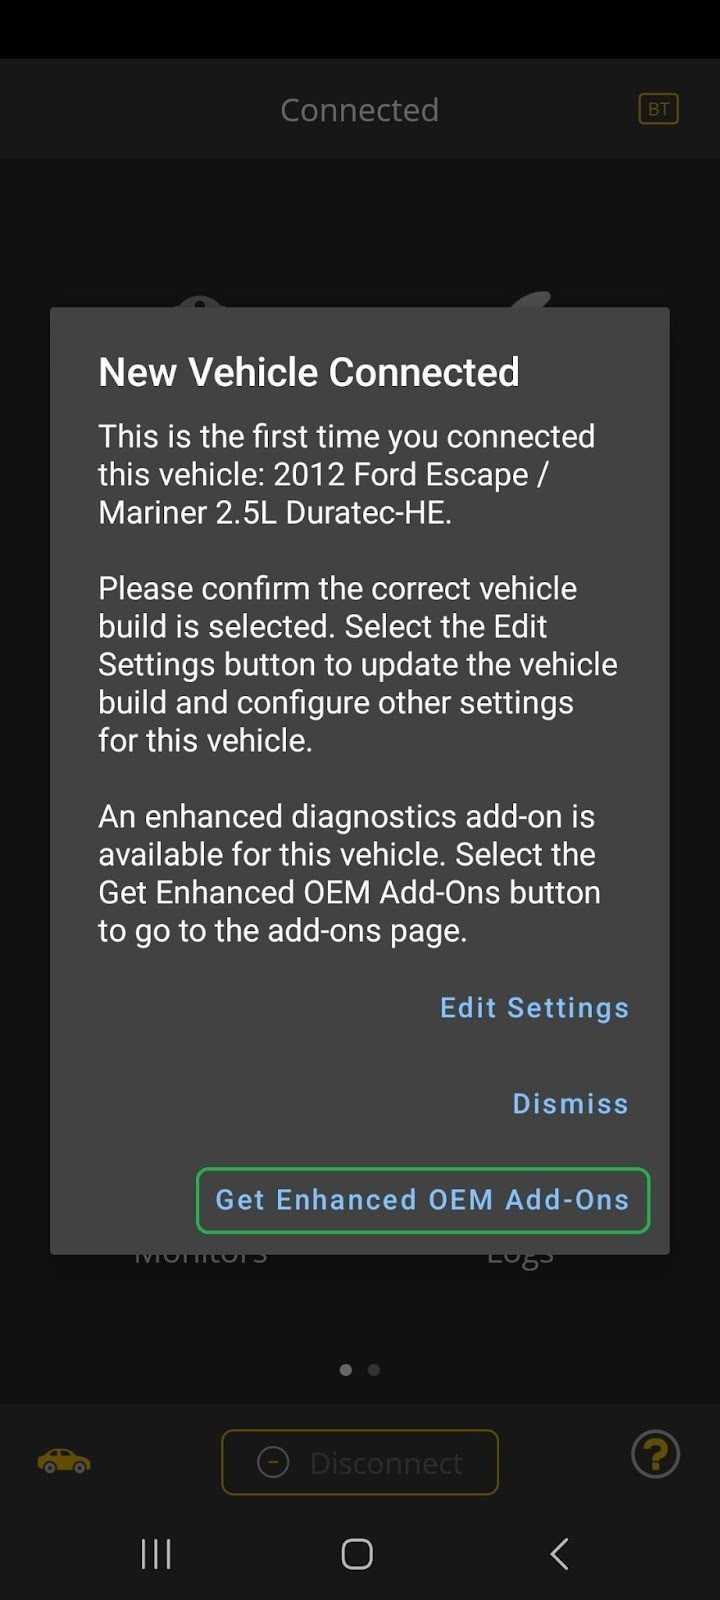


-
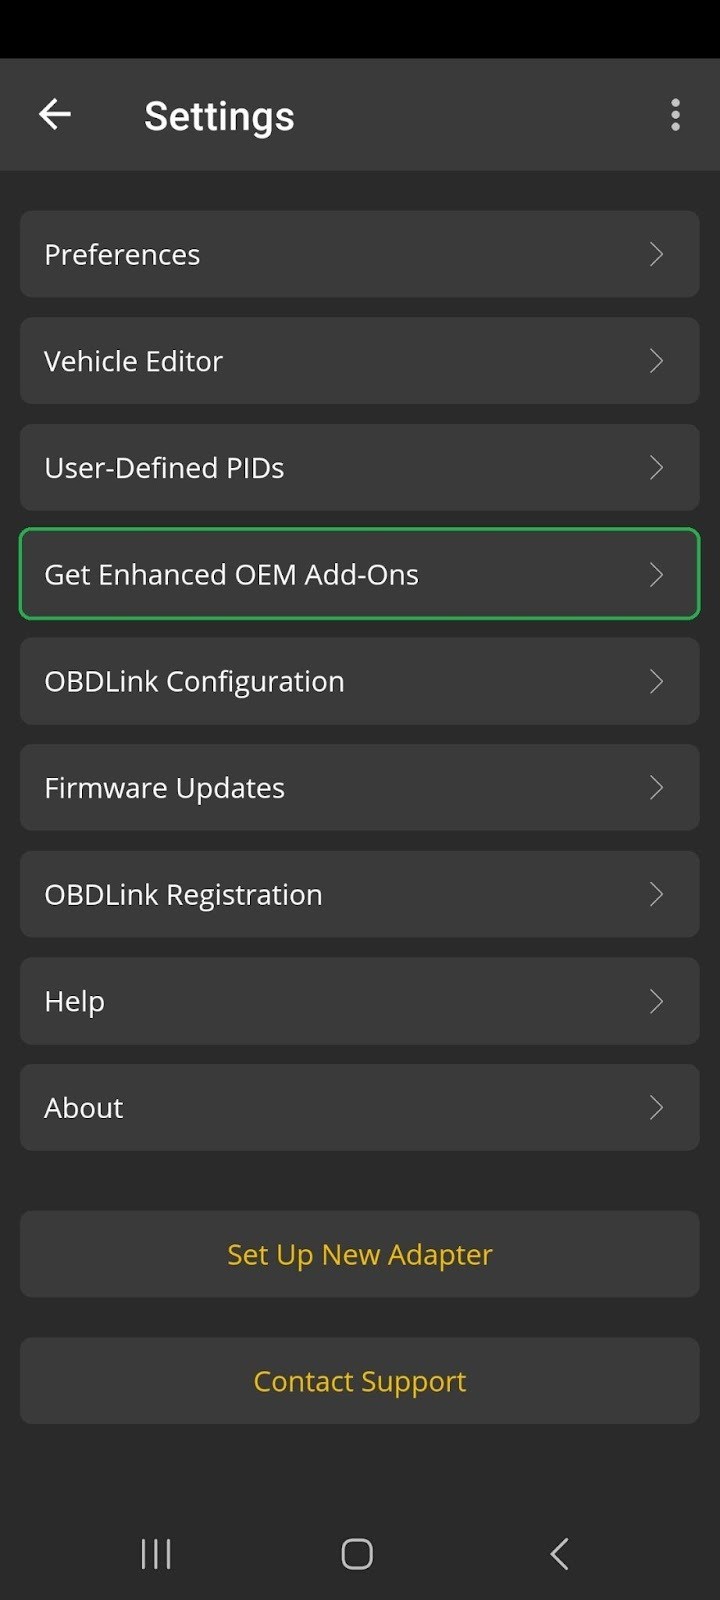
If you’ve connected your OBDLink adapter before, navigate to the settings menu. Access this by tapping the Settings icon, then select Get Enhanced OEM Add-Ons from the list.
Android Android OBDLink app Settings menu, with ‘Get Enhanced OEM Add-Ons’ clearly marked for downloading manufacturer-specific diagnostics. -
You will be presented with a list of vehicle manufacturers. Scroll through and tap on your vehicle’s brand to proceed.
Android Android OBDLink app showing vehicle manufacturer selection for enhanced diagnostics download, in this example, ‘Ford, Lincoln, Mercury’ is selected. Note: You might encounter a notification regarding add-ons exclusive to the OBDLink MX+ adapter, such as those for GM, Honda/Acura, and Hyundai/Kia. For instance, when connecting to a GM vehicle, using an OBDLink MX+ adapter is necessary to utilize these exclusive enhanced diagnostics. -
After selecting the manufacturer, a list of model years will appear. Browse and tap on your vehicle’s specific model year.
iOS iOS screen (interface is similar on Android) for selecting vehicle model year for enhanced diagnostics, with ‘Ford 2012’ highlighted. -
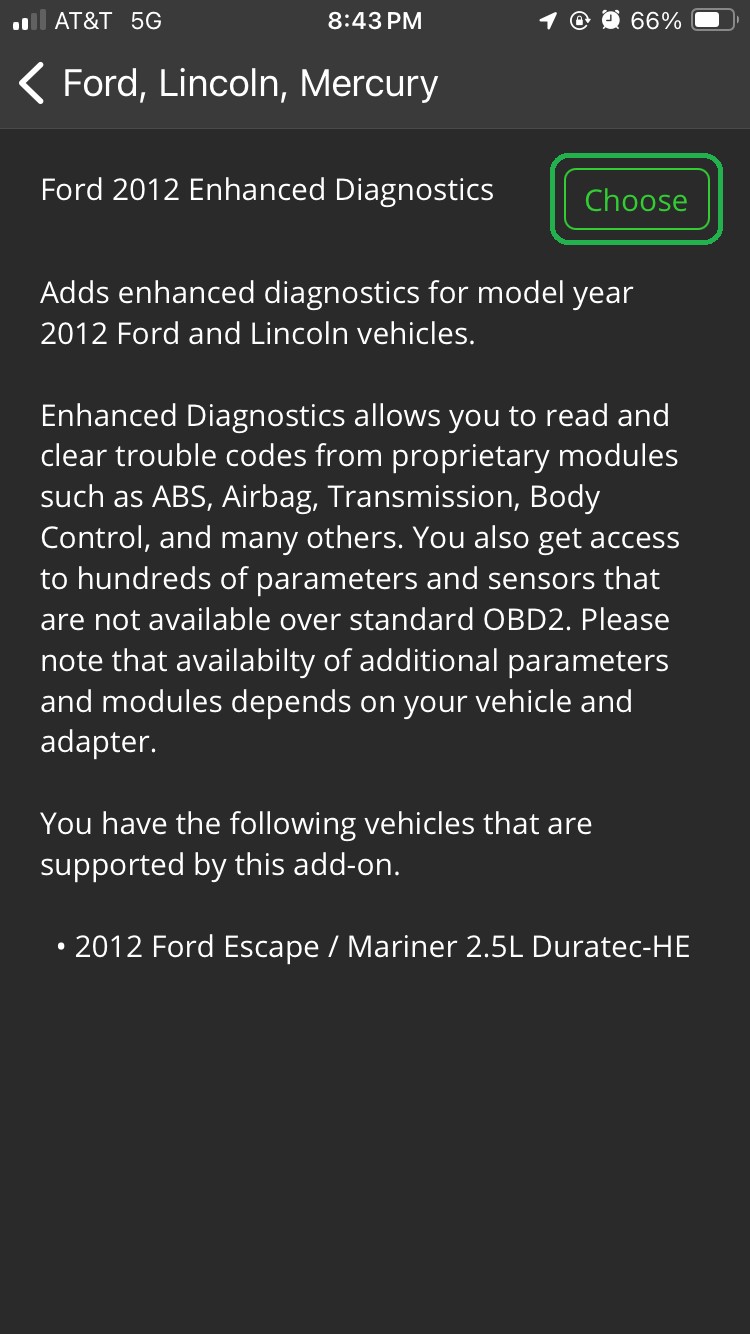
Tap Choose to confirm your selection and proceed with downloading the enhanced diagnostics package for your vehicle.
iOS iOS confirmation screen (Android similar) for enhanced diagnostics, with the ‘Choose’ button to initiate the download. -
A notification about a free add-on available for your adapter may appear. It’s highly recommended to tap GET FREE ADD-ON to ensure you have access to the full range of features your OBDLink adapter offers.
iOS iOS prompt (Android similar) offering a free add-on to maximize OBDLink adapter functionality, with ‘Get Free Add-on’ highlighted. -
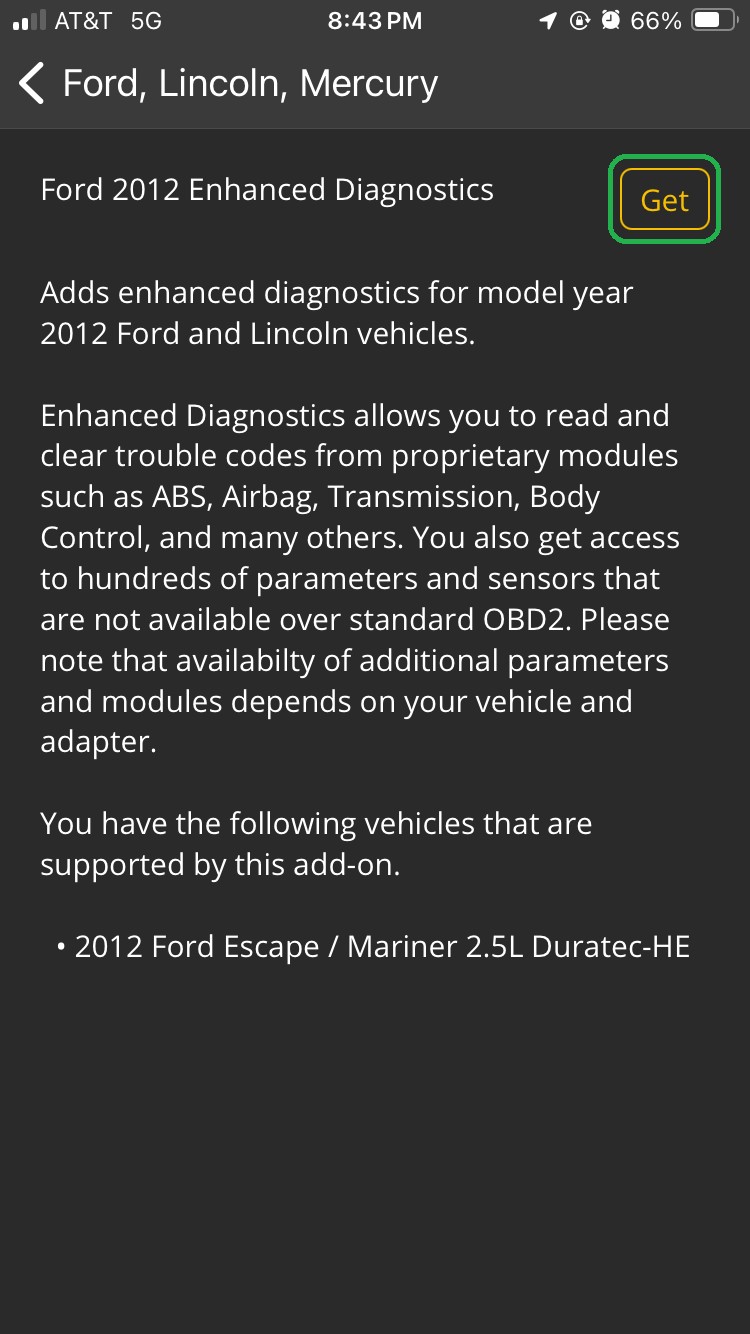
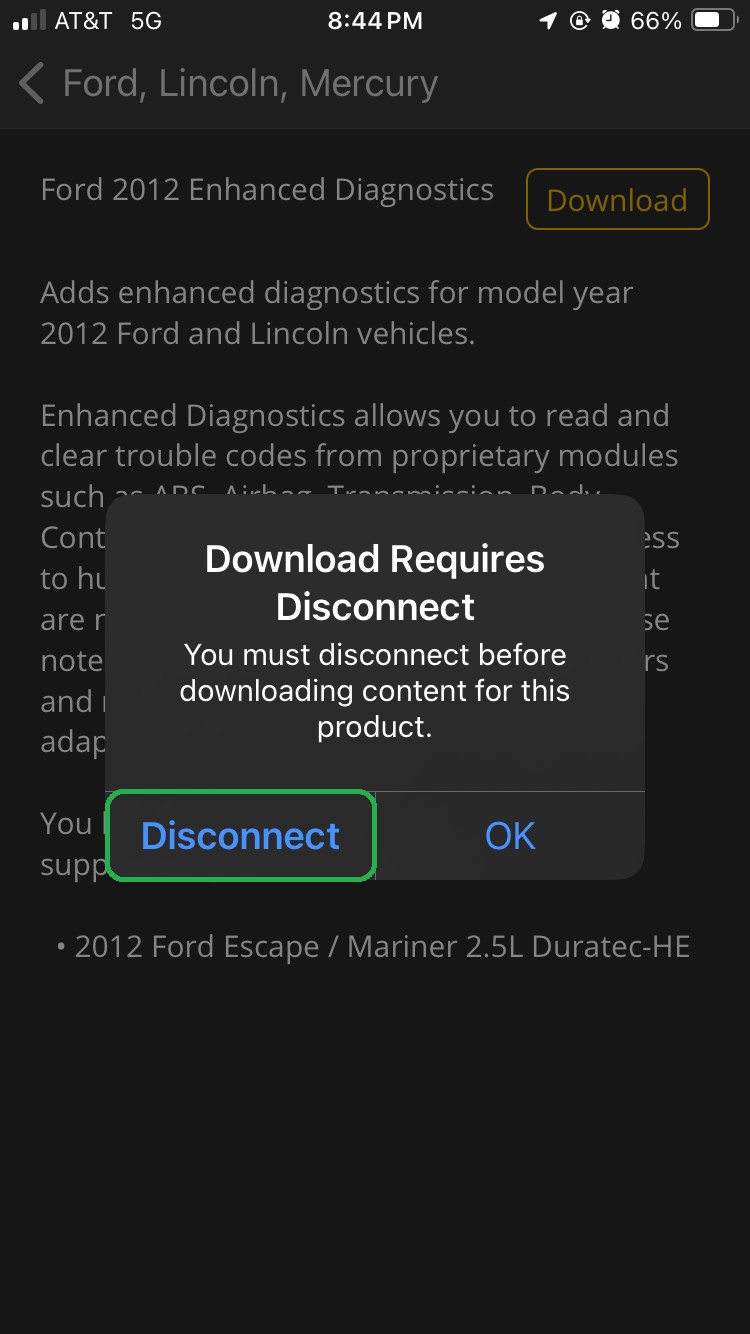
Finally, tap Get to start downloading the diagnostics for your chosen vehicle. The download process may take a minute or two to complete.
iOS iOS download initiation screen (Android similar), with the ‘Get’ button to begin downloading enhanced diagnostics. If your adapter is already Connected to the OBDLink app, you might see a “Download Requires Disconnect” notification. Tap Disconnect. The app will temporarily disconnect from the adapter to complete the download and then automatically reconnect. iOS — iOS notification (Android similar) indicating a temporary disconnect is needed for download, with ‘Disconnect’ button highlighted. -
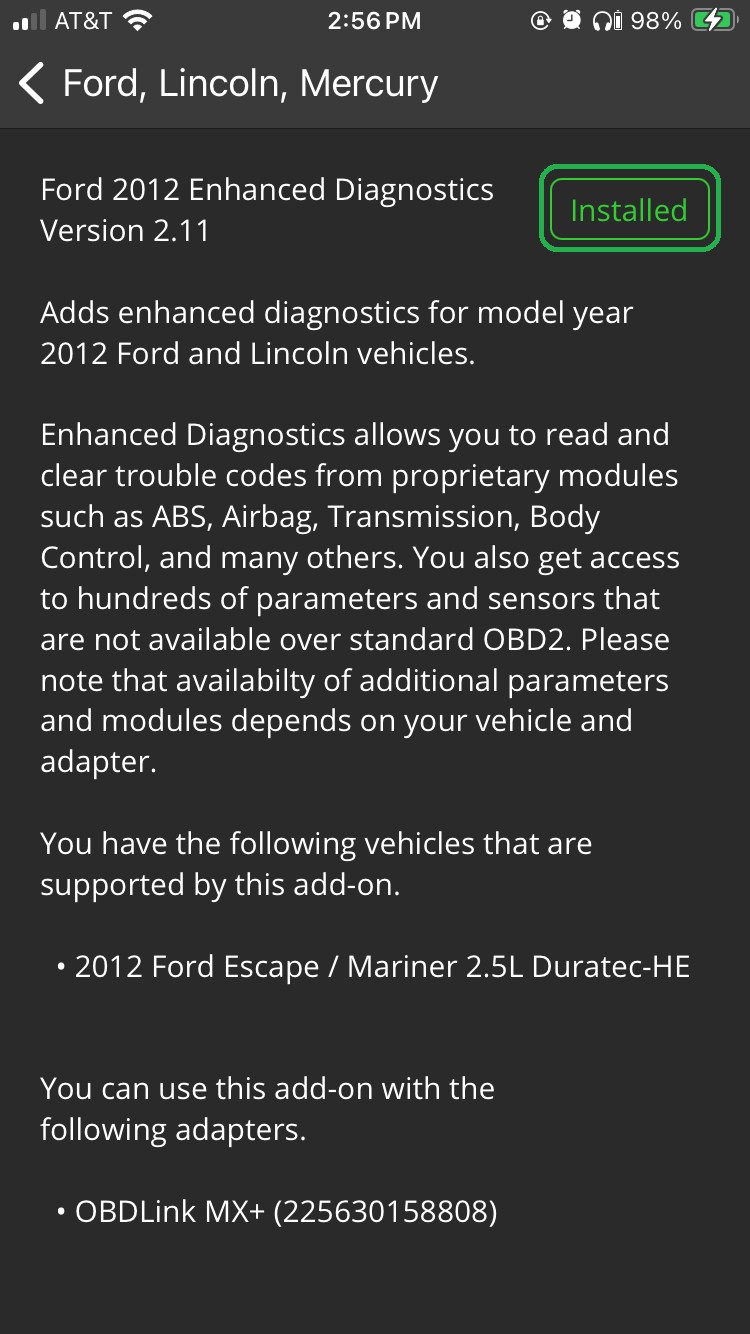
Once the download finishes, you’ll see confirmation that the diagnostics are installed and ready to use.
iOS iOS confirmation screen (Android similar) indicating successful installation of enhanced diagnostics, with ‘Installed’ highlighted. Tap the back arrow (**) twice to return to the app’s home screen.
Proceed to the next section to select your vehicle’s network for diagnostics.
Selecting Your Vehicle’s Diagnostic Network on Android
Note: If your vehicle is from GM, Honda/Acura, or Hyundai/Kia, you can skip this section and go directly to View diagnostics. Network selection is automatically managed for these manufacturers.
-
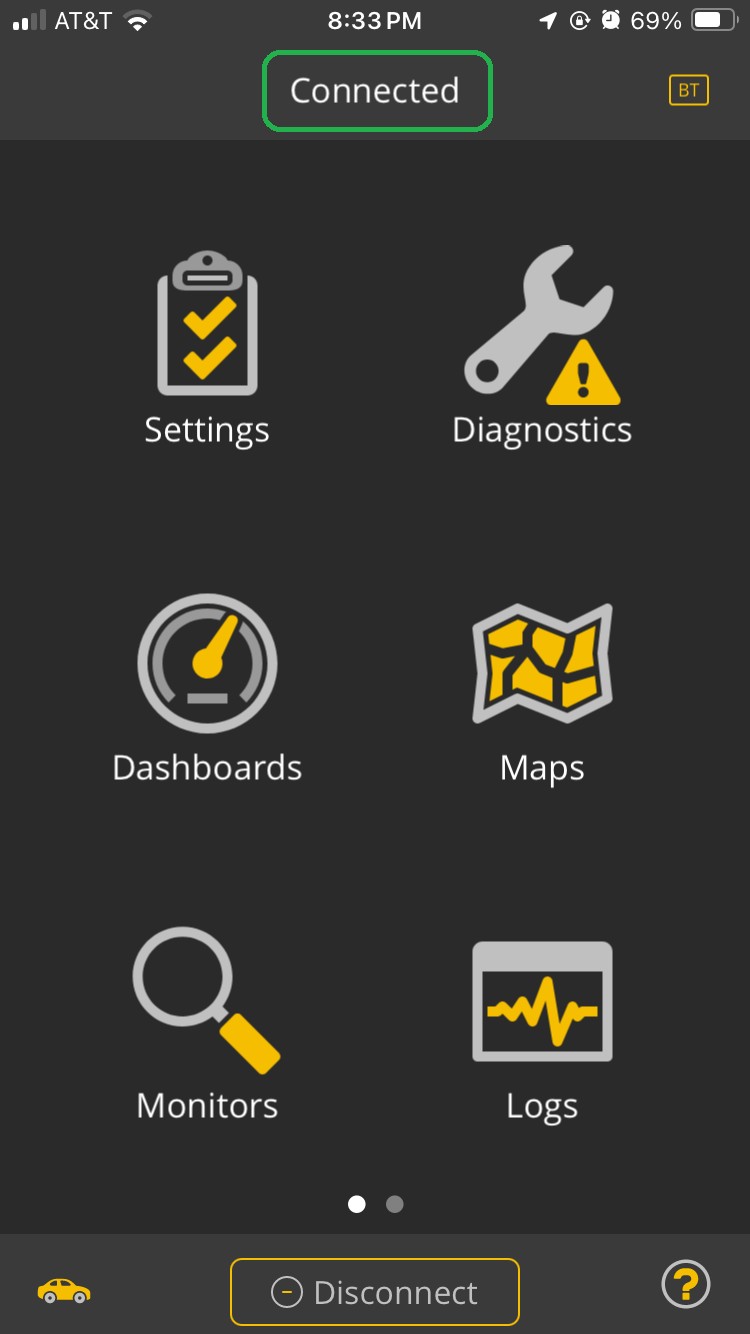
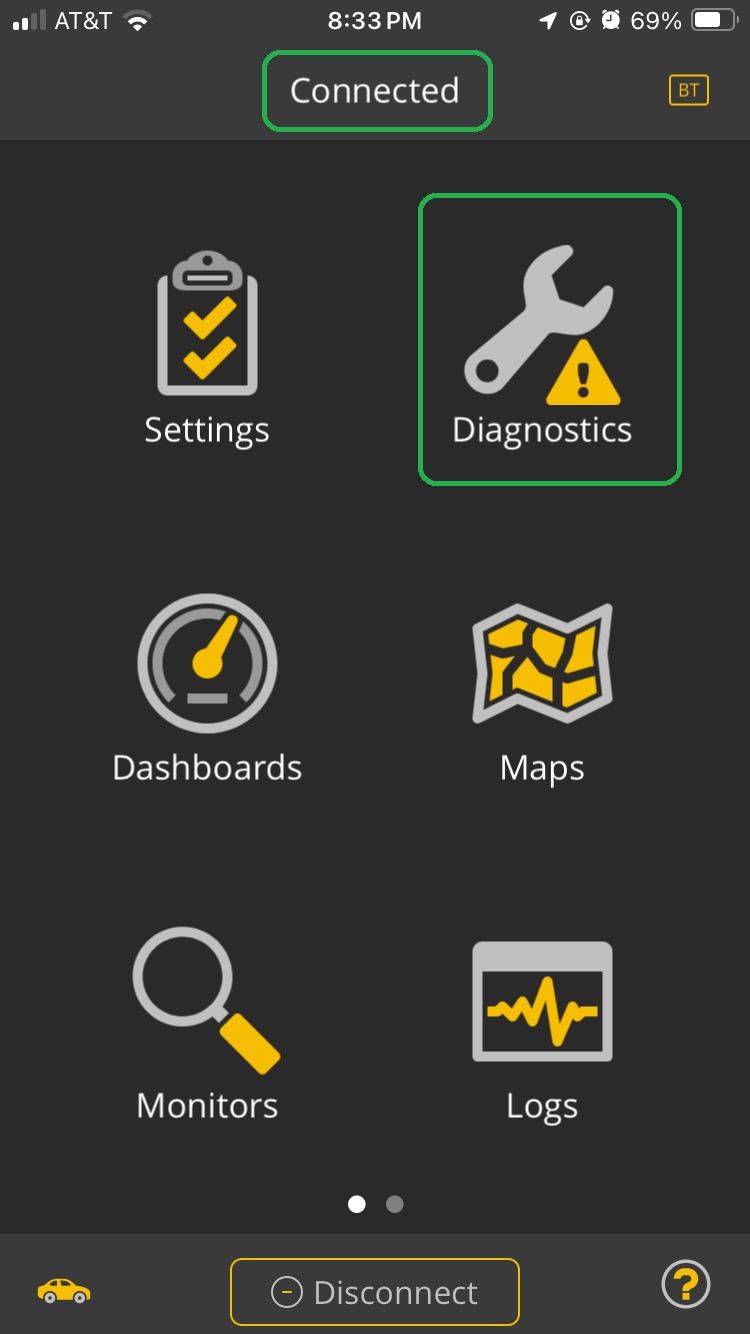
Ensure your Android phone or tablet is Connected to the OBDLink adapter. The connection status is displayed on the home screen of the app.
iOS iOS home screen (Android similar) with ‘Connected’ status indicator highlighted, confirming OBDLink adapter connection. -
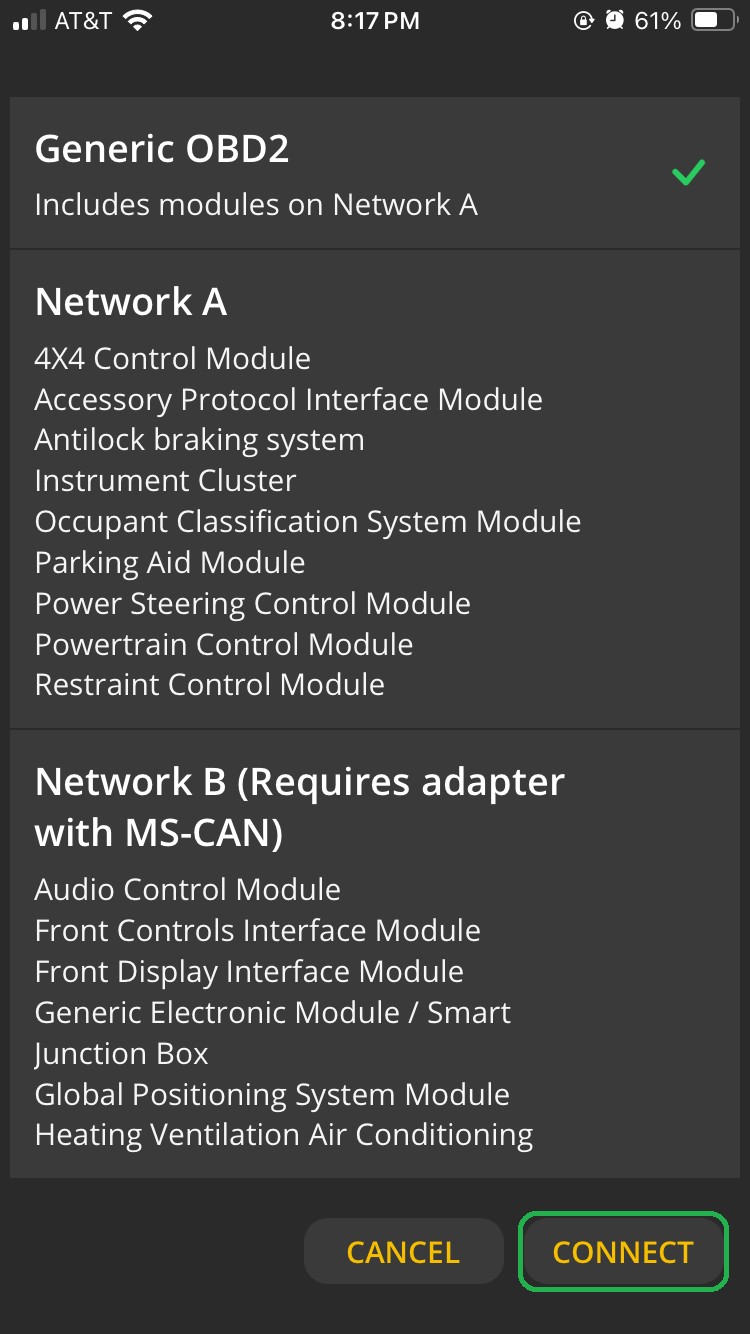
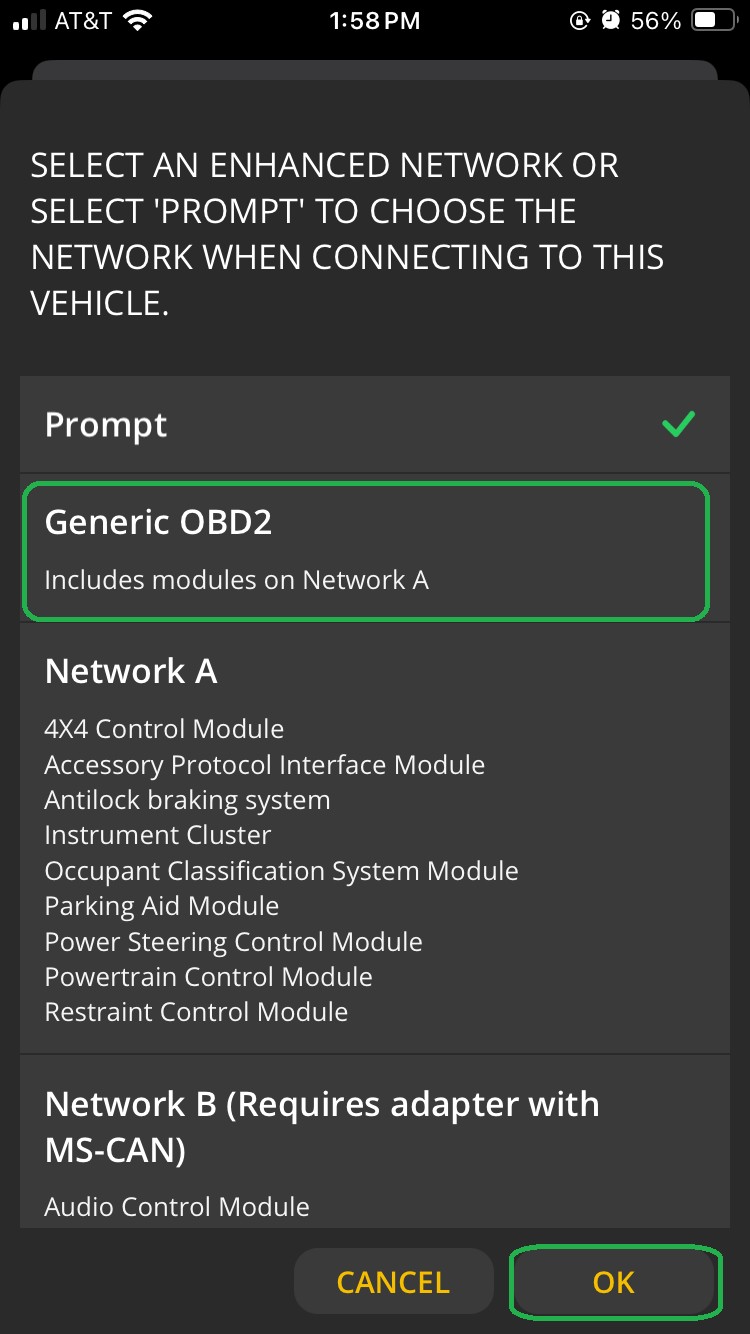
A dialog box will appear, prompting you to select a vehicle diagnostic network. Choose the network that is likely to contain the modules you intend to diagnose. For general, everyday use, Generic OBD2 is a recommended starting point. Scroll down the list and tap CONNECT.
iOS iOS Enhanced Network selection screen (Android similar), with ‘Generic OBD2’ chosen and ‘Connect’ button highlighted. -
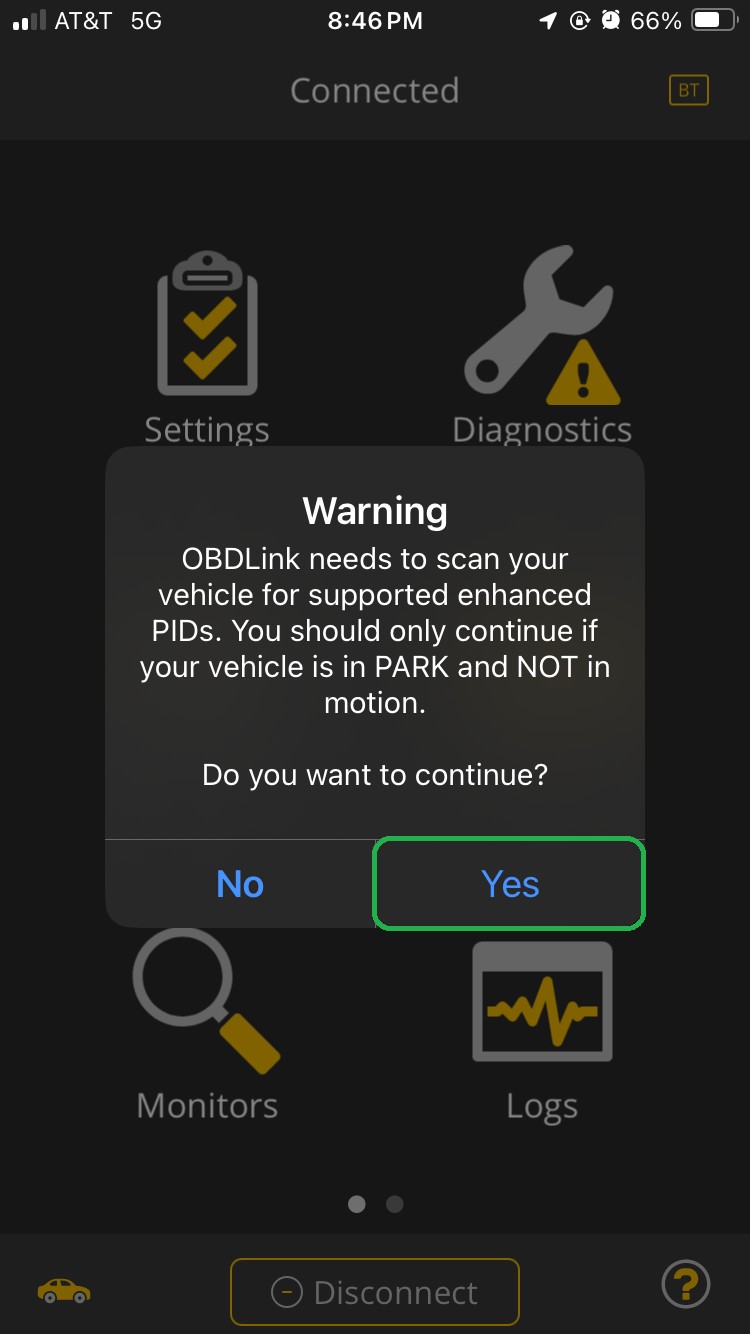
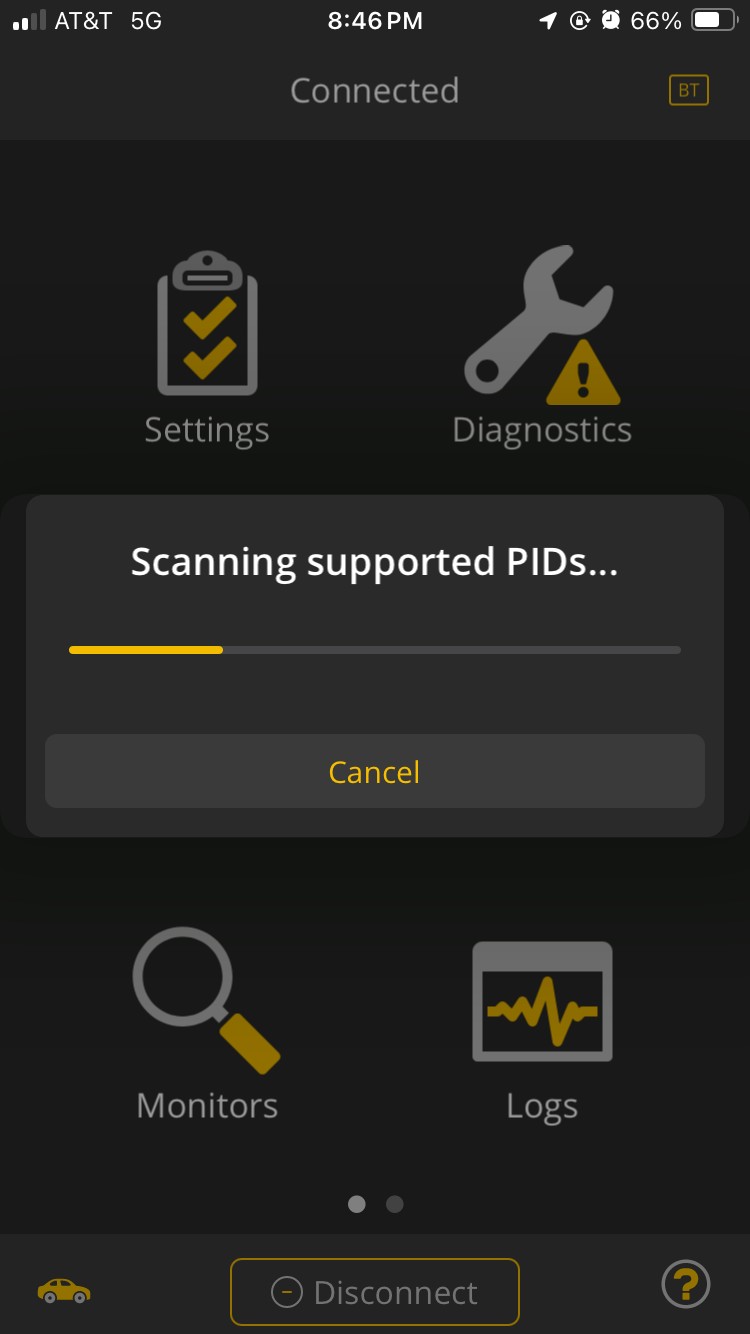
If OEM Live Parameters are supported for your vehicle (refer to the OEM-Specific Enhanced Diagnostics Support Coverage PDF for details), the OBDLink app will initiate a scan for supported enhanced Parameter IDs (PIDs) upon the first connection to an enhanced network. This scan may take 1-2 minutes. The results are saved, so subsequent connections will be faster. Tap Yes to allow the PID scan to begin. You might not always see the “Scanning” message as the process can be quite rapid.
iOS iOS PID scanning warning prompt (Android similar), with ‘Yes’ button to confirm and start the scan. iOS “Scanning” message (Android similar) indicating the app is actively scanning for enhanced PIDs.
Once the scan is complete, proceed to the next section to start viewing diagnostic data and trouble codes.
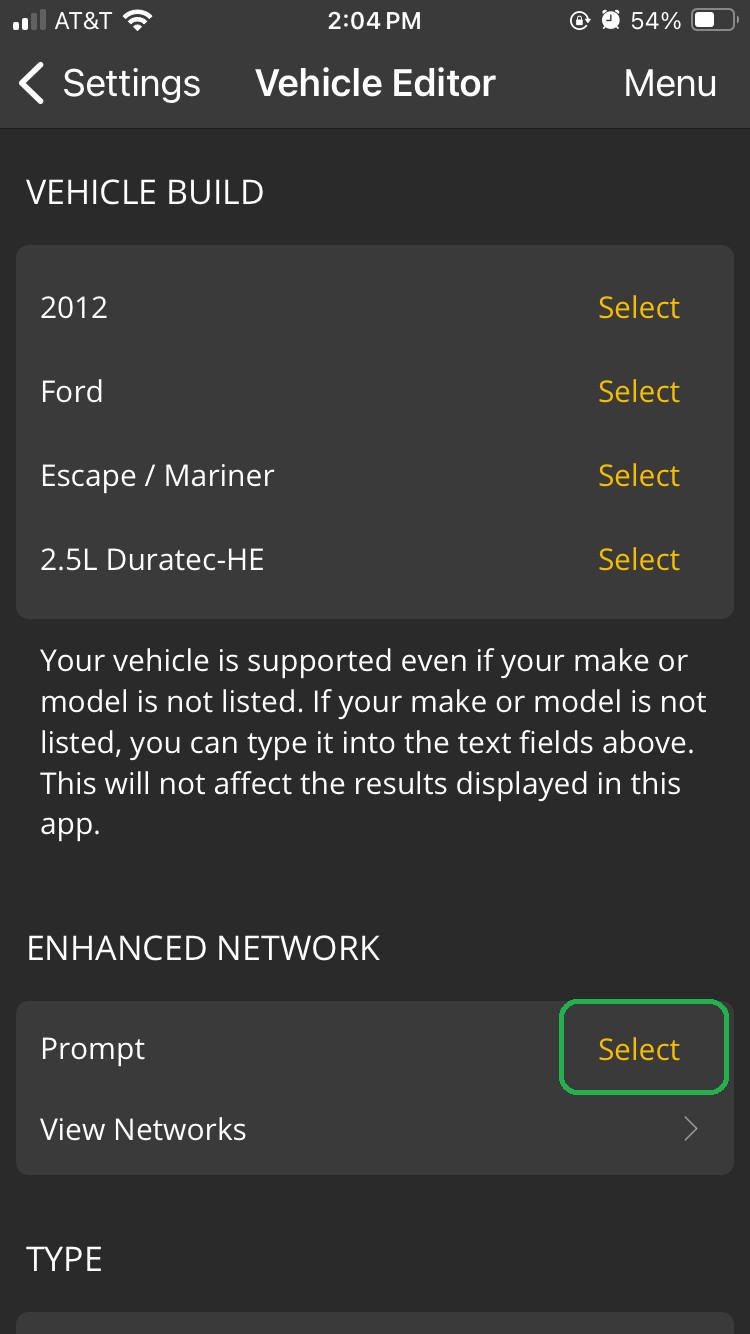
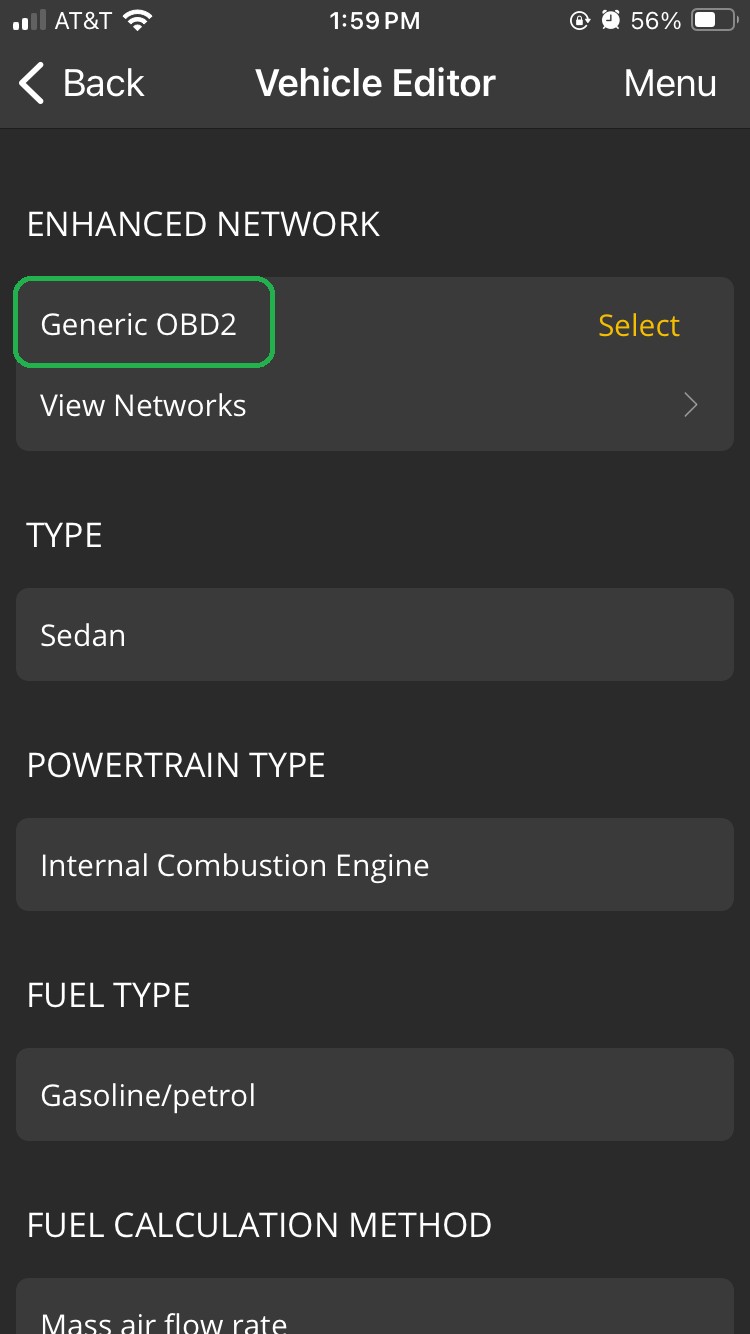
Tip: To switch to a different diagnostic network later, go to Settings > Vehicle Editor > Enhanced Network > and tap Select.
| iOS |
|---|
| iOS Vehicle Editor screen (Android similar) showing ‘Enhanced Network’ settings, with ‘Prompt Select’ highlighted for network selection options. |
Prompt is the default setting, allowing you to choose a network each time you connect. While Generic OBD2 provides access to many PIDs, some specialized data is only available through specific networks.
For example, on a Toyota vehicle, accessing Tire Pressure Monitor PIDs requires selecting the dedicated “Tire Pressure Monitor” network. Choosing “Generic OBD2” or “Network A” would not provide access to this specific data.
To change the default network selection behavior, tap on your preferred network and then tap OK.
In this example, we selected Generic OBD2 and tapped OK. The subsequent screenshot shows the default option now set to Generic OBD2.
| iOS |
|---|
| iOS Enhanced Network selection screen (Android similar) highlighting ‘Generic OBD2’ and ‘OK’ button for selection confirmation. |
| iOS Enhanced Network settings screen (Android similar) showing ‘Generic OBD2’ now set as the default network option. |
Interpreting Diagnostic Data on Your Android Device
-
Ensure your Android device is Connected to the OBDLink adapter. On the main screen of the OBDLink app, tap Diagnostics to access the diagnostic functions.
iOS iOS home screen (Android similar) with ‘Connected’ status and ‘Diagnostics’ button highlighted to access vehicle diagnostic data. -
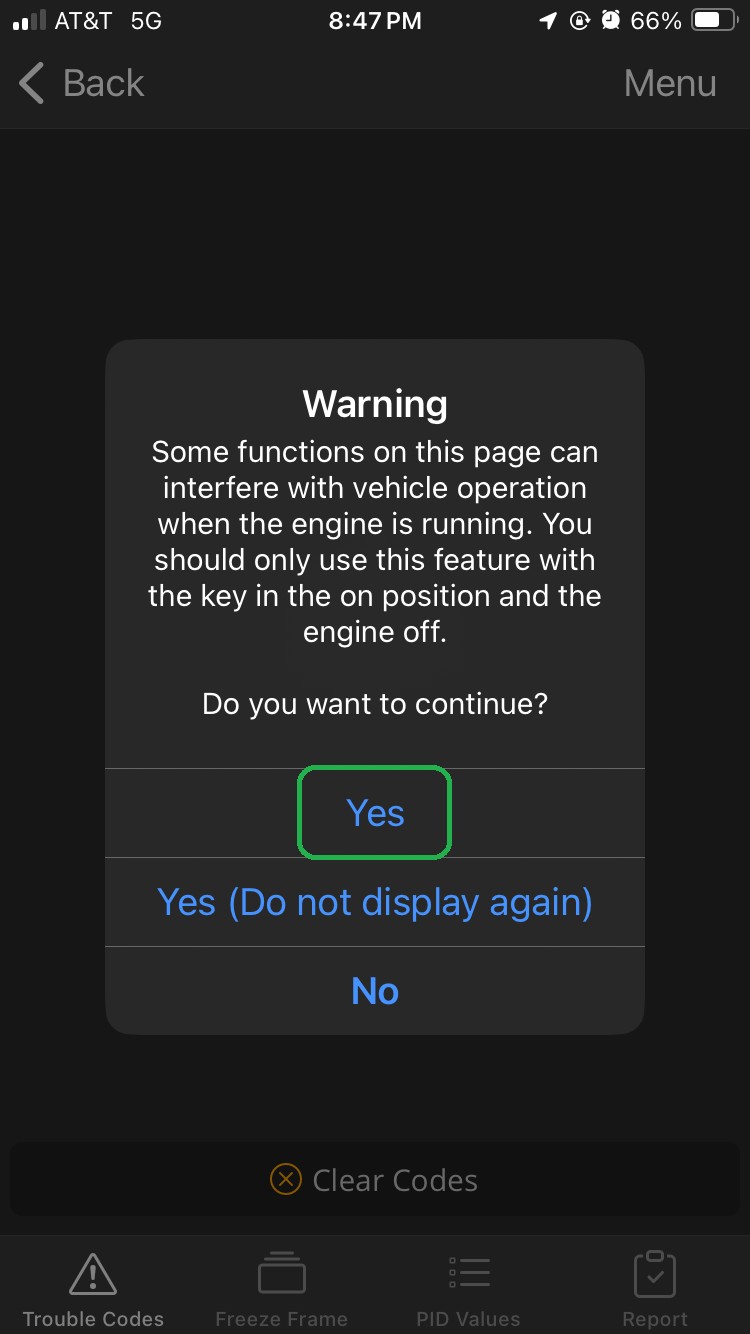
A warning message may appear, advising against running the engine during certain diagnostic tests. Tap Yes to acknowledge and proceed. It’s generally recommended to perform code clearing and some diagnostic procedures with the ignition ON but the engine OFF for safety and accuracy.
iOS iOS warning message (Android similar) about engine state during diagnostics, with ‘Yes’ button to continue.
Understanding Trouble Codes
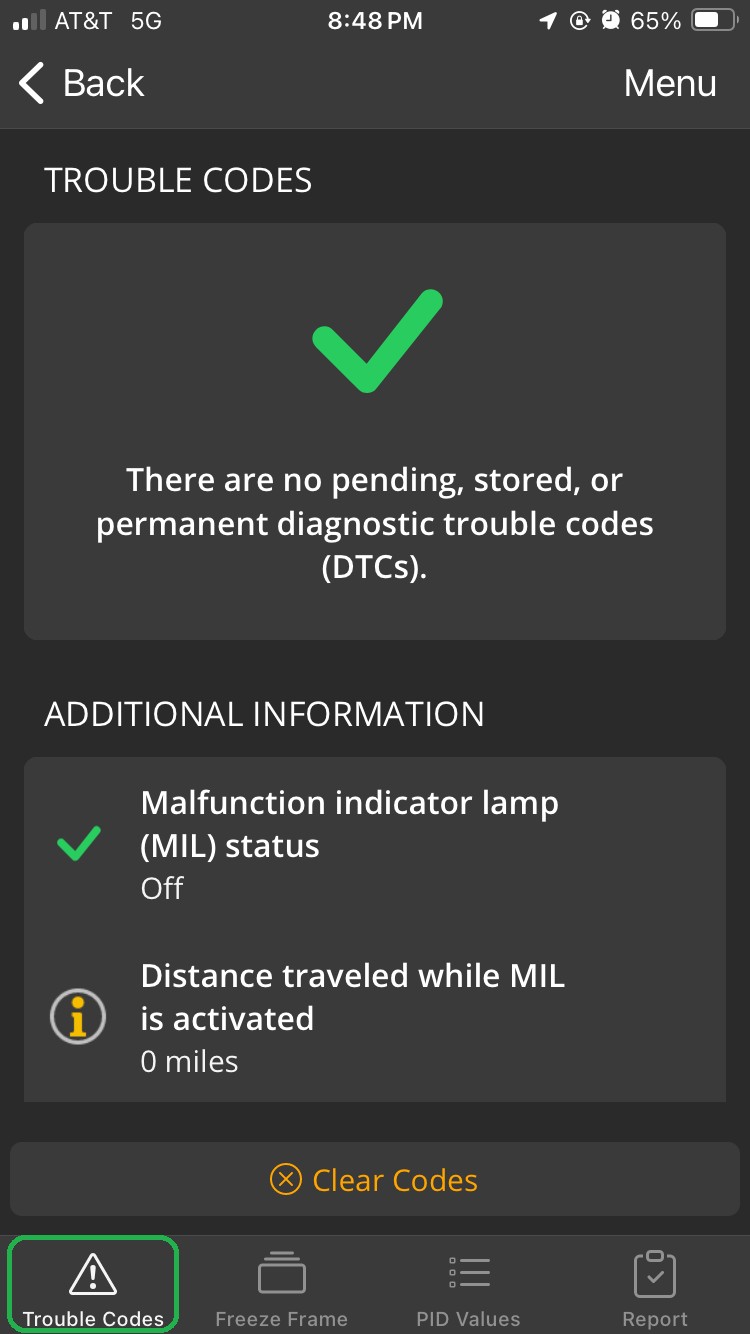
The OBDLink Diagnostics interface opens directly to the Trouble Codes tab.
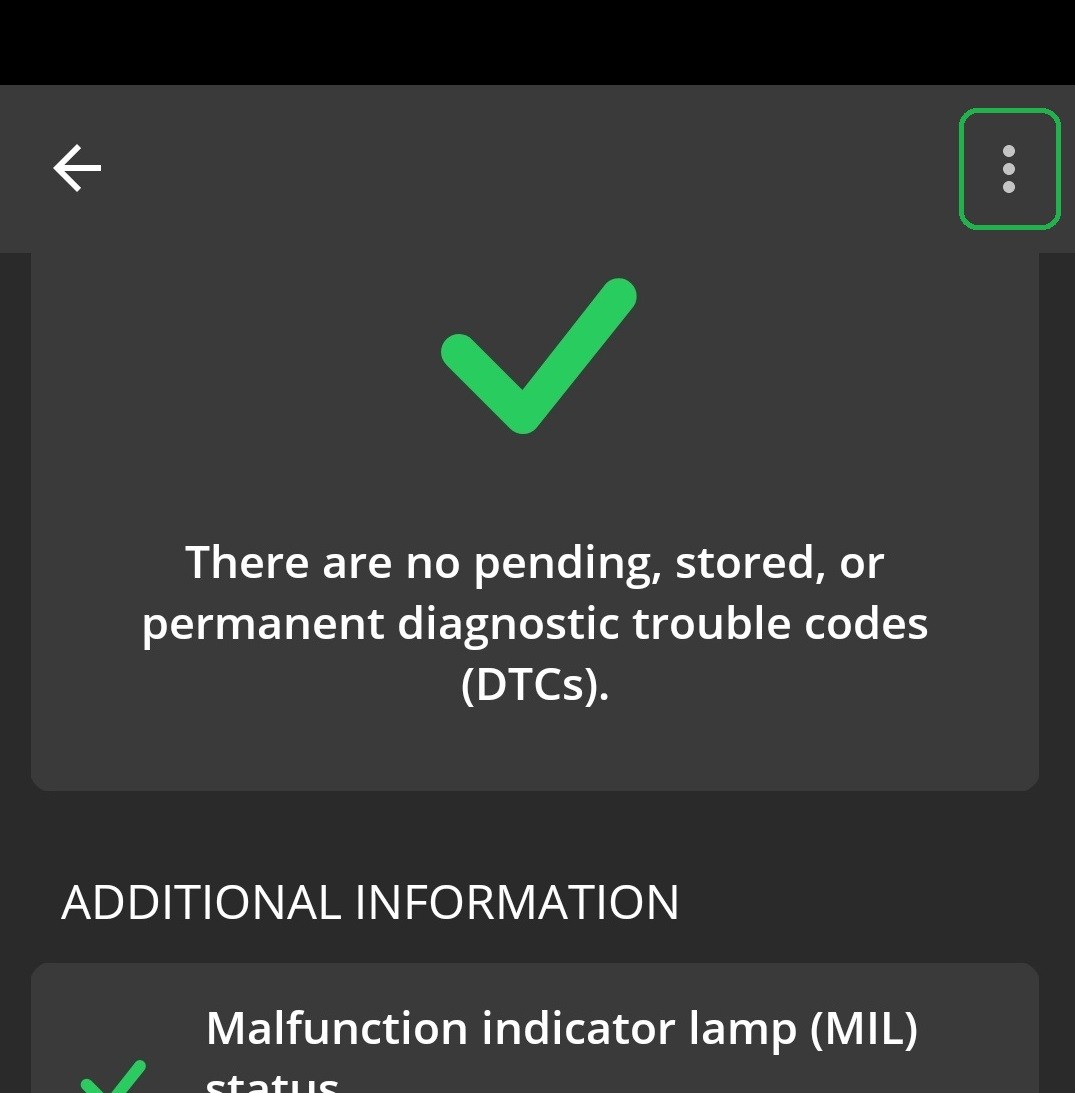
If no Diagnostic Trouble Codes (DTCs) are present, you will see a screen indicating a clean bill of health for your vehicle. You might need to scroll down to view the complete system status.
| iOS |
|---|
| iOS Trouble Codes tab (Android similar) showing a green checkmark, indicating no current diagnostic trouble codes detected. |
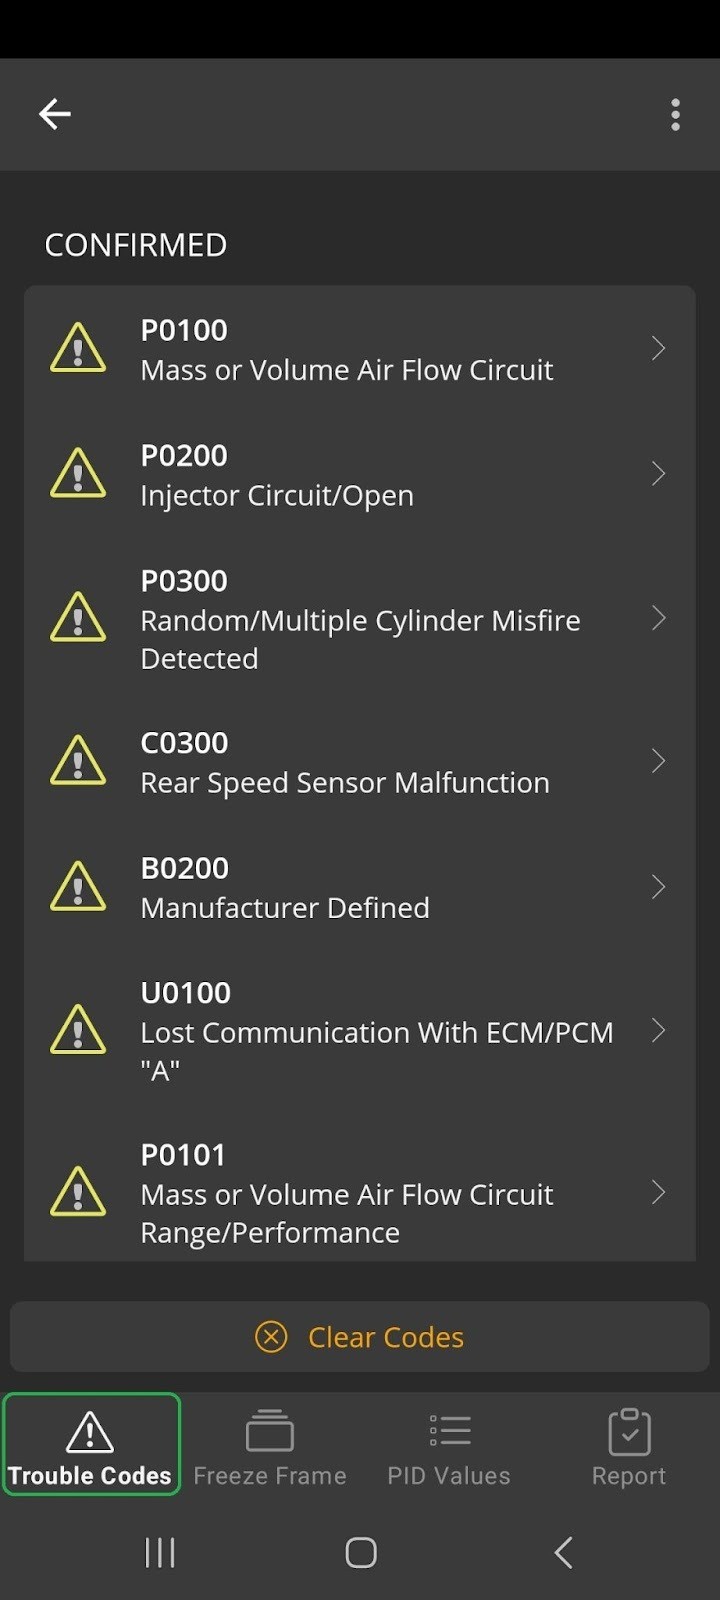
If DTCs are detected, the screen will display them, similar to the example below. You’ll also find a Clear Codes button to reset the codes after addressing the underlying issues.
| Android |
|---|
| Android Trouble Codes tab displaying detected diagnostic trouble codes and the ‘Clear Codes’ button. |
Warning: Only clear trouble codes with the ignition ON and the engine OFF. Never attempt to clear codes while the engine is running.
Tapping on a specific trouble code reveals more detailed information about it. The screenshot below illustrates the basic information displayed for the P0100 DTC (Mass Air Flow Circuit Malfunction).
| Android |
|---|
| Android screen displaying detailed information for DTC P0100, Mass Air Flow Circuit Malfunction. |
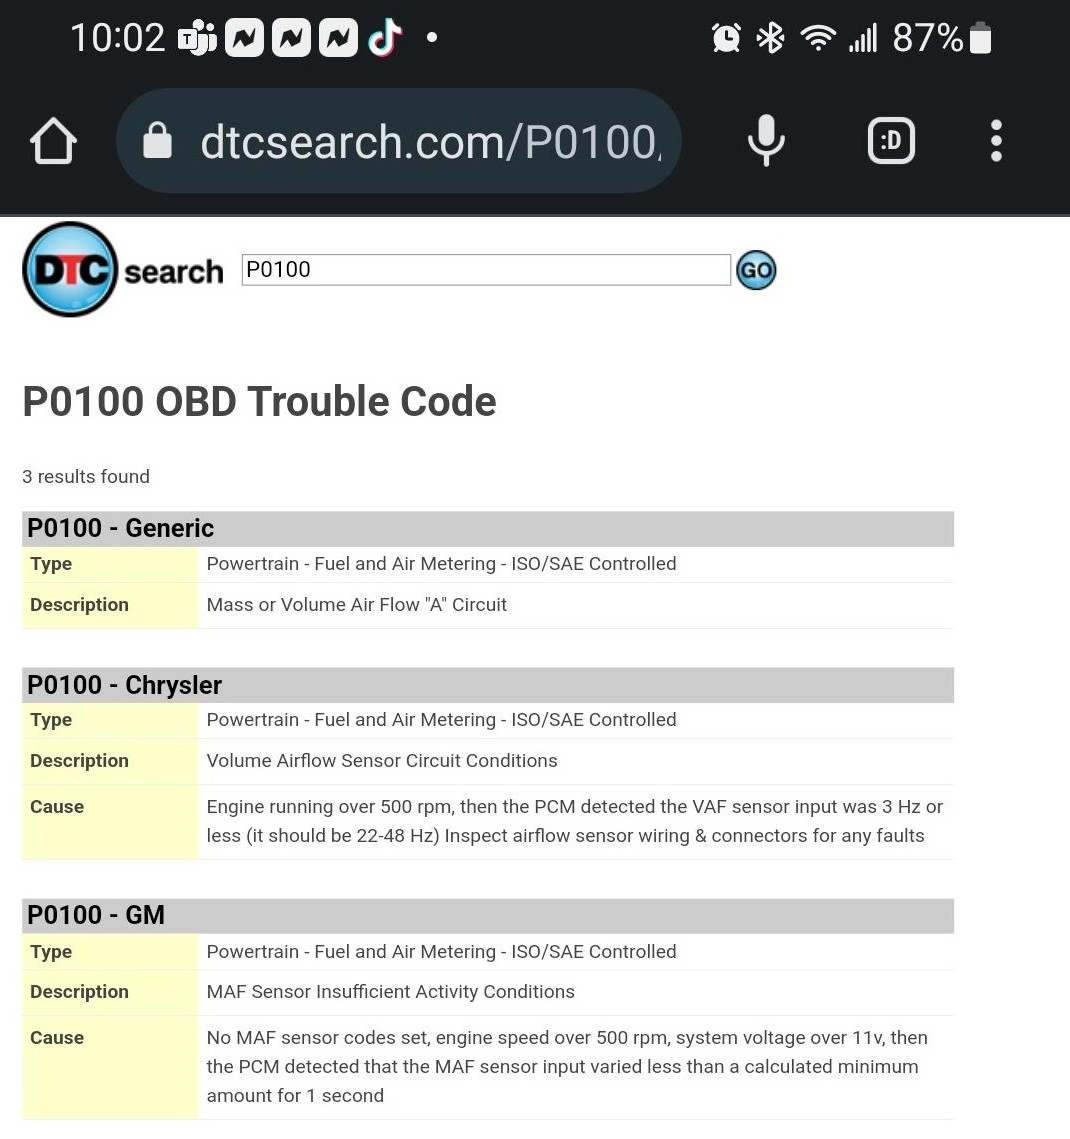
For even deeper insight, tap Online Lookup to access a wealth of information about the DTC definition directly from the internet. This provides comprehensive details to aid in troubleshooting.
| Android |
|---|
| Browser display of an online lookup result for OBD DTC P0100, providing extensive troubleshooting information. |
For help within the app, tap the Menu button (three vertical dots in the top right corner on Android) and select Help. This will provide guidance on reading trouble codes, including definitions of status indicators.
| Android | iOS |
|---|---|
| Android Trouble Codes tab with the Menu button (three vertical dots) highlighted to access in-app help. |
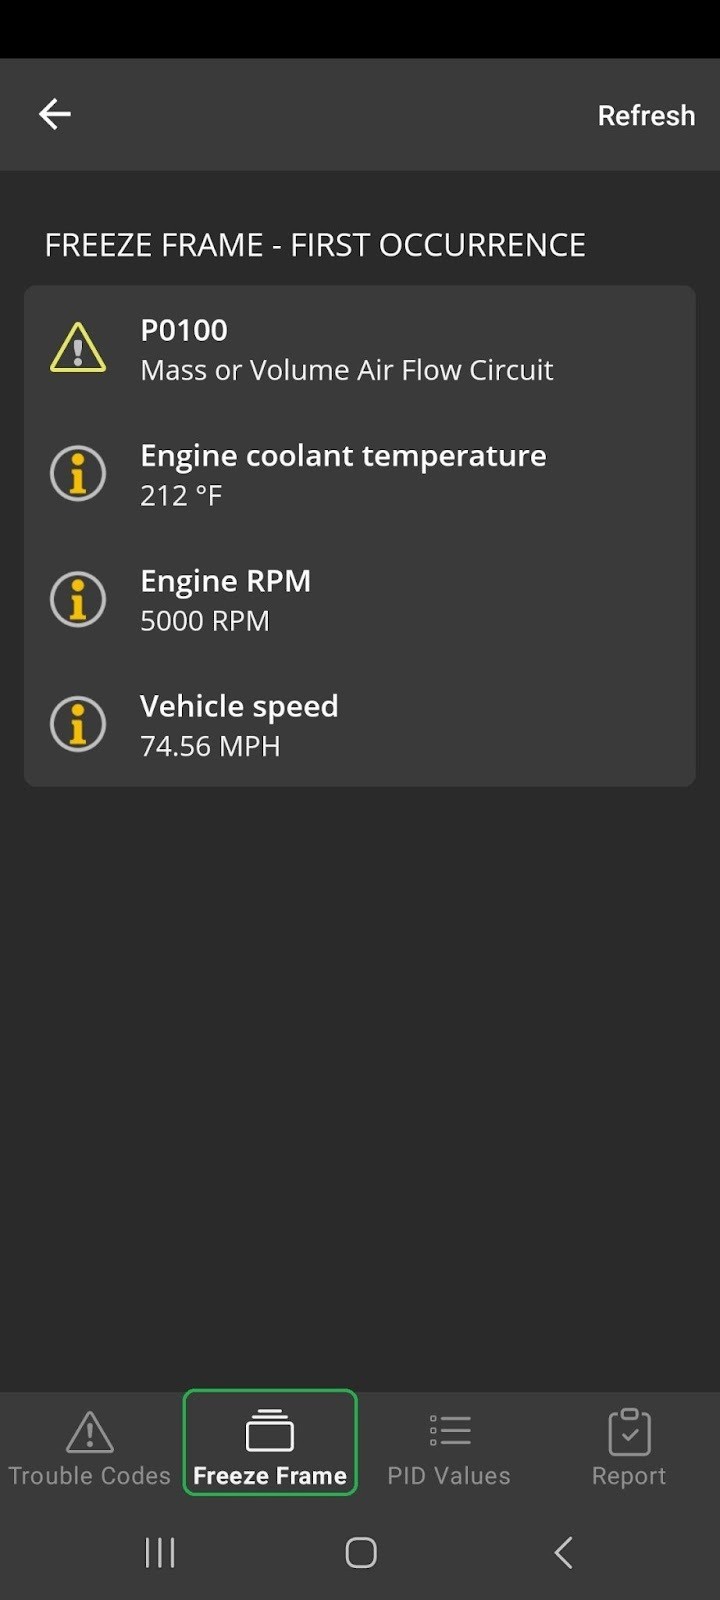
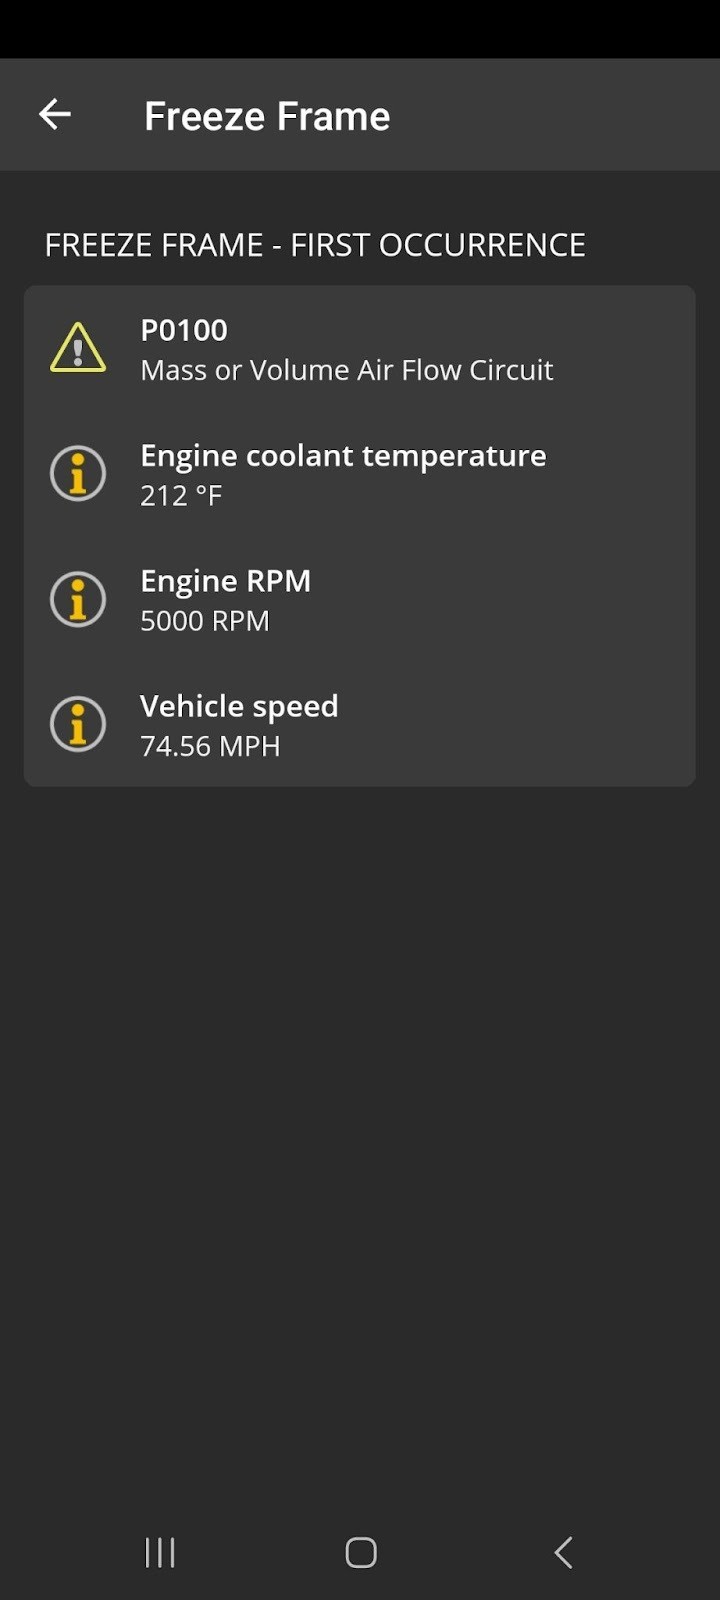
Analyzing Freeze Frame Data
When a DTC is triggered, the vehicle’s ECU (Engine Control Unit) captures a snapshot of various PID values at that precise moment. This “freeze frame” data can be invaluable in understanding the conditions that led to the fault.
Freeze frame data is automatically cleared when you clear the trouble codes.
While not directly visible on the Trouble Codes tab after disconnecting, freeze frame data is stored and accessible within the Report tab for later review.
The example below shows a freeze frame indicating high engine coolant temperature, engine RPM, and vehicle speed at the time the P0100 DTC was recorded. This contextual data helps narrow down potential causes of the issue.
| Android |
|---|
| Android Freeze Frame tab displaying vehicle parameters recorded at the moment a DTC was triggered, aiding in diagnostics. |
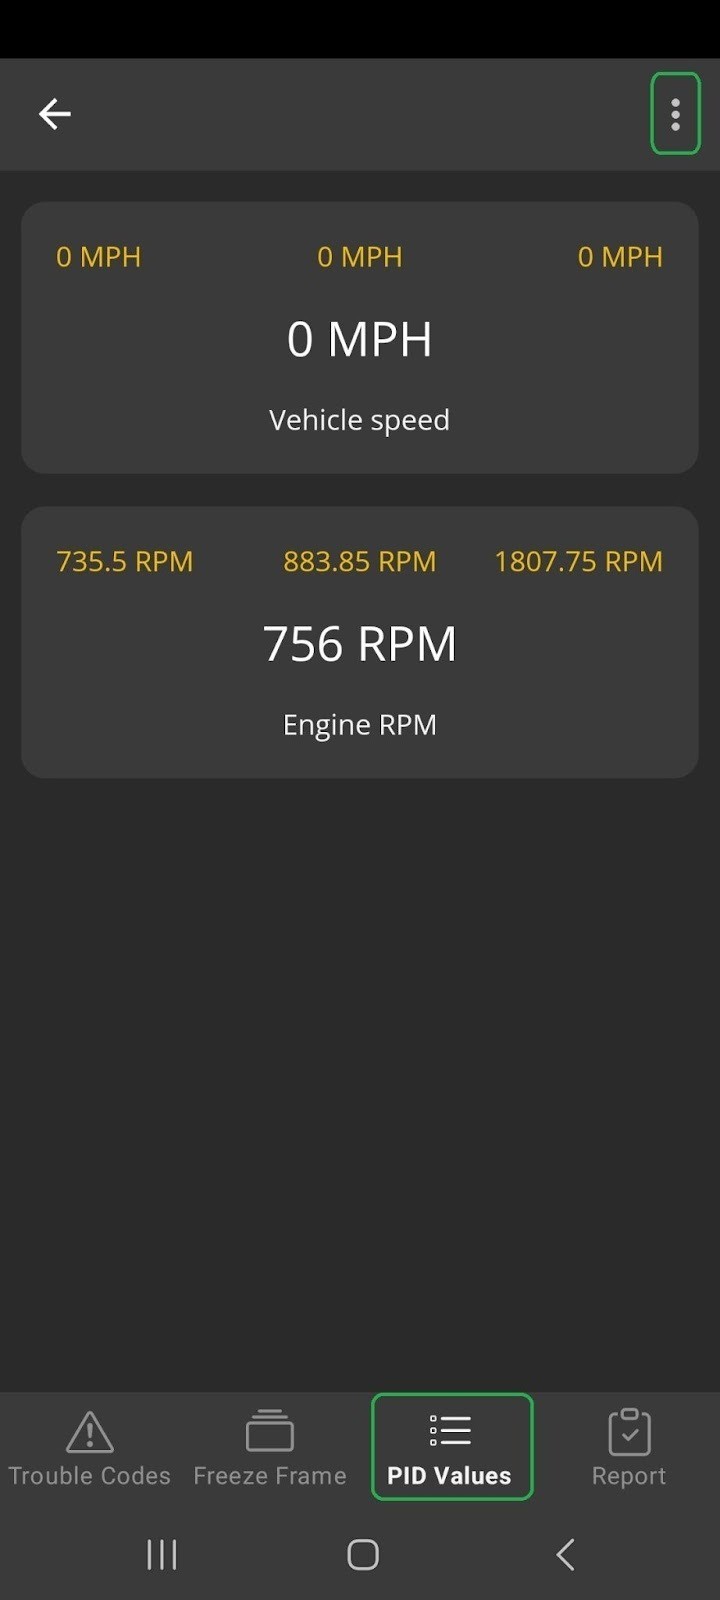
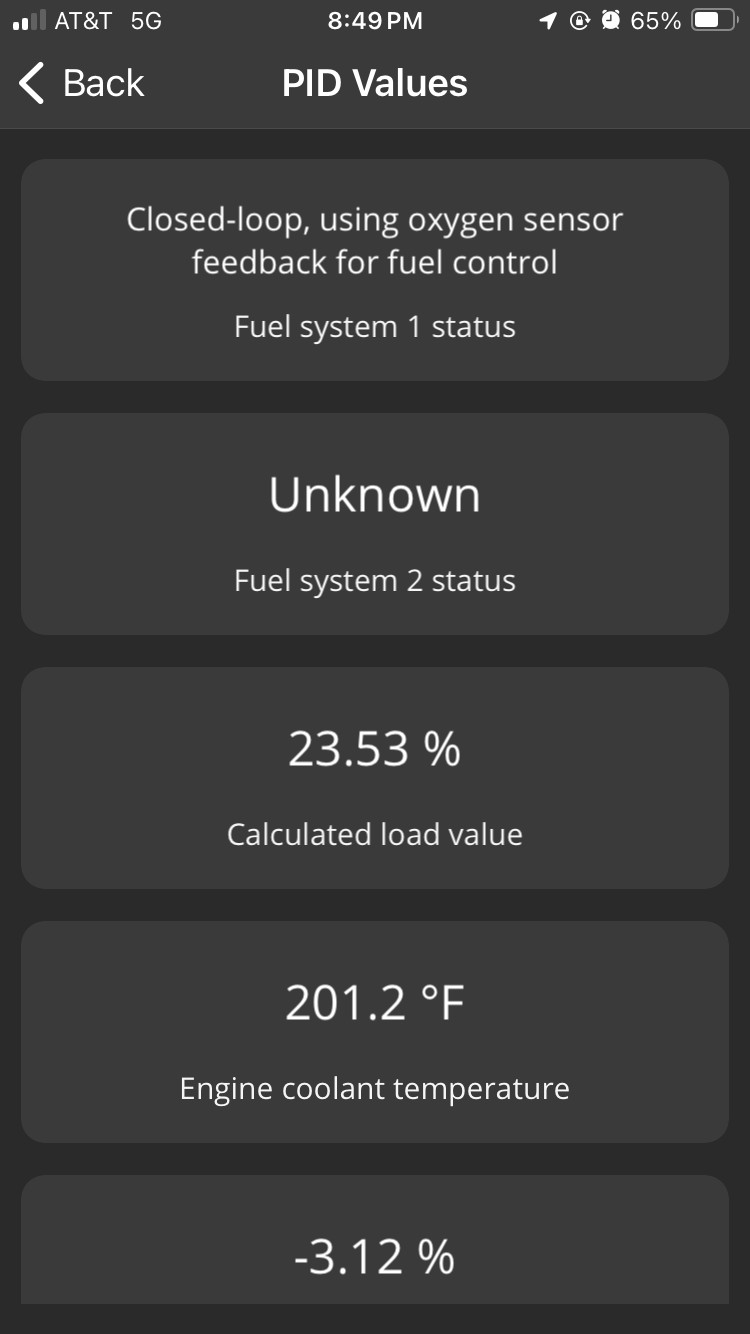
Monitoring Real-Time PID Values
The PID Values tab provides a live view of various vehicle parameters. By default, vehicle speed (MPH) and engine RPM are displayed.
The gold numbers shown in the example screenshots represent the recorded minimum, average, and maximum values for the displayed PIDs since monitoring began.
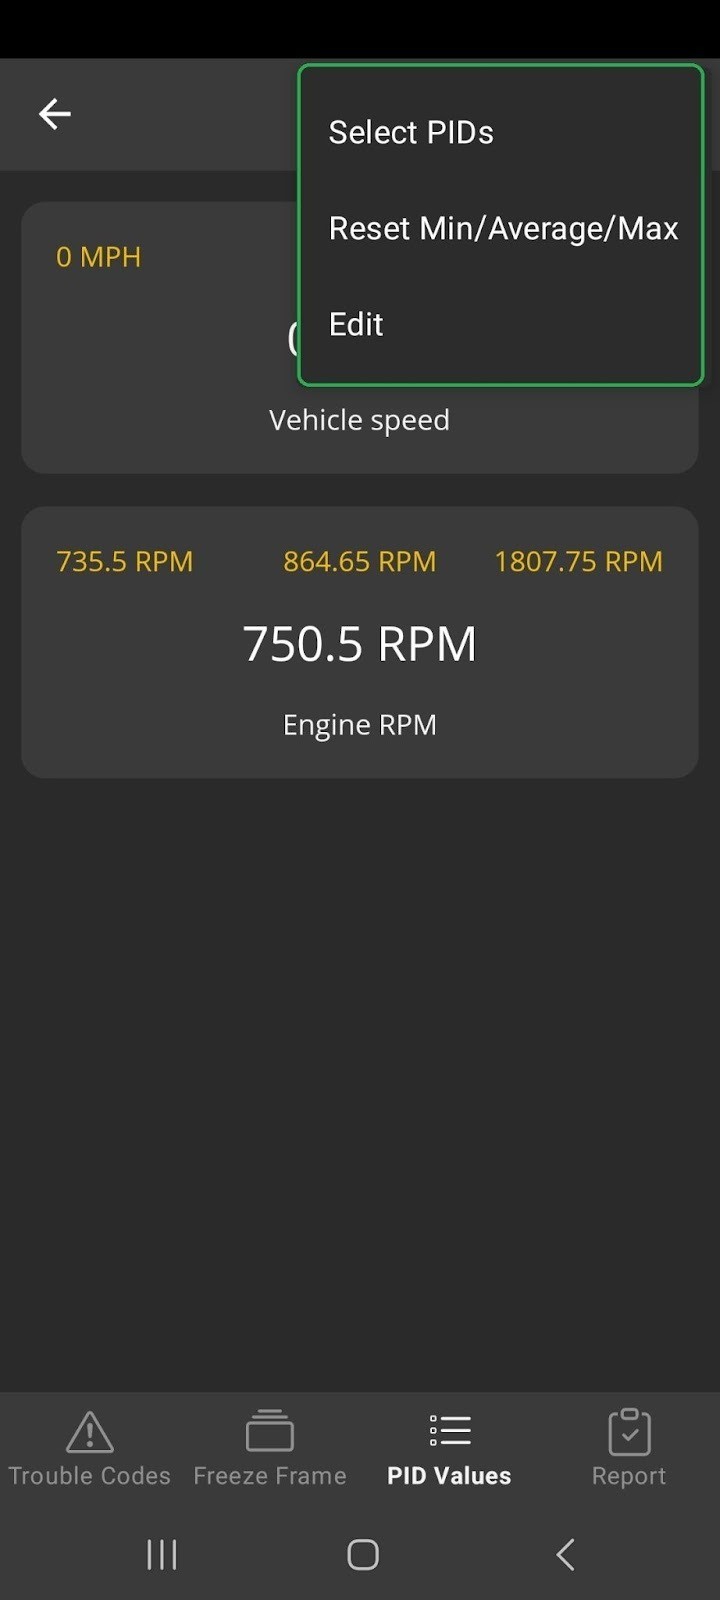
Tap the Menu button (three vertical dots) for options to customize this view:
- Select PIDs: Add or remove PIDs to monitor on this tab, tailoring the display to your specific diagnostic needs.
- Reset Min/Average/Max: Reset the recorded minimum, average, and maximum values for the currently displayed PIDs to zero.
- Edit: Remove PIDs from the current tab display.
| Android |
|---|
| Android PID Values tab showing real-time vehicle parameters, with the Menu button (three dots) highlighted for customization. |
| Android PID Values tab with the Menu options highlighted, including ‘Select PIDs’, ‘Reset Min/Average/Max’, and ‘Edit’. |
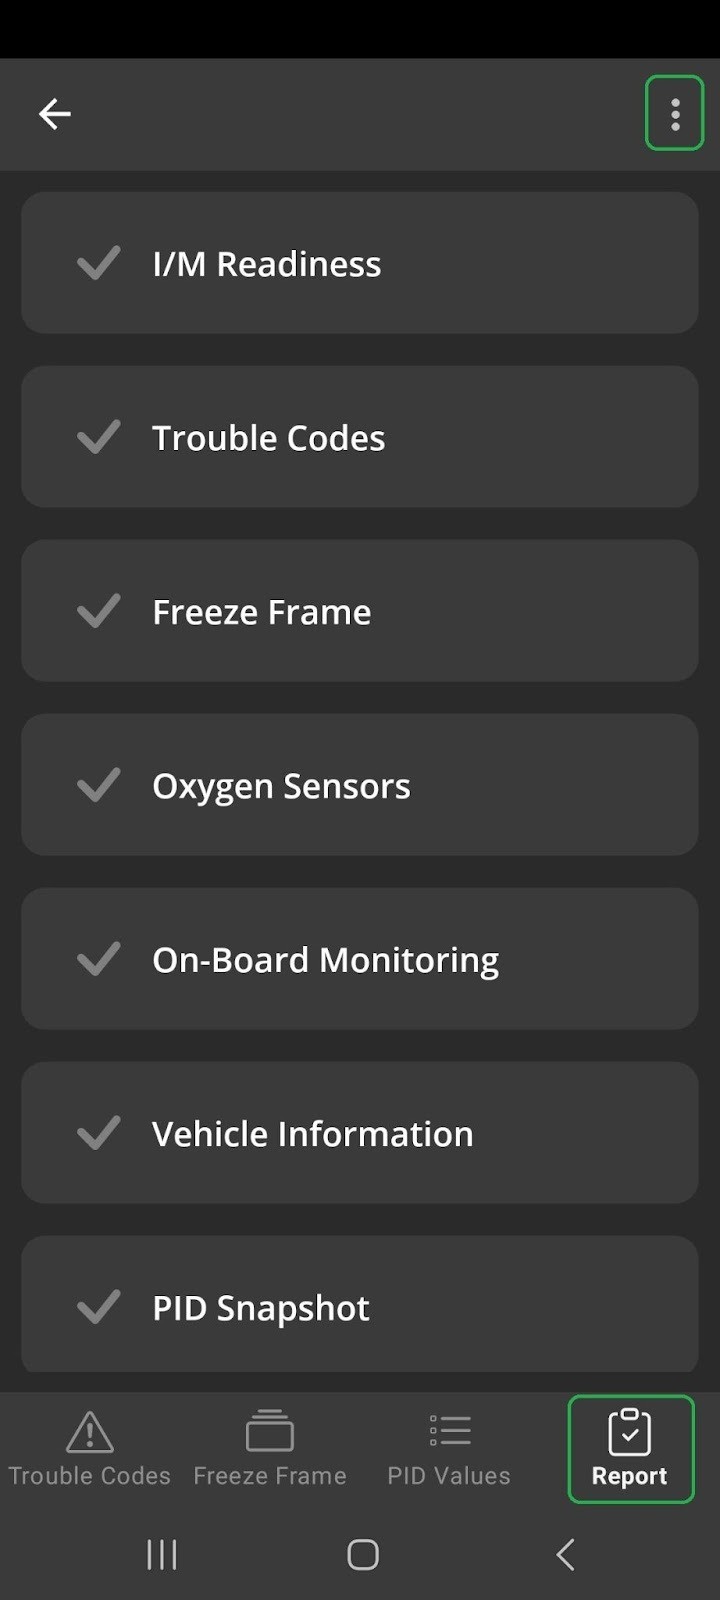
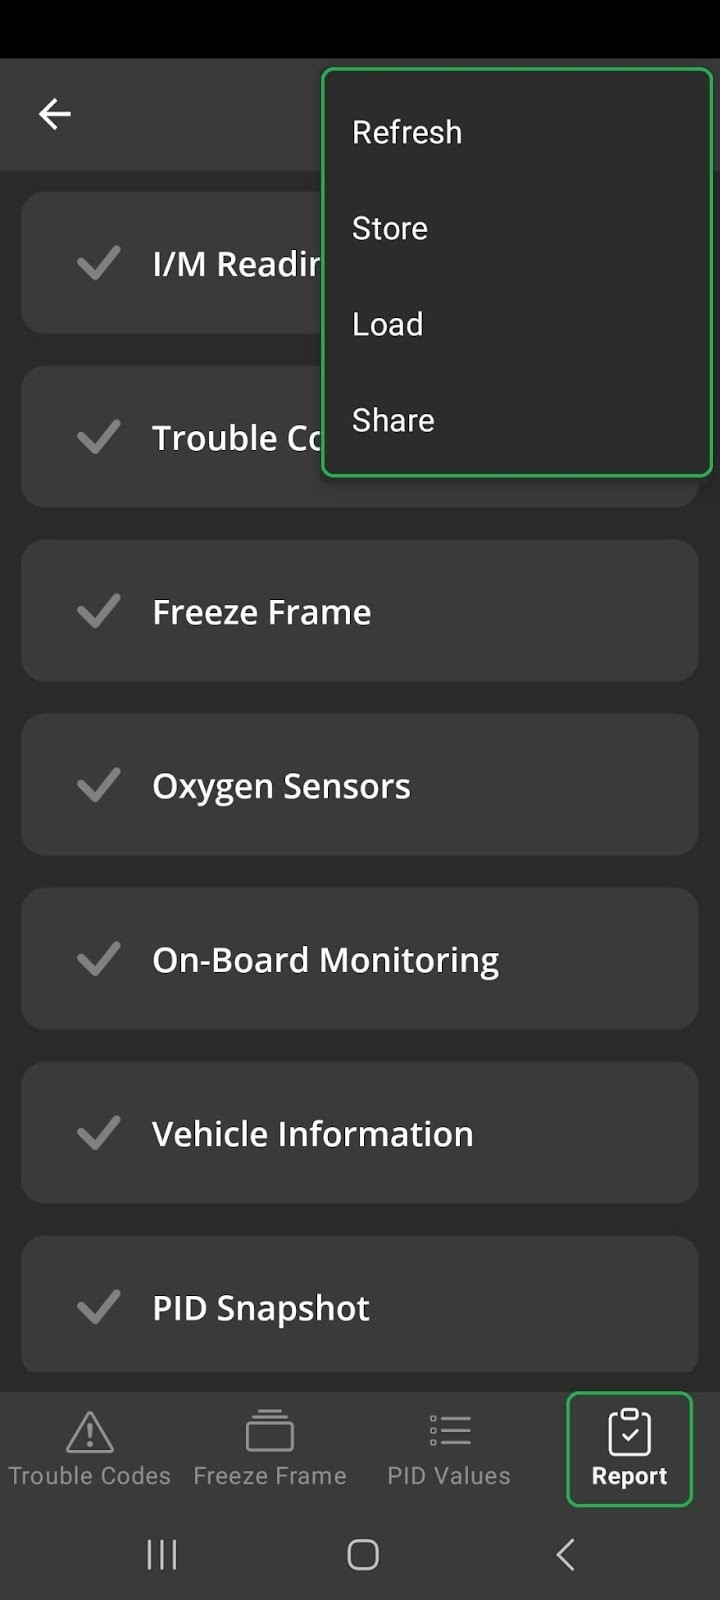
Generating and Utilizing Diagnostic Reports
The Report tab allows you to generate comprehensive diagnostic reports. Tap the Menu button (three vertical dots) for report management options:
- Refresh: Generate a new diagnostic report. This process may take 1-2 minutes to gather all data. You can also refresh by swiping down on the screen.
- Store: Save the current report to your device. You can name the report for easy retrieval later.
- Load: Access previously saved reports stored on your device. This allows you to review past diagnostic sessions.
- Share: Share the report in HTML format via email or other compatible applications for easy communication and record-keeping.
| Android |
|---|
| Android Reports tab showing the ‘Disc’ icon for saving and the Menu button (three dots) for report options. |
| Android Reports tab with the Menu options highlighted: ‘Refresh’, ‘Store’, ‘Load’, and ‘Share’. |
The loading report is shown on the left, and a completed report example is on the right. Scroll down within the completed report to explore various categories. Tap on a category to expand and view detailed information.
| Android |
|---|
| Android Reports tab displaying a completed diagnostic report, ready for review and analysis. |
Example Report Sections:
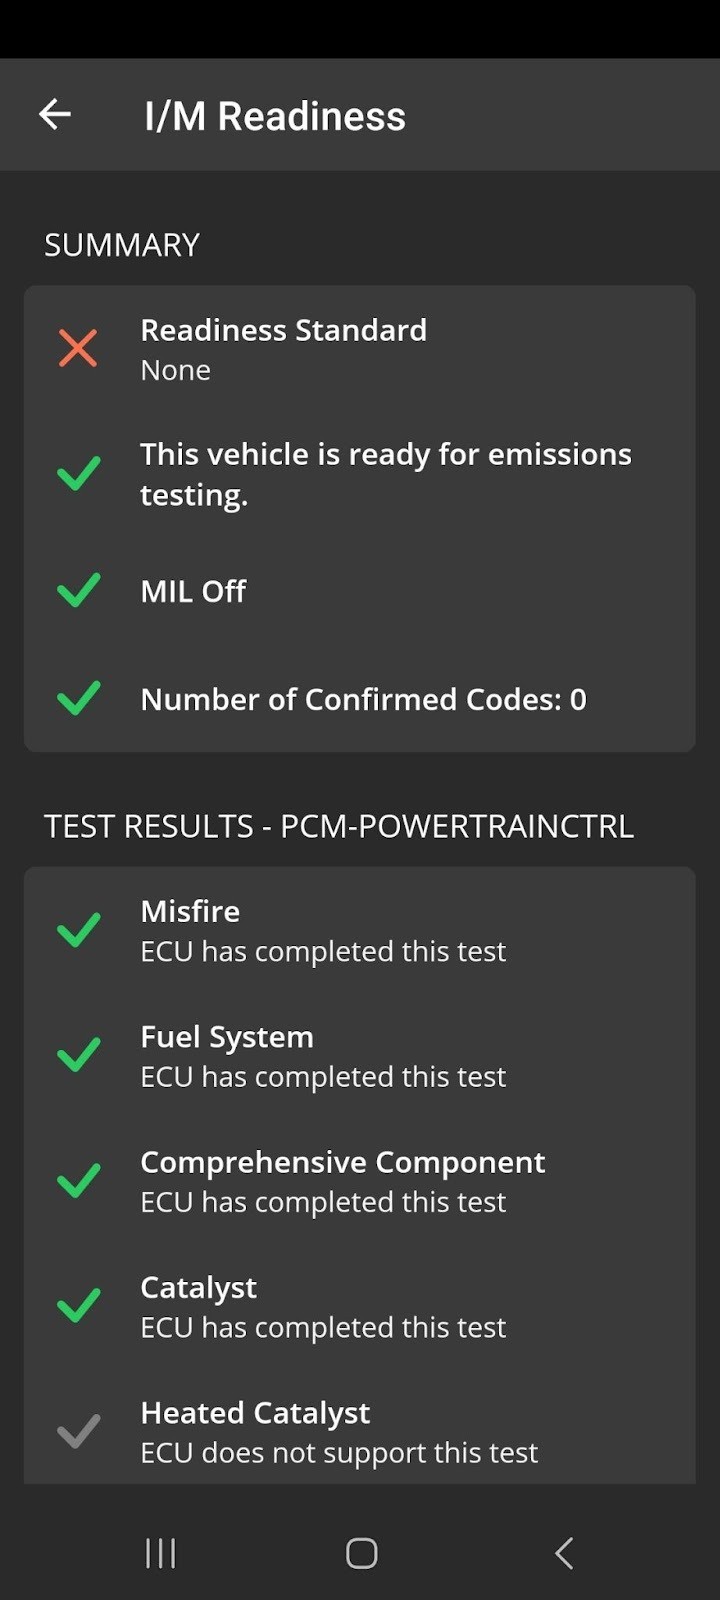
Monitor Tests (I/M Readiness):
This section assesses your vehicle’s emission system readiness against state-specific standards, crucial for vehicle inspections.
| Android |
|---|
| Android I/M Readiness report section, detailing emission system test results against state standards. |
Tip: To customize the readiness standard for your state, navigate to Home > Monitors > Menu (three dots) > Readiness Standard.
| Android |
|---|
| Android Monitors menu with ‘Readiness Standard’ highlighted, allowing customization for state-specific emission requirements. |
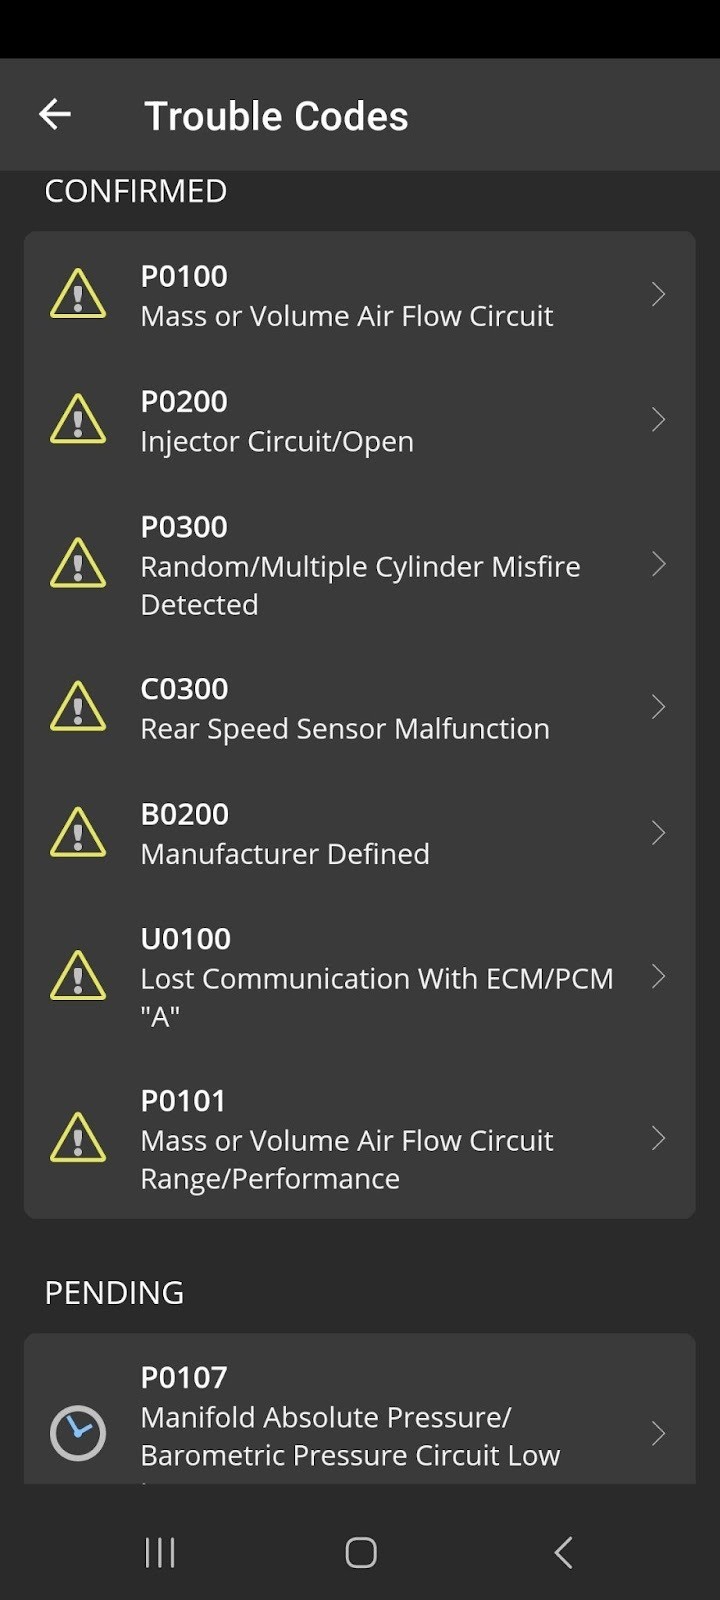
Trouble Codes Report:
A detailed listing of all DTCs captured during the diagnostic session. Scroll down to see the complete list and associated information.
| Android |
|---|
| Android Trouble Codes report section, providing a comprehensive list of detected DTCs and related details. |
Freeze Frame Report:
Displays the PID values recorded at the moment each DTC was triggered, providing valuable context for diagnosis.
| Android |
|---|
| Android Freeze Frame report section, showing PID values captured when DTCs occurred for better diagnostic context. |
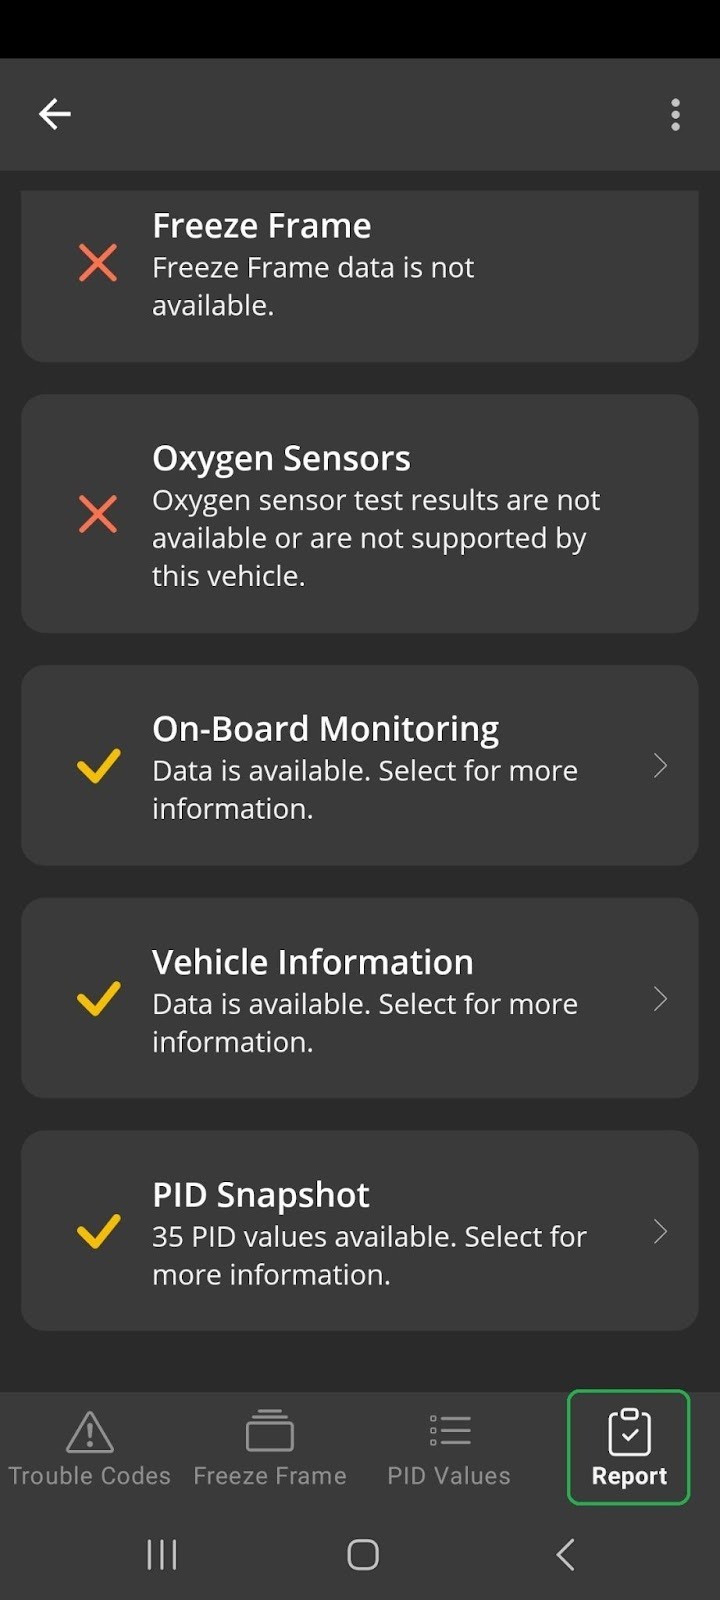
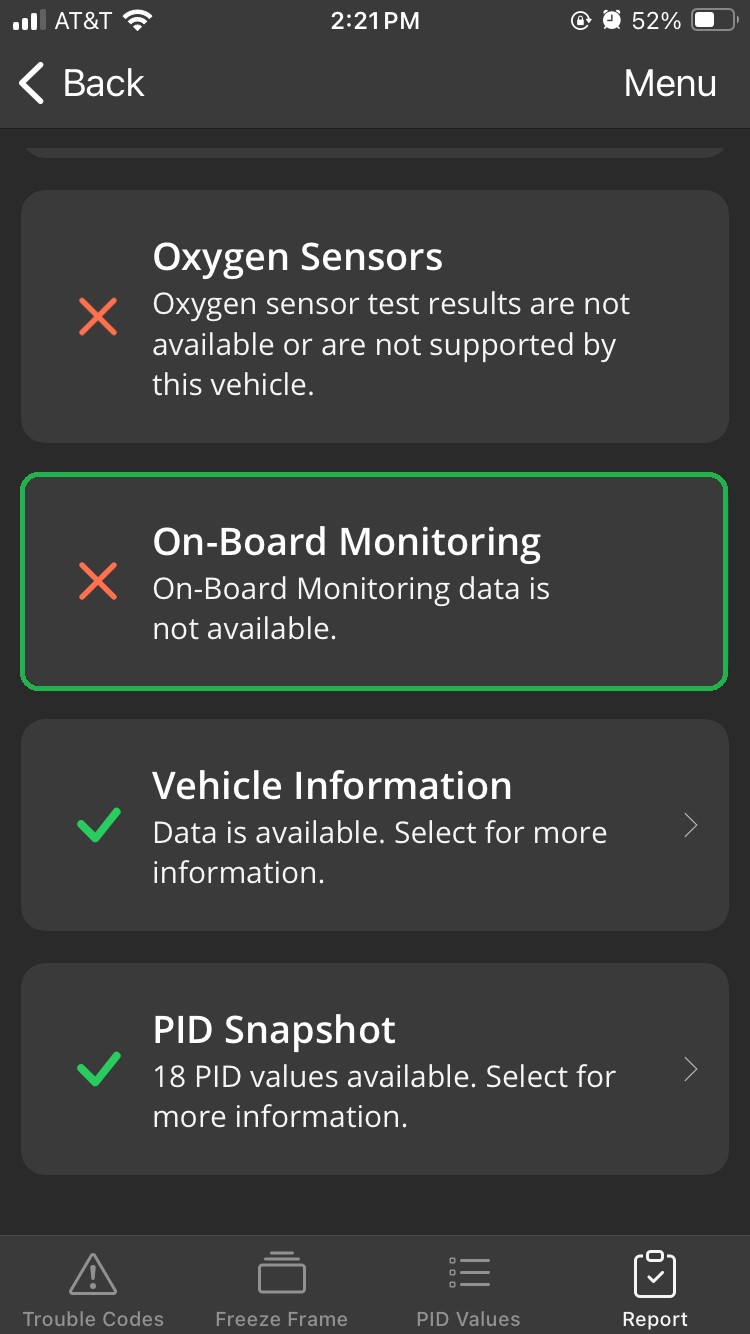
Oxygen Sensors Report:
For pre-2008 vehicles without CAN bus, this report shows oxygen sensor data (Mode $05 data).
| Android |
|---|
| Android Oxygen Sensors report example showing a vehicle that does not support oxygen sensor test results. |
On-board Monitoring Report:
For 2008 and newer CAN bus vehicles, this report provides oxygen sensor data (Mode $06 data).
| iOS |
|---|
| iOS On-Board Monitoring report section (Android similar), displaying oxygen sensor data for newer CAN bus vehicles. |
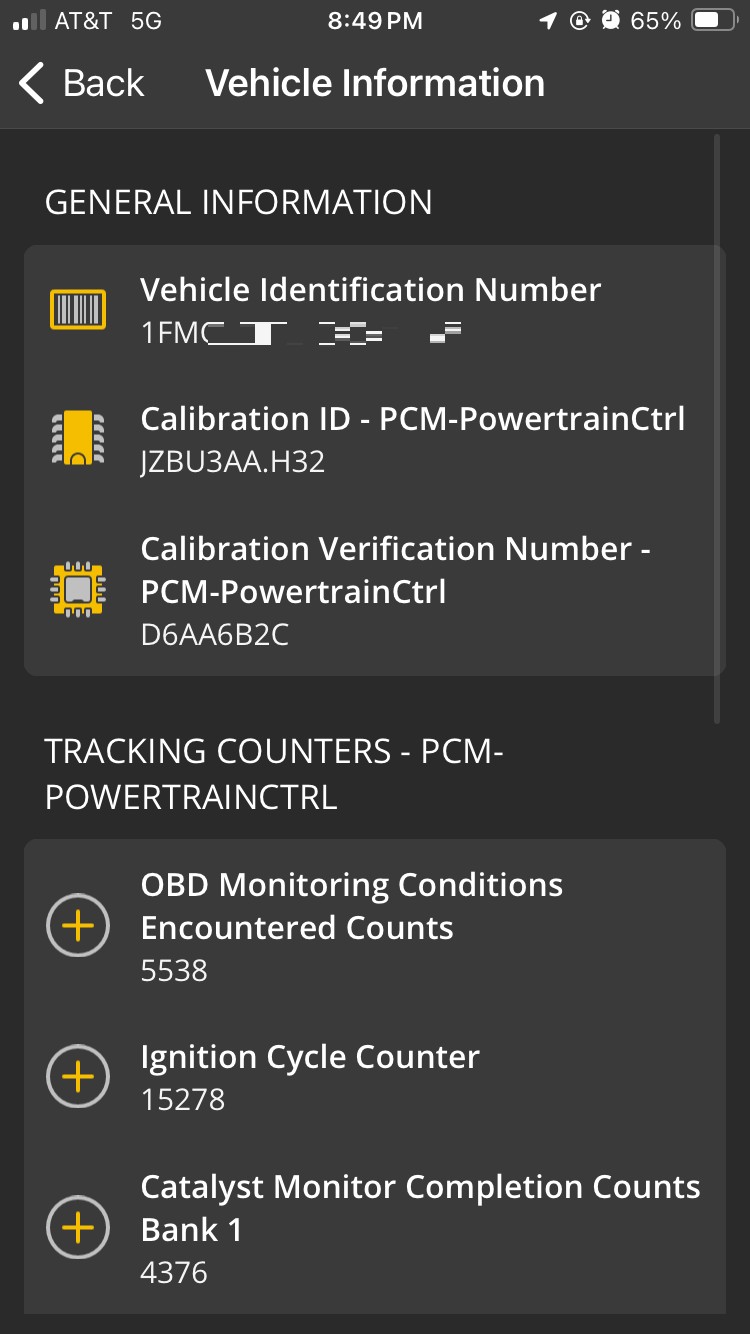
Vehicle Information Report:
Provides details about your vehicle, often referred to as Mode $09 data, including VIN and calibration IDs.
| iOS |
|---|
| iOS Vehicle Information report section (Android similar), detailing vehicle-specific data like VIN and calibration IDs. |
PID Snapshot Report:
Lists all PIDs and their current values as reported by the vehicle, useful for detailed troubleshooting and system analysis.
| iOS |
|---|
| iOS PID Snapshot report section (Android similar), listing all reported PIDs and their current values for in-depth analysis. |
Further Exploration
By following these steps, you can effectively use your Android device and the OBDLink app to access and interpret valuable diagnostic information from your vehicle. This empowers you to understand your car better, perform proactive maintenance, and address potential issues efficiently.
Need Additional Support?
For more in-depth assistance and community support, explore these resources:
Submit a Support Ticket
OBDLink® is a registered trademark of OBD Solutions, LLC.