For Toyota FJ Cruiser owners looking to modernize their ride’s infotainment system, the Alpine iLX-W650 multimedia receiver is a popular and feature-rich upgrade. This guide details the step-by-step installation process of the Alpine iLX-W650 in a 2008 Toyota FJ Cruiser, focusing on retaining factory functionalities and enhancing your in-car experience. While the Alpine iLX-W650 itself doesn’t directly interface with OBD2 for vehicle diagnostics, upgrading to a modern head unit like this sets the stage for enhanced vehicle integration and access to a wealth of digital features in your dashboard.
The original factory radio in older vehicles often lacks modern conveniences like Bluetooth, smartphone integration, and a responsive touchscreen. In this project, we’ll replace the OEM FJammer radio in a 2008 FJ Cruiser with the Alpine iLX-W650. This upgrade will bring features like Apple CarPlay and Android Auto, improved sound quality, and a more user-friendly interface to your classic SUV. To ensure a smooth installation and maintain factory features like steering wheel controls and the factory subwoofer, we’ll be using components from PAC and Metra, all sourced from Crutchfield for guaranteed compatibility.
The components used for this installation include:
- Alpine iLX-W650: The star of the show, a mech-less digital media receiver with a shallow chassis, perfect for tight spaces and packed with features.
- PAC RP4.2-TY11 Wiring Interface: Crucial for retaining factory steering wheel controls, amplifier, and other vehicle functionalities.
- Metra 95-8202 Dash Kit: Provides a seamless and professional-looking installation by filling in gaps between the new head unit and the dashboard.
Step-by-Step Installation Process
-
Preparation and OEM Radio Removal:
Begin by safely disconnecting the negative terminal of your car battery. This is a crucial safety step to prevent electrical shorts during the installation process. Next, carefully remove the trim pieces surrounding your factory radio to access the mounting screws or bolts. Once exposed, unbolt and gently pull out the OEM FJammer radio. Disconnect all wiring harnesses connected to the back of the radio. -
Modifying Factory Radio Mounts:
The factory radio mounts in the FJ Cruiser are designed specifically for the OEM unit. Aftermarket head units like the Alpine iLX-W650 may require slight modifications to these mounts for a flush fit. Identify any small metal bumps or protrusions on the factory brackets that might interfere with the new head unit sitting flush. In this case, some minor drilling was needed to remove these bumps. Ensure you only remove obstructions and maintain the structural integrity of the brackets. After modification, attach the Metra dash kit to the modified metal brackets. This kit is designed to bridge any gaps between the standard double DIN size of the Alpine unit and the FJ Cruiser’s dashboard opening. -
Wiring Harness Preparation:
This is arguably the most critical step. Begin by wiring the Alpine head unit’s harness to the PAC RP4.2-TY11 wiring interface. Start with the primary power and ground wires: black (ground), yellow (battery/constant 12V), and red (accessory/switched 12V). If you are installing a parking brake bypass module (like the MicroBypass mentioned later), hold off on connecting the black ground wire until instructed by the bypass module’s instructions. -
Speaker Wire Connections:
Carefully connect the speaker wires. Match the corresponding speaker wires from the Alpine harness to the PAC harness. Typically, these are color-coded and often follow a standard convention:- Rear Left: green (+) and green/black (-)
- Front Left: white (+) and white/black (-)
- Front Right: gray (+) and gray/black (-)
- Rear Right: violet (+) and violet/black (-)
Ensure each connection is secure, using crimp connectors, soldering, or other reliable methods to prevent loose connections and signal loss.
-
Implementing Parking Brake Bypass (Optional but Recommended):
The Alpine iLX-W650, like many modern head units, has features that are typically locked out unless the parking brake is engaged. For convenience, a parking brake bypass module, such as the MicroBypass, can be installed. This module tricks the head unit into thinking the parking brake is always engaged, unlocking all features at any time. If using a MicroBypass, follow its specific instructions, which usually involve connecting it to the ground, parking brake, and remote turn-on wires of the head unit. You might need to revisit the ground wire connection from step 3 as shown in the original installation. -
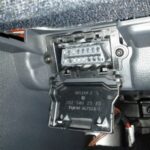
Connecting PAC Interface and Vehicle Plugs:
The PAC RP4.2-TY11 interface is designed to be compatible with various Toyota, Lexus, and Scion models. Identify the correct vehicle connector plugs for your 2008 FJ Cruiser. In this 2008 FJ Cruiser installation, plugs 3, 4, and 5 from the PAC harness were used. Connect these plugs to the corresponding factory wiring harnesses in your FJ Cruiser. Then, plug the harness from the Alpine unit and the vehicle connectors into the PAC interface module itself. Ensure you use the “Non-amplified Audio Output” on the PAC interface if your FJ Cruiser does not have a separate factory amplifier (common in 2008 FJ Cruisers, though the subwoofer has its own amp which is separate). -
Programming the PAC Interface:
The PAC RP4.2-TY11 interface needs to be programmed for your specific vehicle and head unit. For Alpine head units, you will need to adjust the programming pins on the side of the interface module. Set pin 1 to the ON position (down) and pins 2-8 to the OFF position (up) as indicated in the original guide for Alpine compatibility. -
Final Installation and Testing:
Carefully tuck all the wiring and the PAC interface module into the dashboard cavity. Mount the Alpine iLX-W650 into the Metra dash kit and secure it to the modified factory brackets using the original OEM bolts, which are often more robust than aftermarket screws. Before fully reassembling the dashboard, reconnect the negative battery terminal and test the head unit. Verify power, sound output to all speakers, steering wheel control functionality, and any other connected features. Once everything is confirmed working, turn off the vehicle, disconnect the battery again, and finish reassembling the dashboard trim pieces for a clean, professional finish.
Conclusion:
Upgrading your 2008 Toyota FJ Cruiser with an Alpine iLX-W650 significantly enhances your driving experience by bringing modern infotainment features to your vehicle. While the iLX-W650 doesn’t offer direct OBD2 data display, the integration of Apple CarPlay and Android Auto, along with improved audio capabilities, makes it a worthwhile upgrade. Furthermore, modern head units represent a step towards greater vehicle connectivity, hinting at future possibilities for deeper integration with vehicle diagnostic systems via OBD2 in car audio technology. With careful wiring and the right components like the PAC RP4.2-TY11 and Metra dash kit, this DIY installation is achievable for anyone with basic wiring knowledge, revitalizing your FJ Cruiser’s technology for years to come.