Upgrading a split keyboard project with the enhanced Qwiic Pro Micro C offers a pathway to a more robust and streamlined DIY experience. Inspired by the open-source ethos and the desire for reliable performance, this upgrade mirrors the same principles one might seek in professional-grade tools, even when considering something as seemingly different as an All Pro Open Source Obd2 Adapter Breakout for automotive diagnostics. While seemingly disparate, both fields value open-source solutions and robust hardware.
My journey into custom keyboards began with a modified Dactyl, an open-source ergonomic split keyboard designed by Matt Adereth. The Dactyl, celebrated within the mechanical keyboard community, offered a unique typing experience. I sourced a 3D-printed case kit from a member of /r/mechmarket, and powered it with QMK, the community-driven open-source firmware, running on Pro Micro clones.
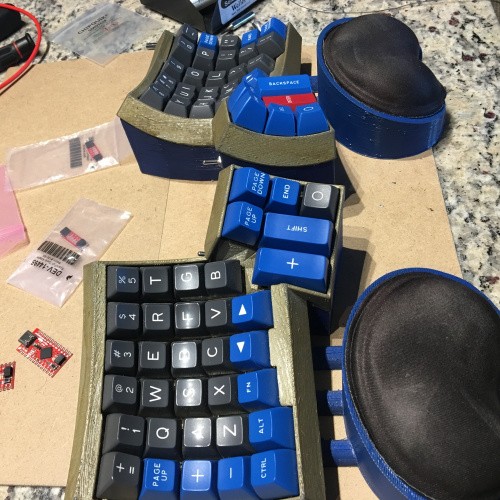
My very own dactyl keyboard, hand-built and customized.
The Pro Micro, a favorite in the DIY keyboard scene, boasts a compact form factor, an ATmega32u4 with USB capabilities, and extensive open-source firmware support. However, both genuine and clone Pro Micros are known for a vulnerability: the surface-mount micro-USB header. Despite careful assembly and generous application of hot glue, the inevitable happened – the connector on the left side of my keyboard succumbed to wear and tear.
Another casualty of the fragile micro-USB connector.
Failure, however, presents an opportunity for improvement. Serendipitously, SparkFun was developing a revised Pro Micro, addressing the very issues I faced. The new iteration featured sturdy through-hole mounted USB-C connections, a Qwiic connector, USB breakout pads, and castellated edges. Among these enhancements, the Qwiic connector stood out, particularly beneficial for split keyboards needing I2C communication between halves, much like reliable communication is crucial in applications using an all pro open source obd2 adapter breakout for vehicle diagnostics.
SparkFun Qwiic Pro Micro – USB-C: A Robust Foundation
The SparkFun Qwiic Pro Micro – USB-C (ATmega32U4) (DEV-15795) offers a significant upgrade, incorporating a reset button, Qwiic connector, USB-C port, and castellated pads into a compact Arduino-compatible board. Priced at $21.50, it represents a valuable investment in durability and functionality.
My upgrade goals extended beyond mere repair; I aimed to declutter the hand-wiring within the keyboard. While detailing the key matrix is beyond this scope (resources like blog.komar.be/how-to-make-a-keyboard-the-matrix/ offer excellent explanations), simplifying the internal wiring was crucial. Acquiring a pair of the Pro Micro revisions and Qwiic adapter boards (DEV-14495) allowed me to leverage the Qwiic ecosystem for inter-board communication.
The excessive hot glue presented a challenge during removal.
Removing the old, glue-encrusted Pro Micros proved to be an initial hurdle. The generous application of hot glue, intended to reinforce the micro-B connector, ironically complicated the removal process. Desoldering the pin headers was time-consuming, leading to the decision to snip them off instead. Soldering the key matrix wires to the new Pro Micros was surprisingly straightforward. The castellated edges proved invaluable, allowing for secure wire wrapping and soldering, both through-hole and along the board’s edge.
The castellated edges facilitated clean and robust soldering.
Reprogramming the keyboard while encased was a persistent challenge with the original build. Although the revised Pro Micro includes a reset button, external access for bootloader mode remained desirable. Panel mount toggle switches were soldered to the reset pins, enabling bootloader activation without disassembling the keyboard, a feature mirroring the accessibility needed for diagnostic tools like an all pro open source obd2 adapter breakout in automotive contexts.
Functional if not perfectly elegant – external reset switch using a toggle.
A minor setback occurred when a panel mount TRRS jack was damaged during removal. Lacking a spare, I opted to utilize an extra-long Qwiic cable connected to the adapter on the opposing board. While not ideal for long-term use, this workaround served for testing and temporary operation, demonstrating adaptability akin to troubleshooting with an all pro open source obd2 adapter breakout in unexpected situations.
Intended TRRS jack connection, temporarily replaced with a Qwiic cable.
Before final assembly, the firmware was rebuilt, flashed onto the Pro Micros, and tested. Initial tests were surprisingly successful, with both halves functioning independently via USB. However, communication issues arose when only one side was connected – the halves failed to communicate. Investigation revealed a forgotten step: switching from serial to I2C communication in the firmware. After this correction and further bus inspection, I2C communication was confirmed, although full functionality remained elusive, prompting further investigation.
The extended Qwiic cable bridging the keyboard halves.
Despite the unresolved communication issue between halves, the transition from the older Pro Micros to the new revision proved remarkably smooth. The enhanced features of the Qwiic Pro Micro – robust USB-C, convenient Qwiic connectivity, and castellated edges – significantly simplified the upgrade process, offering a “pro” level experience in DIY keyboard modification, and highlighting the value of open-source hardware and community-driven solutions, principles equally important in fields ranging from custom keyboards to automotive diagnostics and the development of tools like the all pro open source obd2 adapter breakout.
SparkFun Products Featured in this Project:
- SparkFun Qwiic Pro Micro – USB-C (ATmega32U4) – DEV-15795
- SparkFun Qwiic Adapter – DEV-14495
- Qwiic Cable – 50mm – PRT-14426
- Qwiic Cable – 500mm – PRT-14429 (Retired)