The Chevrolet HHR, a retro-styled wagon produced from 2006 to 2011, incorporates an On-Board Diagnostics system, specifically OBD2, which is crucial for vehicle maintenance and troubleshooting. Understanding the fuse system related to your 2006 HHR’s OBD2 functionality is essential for any car owner. This guide will provide you with detailed information about the fuse locations and assignments in your 2006-2011 Chevrolet HHR, with a focus on fuses relevant to the OBD2 system.
Decoding the Fuse Boxes of Your Chevy HHR (2006-2011)
Like most modern vehicles, the Chevrolet HHR utilizes multiple fuse boxes to protect its electrical circuits. For 2006-2011 HHR models, the primary fuse boxes are located in the passenger compartment and the engine compartment. Let’s explore each of these to understand which fuses might be related to your OBD2 system.
Instrument Panel Fuse Box: Your Interior Electrical Hub
Location within the Cabin
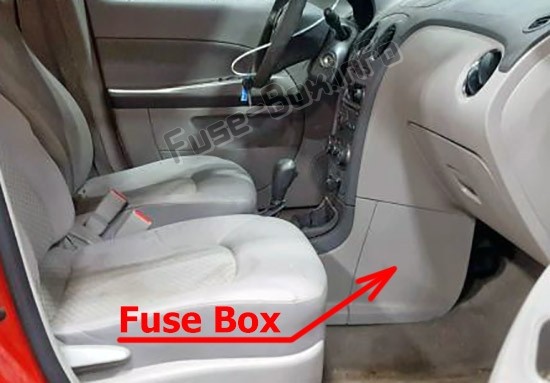
The Instrument Panel Fuse Box in the Chevrolet HHR is conveniently situated inside the vehicle cabin. You can find it on the passenger side panel of the center console. This location makes it easily accessible for inspection and fuse replacement.
Diagram and Fuse Assignments for the Interior Fuse Box
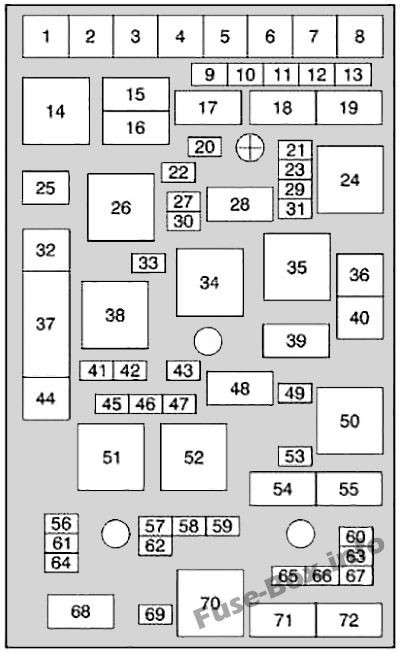
Below is a detailed diagram illustrating the layout of the Instrument Panel Fuse Box in your Chevrolet HHR. The table provides a breakdown of each fuse and relay assignment. While there isn’t a fuse explicitly labeled “OBD2,” several fuses here are critical for systems that interact with or are necessary for OBD2 functionality, such as the Engine Control Module (ECM) and Transmission Control Module (TCM).
| № | Usage |
|---|---|
| 1 | Fuse Puller |
| 2 | Empty |
| 3 | Empty |
| 4 | Empty |
| 5 | Empty |
| 6 | Amplifier |
| 7 | Cluster |
| 8 | Ignition Switch, PASS-Key III+ |
| 9 | Stoplamp |
| 10 | Heating, Ventilation, Air Conditioning, PASS-Key III+ |
| 11 | Empty |
| 12 | Spare |
| 13 | Airbag |
| 14 | Spare |
| 15 | Windshield Wiper |
| 16 | Climate Control System, Ignition |
| 17 | Window Retained Accessory Power |
| 18 | Empty |
| 19 | Electric Power Steering, Steering Wheel Control |
| 20 | Sunroof |
| 21 | Spare |
| 22 | Empty |
| 23 | Audio System |
| 24 | XM Radio, OnStar |
| 25 | Engine Control Module, Transmission Control Module |
| 26 | Door Locks |
| 27 | Interior Lights |
| 28 | Steering Wheel Control Illumination |
| 29 | Power Windows |
| Relays: | |
| 30 | Climate Control System |
| 31 | Empty |
| 32 | Retained Accessory Power (RAP) |

Note: Fuse #25, labeled Engine Control Module, Transmission Control Module, is particularly relevant to the OBD2 system. A blown fuse here could directly impact your vehicle’s ability to communicate diagnostic information. Fuse #8, related to the Ignition Switch, is also crucial as the ignition system powers up the ECM and OBD2 system.
Engine Compartment Fuse Box: Powering the Engine Bay
Location Under the Hood
The Engine Compartment Fuse Box in the Chevy HHR is located on the driver’s side of the engine compartment. It is protected by a cover, which you’ll need to remove to access the fuses and relays inside.
Diagram and Fuse Assignments for the Engine Bay Fuse Box
The diagram below outlines the Engine Compartment Fuse Box layout for your Chevrolet HHR. Similar to the interior fuse box, this one also contains fuses and relays vital for systems that interact with or enable OBD2 diagnostics.
| № | Usage |
|---|---|
| 1 | Electric Power Steering |
| 2 | Rear Defogger |
| 3 | Empty |
| 4 | Body Control Module 3 |
| 5 | Starting System |
| 6 | Body Control Module 2 |
| 7 | Rear Power Plug (Panel Van Only), Cooling Fan (SS only) |
| 8 | Empty |
| 9 | Air Conditioning Clutch Diode |
| 10 | Liftgate, Sunroof |
| 11 | Empty |
| 12 | Rear Power Outlet (Panel Van Only) |
| 13 | Fuel Pump |
| 20 | Rear Wiper |
| 21 | Mirror |
| 22 | Air Conditioning |
| 23 | Heated Seats (Option) |
| 25 | Fuse Puller |
| 27 | Empty |
| 29 | Cigarette Lighter |
| 30 | Power Outlet |
| 31 | Daytime Running Lamps |
| 32 | Empty |
| 33 | Emissions |
| 36 | Power Windows (Turbo Only) |
| 37 | Power Seat (Option) |
| 40 | Cooling Fan |
| 41 | Engine Control Module |
| 42 | Cam Phaser (Turbo Only) |
| 43 | Engine Control Module, Transmission |
| 44 | Antilock Brake System (Option) |
| 45 | Injectors, Ignition Module |
| 46 | Backup Lamps |
| 47 | Heated Seat (Option) |
| 49 | Windshield Washer Pump |
| 53 | Fog Lamps (Option) |
| 56 | Sensing and Diagnostic Module (SDM) |
| 57 | Antilock Brake System (Option) |
| 58 | Windshield Wiper Diode |
| 59 | Windshield Wiper |
| 60 | Horn |
| 61 | Antilock Brake System (Option) |
| 62 | Instrument Panel, Ignition |
| 63 | Driver Side High-Beam |
| 64 | Canister Vent |
| 65 | Driver Side Low-Beam |
| 66 | Passenger Side Low-Beam |
| 67 | Passenger Side High-Beam |
| 69 | Parking Lamps |
| Relays: | |
| 14 | Rear Defogger Relay |
| 15 | Air Conditioning Clutch |
| 16 | Empty |
| 17 | Rear Wiper |
| 18 | Liftgate Release |
| 19 | Fuel Pump |
| 24 | Empty |
| 26 | Powertrain |
| 28 | Daytime Running Lamps |
| 34 | Starting System |
| 35 | Empty |
| 38 | Empty |
| 39 | Windshield Washer Pump |
| 48 | Rear Windshield Washer |
| 50 | Cooling Fan |
| 51 | Run, Crank |
| 52 | Windshield Wiper |
| 54 | Fog Lamps (Option) |
| 55 | Horn |
| 68 | Parking Lamps |
| 70 | Windshield Wipers |
| 71 | Headlamp Low-Beam |
| 72 | Headlamp High-Beam |
Note: In the Engine Compartment Fuse Box, fuses #41 and #43, both labeled Engine Control Module, Transmission, are critical for OBD2 system operation. Additionally, Fuse #62, covering Instrument Panel, Ignition, plays a role in powering up the systems necessary for diagnostics.
Fuses and the OBD2 System: What to Check
While there isn’t a specific fuse labeled “OBD2 fuse” in the 2006 HHR fuse diagrams, the OBD2 system relies on several electrical circuits to function. If you are experiencing issues with your OBD2 port not working or your scan tool not connecting, checking these fuses is a good first step:
- Engine Control Module (ECM) / Powertrain Control Module (PCM) Fuses: These are the most likely culprits. Check Fuse #25 in the Instrument Panel Fuse Box and Fuses #41 and #43 in the Engine Compartment Fuse Box.
- Ignition System Fuses: Fuses #8 (Instrument Panel) and #62 (Engine Compartment) are essential for powering up the ignition system, which is necessary for the ECM and OBD2 to operate.
- Instrument Panel Fuses: Since the OBD2 port is typically connected to the instrument panel wiring, fuses related to the instrument panel itself, like Fuse #62 in the Engine Compartment Fuse Box, could be relevant.
Troubleshooting and Fuse Replacement
If you suspect a blown fuse is related to your OBD2 issue, follow these steps:
- Locate the Fuse Boxes: Use the location descriptions provided above to find both the Instrument Panel and Engine Compartment Fuse Boxes in your 2006 Chevrolet HHR.
- Identify Potential Fuses: Refer to the diagrams and tables to pinpoint the fuses related to the ECM, TCM, and Ignition system.
- Inspect the Fuses: Visually inspect each fuse. A blown fuse will typically have a broken wire inside. You can also use a fuse tester for a more definitive check. The fuse puller (№1 in Instrument Panel Fuse Box, №25 in Engine Compartment Fuse Box) can assist in removing fuses.
- Replace Blown Fuses: If you find a blown fuse, replace it with a new fuse of the exact same amperage. Using a fuse with a higher amperage can damage your vehicle’s electrical system.
How to replace a blown fuse?
Understanding Why Fuses Blow
Fuses blow to protect electrical circuits from overloads. If a fuse blows repeatedly, it indicates an underlying electrical problem that needs to be addressed. It’s important to diagnose the root cause of the issue rather than just continuously replacing fuses.
Why do car fuses blow?
Conclusion: Keeping Your 2006 HHR’s Electrical System Healthy
Understanding the fuse layout of your 2006 Chevrolet HHR, particularly the fuses related to the Engine Control Module and ignition system, is crucial for maintaining your vehicle and ensuring the OBD2 diagnostic system functions correctly. By using this guide, you can effectively troubleshoot potential fuse-related issues and keep your HHR running smoothly. Remember to always consult your vehicle’s owner’s manual for the most accurate and up-to-date information on fuses and electrical systems. For more detailed information on fuses, you can also explore resources on checking and identifying different types of automotive fuses.
How to check the fuses?
Types of automotive fuses