Experiencing trouble connecting your OBD2 scanner to your 2005 Acura MDX? You’re not alone. Many DIY mechanics and car owners encounter frustrating situations where their diagnostic tools simply won’t link up with their vehicle’s computer system. This article will walk you through a systematic approach to diagnose why your 2005 MDX OBD2 scanner won’t connect, drawing upon practical steps and insights to help you pinpoint the problem.
First, it’s important to understand the basics of your OBD2 port. This port, usually located under the dashboard on the driver’s side, is your gateway to accessing your vehicle’s diagnostic data. When your OBD2 scanner fails to connect, it could stem from a variety of issues ranging from simple loose connections to more complex electrical problems.
Let’s start with some fundamental checks to ensure we rule out the obvious culprits before diving deeper. A common first step is to visually inspect the OBD2 port itself. Are there any signs of physical damage? Bent pins, debris, or corrosion within the port can all prevent a proper connection. Try gently cleaning the port with compressed air or a soft brush to remove any potential obstructions.
If a visual inspection doesn’t reveal any immediate problems, the next step involves electrical testing to verify the port is receiving power and ground correctly. Using a multimeter, you can perform a series of voltage and continuity checks to assess the health of your OBD2 port. Here’s a breakdown of the key tests performed to diagnose a potential issue:
-
Ground Continuity Check (Pin 4 & 5): Using a multimeter in continuity mode, check the connection between Pin 4 and vehicle ground, and then Pin 5 and vehicle ground. A solid connection is essential for the OBD2 scanner to function. Ground points are typically accessible behind the driver’s side kick panel.
-
Voltage Between Ground Pins (Pin 4 & 5): Measure the voltage between Pin 4 and Pin 5. This reading should be minimal, ideally less than 2V. A low reading confirms the ground circuit is behaving as expected. In this case, a reading of approximately 0.5 mV was observed, indicating a healthy ground.
-
Power Voltage Check (Pin 16): Test the voltage between Pin 16 and vehicle ground. Pin 16 is the power supply for the OBD2 port and should read around 12V, reflecting the vehicle’s battery voltage. A reading of 12.23V was recorded, confirming adequate power to the port.
-
Voltage Between Power and Ground Pins (Pin 4 & 16, Pin 5 & 16): Finally, measure the voltage between Pins 4 & 16 and Pins 5 & 16. Both readings should also be approximately 12V, mirroring the voltage observed at Pin 16. Readings of 12.26V for both pairs further validate the power and ground circuits are functioning correctly.
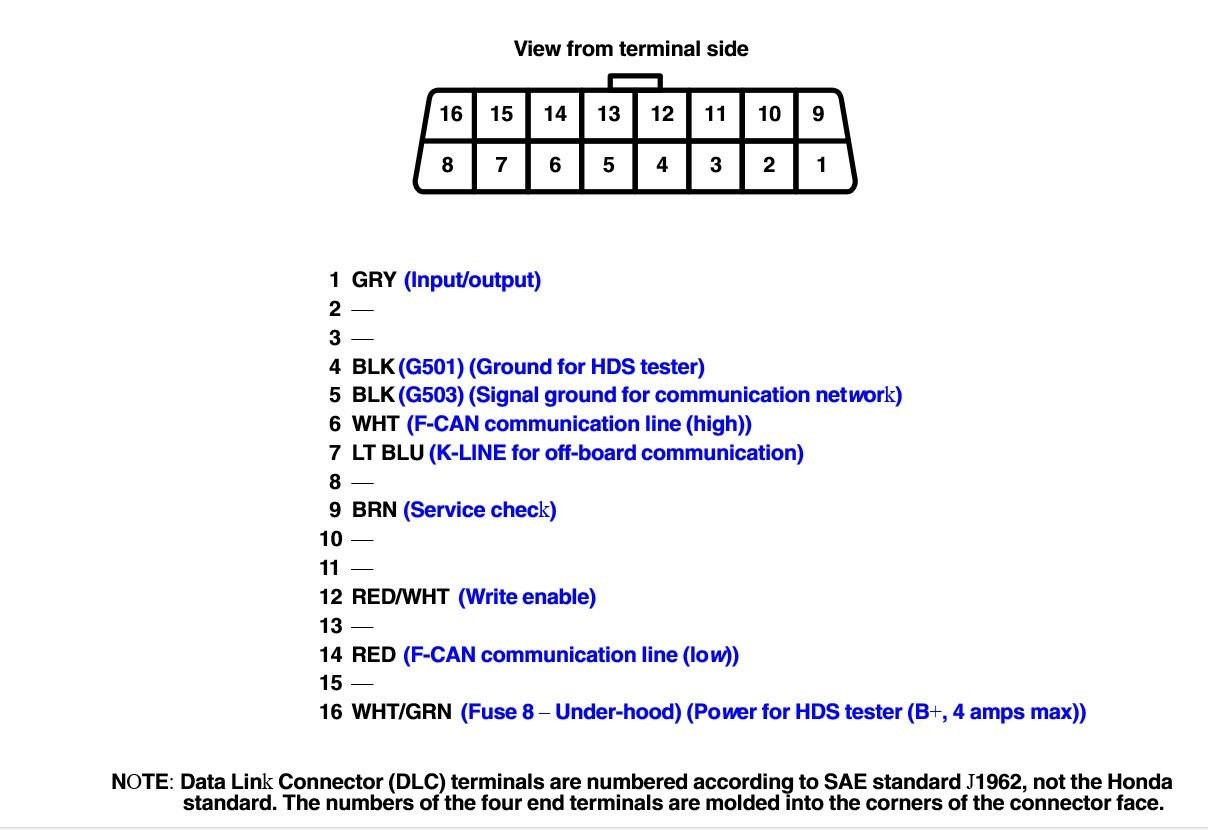 OBD-II Port Pinout Diagram for 2005 Acura MDX. Diagram showing pin assignments for diagnosing OBD2 scanner connection issues in a 2005 MDX, including power, ground, and communication pins for troubleshooting.
These voltage tests are crucial in eliminating electrical issues as the root cause of your 2005 MDX OBD2 scanner won’t connect problem. If all readings are within the expected range, as demonstrated by the example readings provided, then the issue may not be electrical power delivery to the port itself.
However, even with proper voltage readings, a connection problem can persist. Consider the physical integrity of the OBD2 port. A loose or worn port can lead to intermittent or nonexistent connections. If you find yourself needing to apply extra pressure or wiggle your scanner to establish a connection, this is a strong indicator of a physically compromised port. Comparing the firmness of your 2005 MDX’s OBD2 port to that of a similar vehicle, like a 2007 Acura RDX, can highlight a noticeable difference if your port is indeed loose.
In conclusion, if your electrical tests are successful and your 2005 MDX OBD2 scanner won’t connect, the problem likely lies in the physical connection of the OBD2 port itself. Investigating the port for looseness, damage, or wear could be the key to resolving your connection issues and getting your diagnostic scanner working reliably. Further steps might involve securing the port more firmly or considering a replacement if it’s significantly worn.