Getting started with your BlueDriver OBD2 Scan Tool is straightforward. This guide will walk you through the simple steps to install the BlueDriver app on your smartphone or tablet and pair your BlueDriver sensor, ensuring you can quickly begin diagnosing your vehicle.
Installing the BlueDriver App
First things first, you’ll need the BlueDriver mobile app. It’s available for both Android and iOS devices.
-
Open the App Store: On your Android device, open the “Play Store” app. If you are using an iPhone or iPad, open the “App Store” app.
-
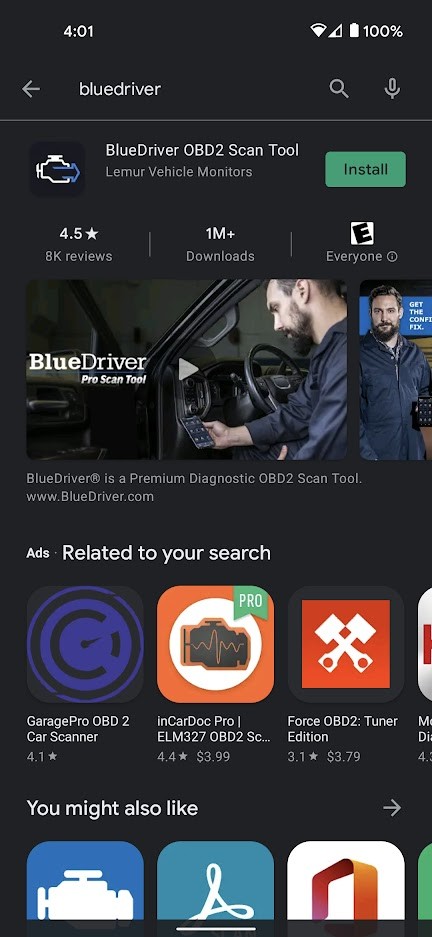
Search for BlueDriver: In the search bar, type “BlueDriver” and tap the search icon.
-
Install the App: Locate the “BlueDriver” app in the search results (it’s usually the first one listed) and tap “Install”.
Pairing Your BlueDriver OBD2 Sensor
Once the app is installed, the next step is to pair your BlueDriver sensor with your device. You can do this in two ways: directly through the BlueDriver app or manually via your device’s Bluetooth settings. For most users, in-app pairing is the easier method.
Option 1: In-App Pairing
This is the recommended method for first-time setup or if you don’t have other BlueDriver sensors currently paired.
-
Turn On Ignition: Turn your vehicle’s ignition to the “ON” position. You don’t need to start the engine, just ensure the car’s electronics are active.
-
Plug in BlueDriver Sensor: Locate your vehicle’s OBD2 port (usually under the dashboard on the driver’s side) and plug in your BlueDriver sensor.
-
Wait for Blue Light: After plugging it in, wait for the solid blue light on the BlueDriver sensor to turn off. This indicates it’s ready to pair. Note: You have about 60 seconds after the light goes out to initiate pairing. If you miss this window, simply unplug and replug the sensor to restart the pairing mode.
-
Launch the BlueDriver App: Open the BlueDriver app on your phone or tablet.
-
Tap ‘Connect’: Look for the ‘Connect’ button, usually located in the top right corner of the app interface, and tap it.
-
Enable Location Services (Android): If you are using an Android device, the app will request you to enable Location Services. Tap “Allow”. Note: This is required by Android for Bluetooth pairing within apps, but BlueDriver does not access your GPS data. If you prefer not to enable location services, you can use the manual pairing method described below.
-
Scan for BlueDriver Sensors: Tap the “Scan for BlueDriver Sensors” button that appears in the app.
-
Select Your BlueDriver: The app will display a list of available BlueDriver sensors. Select your new BlueDriver from the “Other Available BlueDriver Sensors” list.
-
Confirm Pairing: If prompted to confirm a PIN or code, simply tap “Pair” or “OK”. If a PIN is requested, you can try entering “0000” or “1234”. Note: You may be asked for permissions to access contacts or call history; these are not necessary for BlueDriver to function and can be unchecked.
-
Automatic Connection: Once successfully paired, the app should connect to your BlueDriver automatically. If you encounter any issues, support is available through the app’s “More” tab under “Contact Us”.
Option 2: Manual Pairing
Use manual pairing if you prefer not to use in-app pairing or if you are pairing a second BlueDriver sensor.
-
Turn Off Ignition: Turn your vehicle’s ignition completely off and remove the keys.
-
Plug in BlueDriver Sensor: Plug the BlueDriver sensor into your vehicle’s OBD2 port.
-
Wait for Blue Light: Wait for the solid blue light on the sensor to go out, indicating it’s in pairing mode. Remember the 60-second pairing window, and replug if needed.
-
Access Bluetooth Settings: On your phone or tablet, go to the device’s Bluetooth settings menu.
-
Search/Scan for Devices: Depending on your device, you may need to tap “search” or “scan” to initiate a Bluetooth device search. Look for a spinning wheel or progress indicator to show that your device is searching.
-
Select BlueDriver: Once “BlueDriver” appears in the list of available devices, tap on it to begin the pairing process.
-
Confirm Passkey (If Requested): Some devices might ask for a passkey confirmation. If a window appears, tap “OK” or “Pair” to proceed.
-
Start Your Vehicle and App: Now, turn your vehicle ignition back to the “ON” position (or start the engine if needed) and launch the BlueDriver app.
-
Connect in App (If Needed): If the app doesn’t connect automatically, tap ‘Connect’ in the top right corner of the app.
Should you encounter any difficulties during pairing, remove the BlueDriver sensor, plug it back in, and try the pairing process again. If problems persist, don’t hesitate to contact BlueDriver support for assistance. They are ready to help you get connected and start using your BlueDriver OBD2 Scan Tool for vehicle diagnostics.