The On-Board Diagnostics II (OBD2) system is a standardized system used in vehicles to monitor and diagnose various engine and emission control components. For car owners and mechanics, understanding the OBD2 pinout is crucial for effective vehicle diagnostics and repair. This article focuses specifically on the 2010 Dodge Avenger OBD2 pinout, providing a detailed guide to help you understand its diagnostic port.
Understanding the Basics of OBD2
Since 1996, OBD2 has been mandatory in most vehicles sold in the United States. It provides access to a wealth of data about your vehicle’s performance and health. The OBD2 port, also known as the Diagnostic Link Connector (DLC), is typically located within 2 feet of the steering wheel column. It’s designed to be easily accessible for technicians to connect diagnostic tools.
For a 2010 Dodge Avenger, the OBD2 port is your gateway to retrieving trouble codes, accessing live data streams, and performing various diagnostic tests. Knowing the pinout configuration allows for precise and safe connection of diagnostic equipment.
Locating the OBD2 Port in a 2010 Dodge Avenger
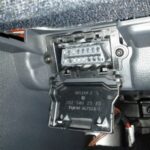
In a 2010 Dodge Avenger, the OBD2 port is usually found beneath the dashboard on the driver’s side. You may need to look under the steering column, often near the pedals or slightly to the right. It’s a 16-pin trapezoidal connector, and its standard location makes it relatively easy to find without tools. Consulting your 2010 Dodge Avenger owner’s manual can also quickly confirm the exact location if you are unsure.
Once located, ensure there is clear access to connect your OBD2 scanner or diagnostic tool.
2010 Dodge Avenger OBD2 Pinout Diagram and Pin Descriptions
The OBD2 connector has a standardized pinout, but understanding the function of each pin is essential for accurate diagnostics. Below is a detailed pinout for a typical OBD2 port, applicable to the 2010 Dodge Avenger:
| Pin | Name | Description |
|---|---|---|
| 1 | Manufacturer Discretionary | Often used for manufacturer-specific applications |
| 2 | J1850 Bus+ | SAE J1850 VPW & PWM (+) Line |
| 3 | Manufacturer Discretionary | Often used for manufacturer-specific applications |
| 4 | Chassis Ground | Ground |
| 5 | Signal Ground | Signal Ground |
| 6 | CAN High (J-2284) | CAN High |
| 7 | K-Line ISO 9141-2 | ISO 9141-2 and ISO 14230-4 K-Line |
| 8 | Manufacturer Discretionary | Often used for manufacturer-specific applications |
| 9 | Manufacturer Discretionary | Often used for manufacturer-specific applications |
| 10 | J1850 Bus- | SAE J1850 VPW & PWM (-) Line |
| 11 | Manufacturer Discretionary | Often used for manufacturer-specific applications |
| 12 | Manufacturer Discretionary | Often used for manufacturer-specific applications |
| 13 | Manufacturer Discretionary | Often used for manufacturer-specific applications |
| 14 | CAN Low (J-2284) | CAN Low |
| 15 | L-Line ISO 9141-2 | ISO 9141-2 and ISO 14230-4 L-Line |
| 16 | Battery Power | +12V Battery Voltage |
Key Pins Explained for 2010 Dodge Avenger Diagnostics:
- Pin 4 & 5 (Ground): These pins provide the necessary ground connections for the diagnostic tool and the vehicle’s electrical system during diagnosis.
- Pin 6 & 14 (CAN High & CAN Low): The Controller Area Network (CAN) bus is a critical communication protocol in modern vehicles. These pins are essential for most diagnostic communication in the 2010 Dodge Avenger, especially for engine and transmission control modules.
- Pin 16 (Battery Power): This pin supplies power from the vehicle’s battery to the OBD2 diagnostic tool, enabling it to operate.
Understanding these key pins will help you ensure proper connection and power supply when using diagnostic scanners. While pins 1, 3, 8, 9, 11, 12, and 13 are listed as “Manufacturer Discretionary,” they may be used for specific diagnostic or communication purposes unique to Dodge or Chrysler vehicles. Always refer to the specific service manual for detailed information if you suspect these pins are relevant to your diagnostic procedure.
Utilizing the OBD2 Port for Diagnostics
With the knowledge of the 2010 Dodge Avenger OBD2 pinout, you can effectively use various diagnostic tools. Connecting an OBD2 scanner to this port allows you to:
- Read Diagnostic Trouble Codes (DTCs): Identify the source of problems indicated by the check engine light or other warning lights.
- Clear DTCs: Reset the check engine light after repairs are made.
- View Live Data Streams: Monitor real-time parameters such as engine temperature, RPM, sensor readings, and more. This is invaluable for diagnosing intermittent issues or performance problems.
- Perform Actuator Tests: In some cases, you can use the OBD2 port to activate certain components for testing purposes.
- Retrieve Vehicle Information: Access VIN, calibration IDs, and other important vehicle data.
By correctly utilizing the OBD2 port and understanding its pinout, you can perform a wide range of diagnostics on your 2010 Dodge Avenger, saving time and potentially costly trips to a mechanic for basic issue identification.
Conclusion
The OBD2 port is an indispensable tool for modern vehicle diagnostics. For a 2010 Dodge Avenger owner or technician, understanding the OBD2 pinout is fundamental for effective troubleshooting and repair. This guide provides a solid foundation for using the diagnostic port effectively, ensuring accurate and safe vehicle maintenance. Always consult your vehicle’s service manual and use appropriate safety precautions when performing any diagnostic or repair procedures.
Remember to always use quality OBD2 scanners and tools to ensure accurate readings and avoid potential damage to your vehicle’s electronic systems.