If you’re a BMW enthusiast, especially one who appreciates the E36 chassis, you’ve likely encountered the ongoing discussion about OBD1 versus OBD2 engine management systems. For owners of the ’94 325i and similar models straddling this technological shift, understanding the differences and potential benefits of each system is crucial. Many performance-oriented owners even consider converting from OBD2 to OBD1, seeking a blend of simplicity and enhanced tuning potential.
This guide delves into the intricacies of performing an OBD1 conversion, drawing upon the real-world experience of a fellow BMW enthusiast who successfully undertook this project on their OBD2 equipped M3. While the original article detailed a conversion on an M3, the principles and many components are directly applicable to the ’94 325i and other models within the E36 range that may benefit from reverting to or utilizing an OBD1 setup. We’ll explore why someone might consider this conversion, what parts are necessary, and the key steps involved, ensuring you have a solid understanding of whether an OBD1 conversion is the right path for your ’94 325i.
Understanding OBD1 and OBD2: Why the Conversion?
Before diving into the specifics of the conversion, it’s important to understand the fundamental differences between OBD1 (On-Board Diagnostics 1) and OBD2 (On-Board Diagnostics 2). OBD2 is a more advanced system mandated in the United States starting in 1996, offering standardized diagnostic codes, enhanced emissions monitoring, and generally stricter control. However, for some BMW owners, particularly those focused on performance modifications, OBD1 offers certain advantages:
- Simpler Engine Management: OBD1 systems are less complex, which can be beneficial for tuning and modification. They often have fewer sensors and a less intricate engine management strategy, making them potentially more forgiving and easier to work with for certain performance upgrades.
- Intake Manifold Advantage: Specifically for BMWs of this era, the OBD1 M50 intake manifold is known for its superior airflow compared to the OBD2 M52/S52 manifolds. This is a primary driver for many OBD1 conversions, as it’s a well-documented performance upgrade.
- Eliminating Certain Sensors: OBD1 systems do not require certain sensors present in OBD2, such as post-catalytic converter oxygen sensors and secondary air pumps. For performance builds, these systems are often removed or bypassed, and OBD1 simplifies this process.
However, it’s also important to acknowledge the downsides:
- Reduced Diagnostic Capabilities: OBD1 is less sophisticated diagnostically than OBD2. Troubleshooting can be more challenging due to less detailed error codes and a lack of standardized diagnostic procedures.
- Emissions Compliance: Converting to OBD1 will likely impact your vehicle’s emissions compliance, potentially making it unsuitable for road use in areas with strict emissions testing.
For a ’94 325i, which might originally be OBD1 or an early OBD2 depending on the exact production date and market, understanding your current system is the first step. If you’re already OBD1, you’re ahead of the game in terms of simplicity for certain modifications. If you’re OBD2 and seeking performance gains, particularly from an intake manifold upgrade, an OBD1 conversion could be a viable route.
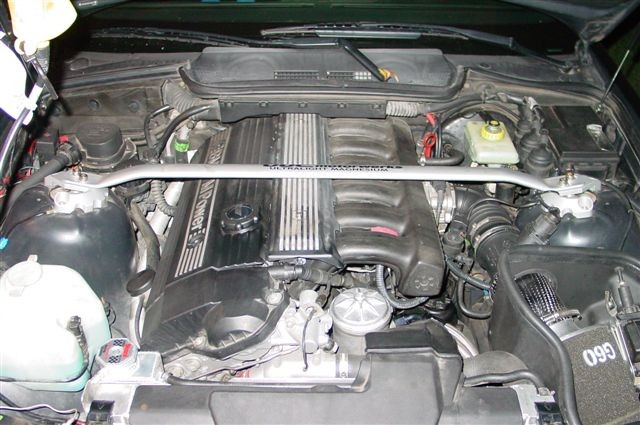
Essential Parts for Your OBD1 Conversion
Based on the experience of the original author, here’s a comprehensive list of parts you’ll likely need for an OBD1 conversion on your BMW, applicable to a ’94 325i or similar models. Sourcing parts from a ’94 325i donor car is often the most cost-effective approach:
- OBD1 Engine Harness: This is the central nervous system of the conversion, providing the correct wiring for the OBD1 ECU and sensors. A harness from a ’94 325i is ideal.
- OBD1 ECU (DME): Specifically, the ‘413’ red label ECU is highly sought after as it typically comes from non-EWS (Electronic Immobilizer System) vehicles, simplifying the process.
- OBD1 Chip: A performance chip designed for OBD1 ECUs, like the Active Autowerkes chip mentioned, can optimize engine performance after the conversion and for any other modifications you have.
- OBD1 Intake Manifold: The M50 intake manifold is the key performance component. Ensure it’s in good condition and includes necessary vacuum ports.
- OBD1 Fuel Rail: OBD1 and OBD2 fuel systems differ, so the OBD1 fuel rail is necessary to accommodate the OBD1 fuel pressure regulator and line connections.
- OBD1 Crank Position Sensor: The location of the crank position sensor differs between OBD1 and OBD2, necessitating the OBD1 sensor.
- OBD1 Cam Position Sensor: Similar to the crank sensor, the cam position sensor should be the OBD1 version for compatibility with the harness and ECU.
- OBD1 Knock Sensors (x2): Ensure you acquire two OBD1 knock sensors.
- OBD1 Oxygen Sensor: OBD1 systems typically use only one pre-catalytic converter oxygen sensor.
- OBD1 HFM (Hot Film Mass Air Meter): The mass air flow sensor may differ between OBD1 and OBD2, requiring an OBD1 unit for proper compatibility.
- OBD1 Main Engine Coolant Hose: This is the large hose connecting to the coolant pipe fitting on the timing cover, heater core, and expansion tank. OBD1 and OBD2 versions are different.
- OBD1 Throttle Boot: The rubber boot connecting the throttle body to the intake manifold.
- OBD1 Throttle Body (Optional): While the OBD2 throttle body can be adapted, using an OBD1 throttle body simplifies the installation.
- OBD1 Valve Cover and Coil Packs (Optional): While OBD2 valve covers and coil packs can be retained, using OBD1 components can streamline wiring and aesthetics.
- OBD1 Coolant Pipe Adapter or OBD1 Timing Cover: To adapt the OBD1 coolant hose to the OBD2 timing cover, you’ll need either an adapter or to swap to an OBD1 timing cover.
- OBD1 PCV Valve (Breather Valve): The Positive Crankcase Ventilation (PCV) system differs, and the OBD1 valve is needed if using the OBD1 valve cover.
- Fuel Lines and Fittings: Be prepared to modify fuel lines to adapt to the OBD1 fuel rail setup.
- Wiring Connectors and Extensions: BMW part # 12-52-2-274-971 (transmission harness) or similar wiring and connectors might be needed for components like the VANOS solenoid.
- Gaskets and Seals: New gaskets for the intake manifold, throttle body, and any other components you remove and reinstall are essential.
- M18 Bolt (for O2 sensor port plug): To plug the unused oxygen sensor ports in the exhaust manifold/headers.
Step-by-Step OBD1 Conversion Guide
The following steps are based on the experience detailed in the original article and provide a roadmap for your OBD1 conversion. Always disconnect the negative battery terminal before working on any electrical components. Labeling wires and taking pictures during disassembly is highly recommended.
-
Valve Cover and Coil Packs:
- Decision Point: Choose whether to retain your OBD2 valve cover and coil packs or switch to OBD1 versions.
- OBD2 Option: Requires modifying the OBD2 valve cover (using a Dremel or similar tool) to route the OBD1 harness wiring for the coil packs, as OBD1 wiring enters from the driver’s side, and OBD2 from the passenger side.
- OBD1 Option: Requires swapping to an OBD1 valve cover and OBD1 coil packs. Both coil pack types are compatible with the OBD1 harness. The original author opted to keep the OBD2 valve cover and modify it.
-
VANOS Solenoid Wiring:
- The OBD2 VANOS solenoid connector wire is shorter than the OBD1 counterpart.
- Solution: Either use an OBD1 VANOS solenoid or extend the OBD2 solenoid wiring using BMW part # 12-52-2-274-971 (transmission harness) or similar wiring and connectors. This harness provides matching connectors for a clean extension.
-
Coolant Pipe Adaptation:
- The main coolant pipe from the timing cover differs between OBD1 and OBD2. OBD2 uses a fixed metal pipe, while OBD1 uses a rubber hose connected to an aluminum neck.
- Solutions:
- Replace the OBD2 timing cover with an OBD1 timing cover.
- Use a coolant pipe adapter (available from Bimmerworld, Active Autowerkes, Turner Motorsport) that fits into the OBD2 timing cover and allows connection of the OBD1 coolant hose. The adapter is typically secured with JB Weld. The original author used an adapter.
-
Intake Manifold Swap:
- Remove the OBD2 intake manifold and install the OBD1 M50 intake manifold. It should bolt directly onto the M52/S52 cylinder head without modification.
- Ensure the OBD1 intake manifold has the air temperature sensor and vacuum port for the fuel pressure regulator on the underside.
-
Throttle Body Installation:
- You can use your OBD2 throttle body, but adaptation is needed due to gasket differences.
- Solutions:
- Use a throttle body adapter plate (available for purchase) between the OBD2 throttle body and OBD1 intake manifold.
- Use an extended gasket designed to seal the OBD2 throttle body to the OBD1 intake manifold.
- Alternatively, use an OBD1 throttle body, which will bolt directly to the OBD1 intake manifold without adapters.
-
Coolant Temperature Sender Wiring:
- OBD2 uses one coolant temp sender, OBD1 uses two.
- Solutions:
- Splice the OBD1 harness wiring and use the OBD2 connector to connect to your single OBD2 temp sender.
- Use a coolant temp sender wiring adapter from Turner Motorsport for a plug-and-play solution.
-
Crank Position Sensor Replacement:
- Replace the OBD2 crank position sensor with the OBD1 crank position sensor.
- Leave the OBD2 sensor in place to plug the hole in the engine block.
-
Fuel Line Modification:
- This is a significant change. The OBD2 fuel system has both lines at the rear of the fuel rail, and the regulator is under the car. OBD1 has the supply at the front and return at the rear of the fuel rail, with the regulator on the rail.
- Steps:
- Remove the OBD2 fuel pressure regulator from under the car.
- Run new 8mm fuel lines to the OBD1 fuel rail.
- Bridge the gap left by the OBD2 regulator removal in the undercarriage fuel lines.
- Connect the fuel filter feed to the front of the OBD1 fuel rail and the return line to the rear of the OBD1 fuel rail.
- Connect the OBD1 fuel pressure regulator vacuum line to the vacuum port on the underside of the OBD1 intake manifold.
-
PCV System Adaptation:
- PCV systems differ between OBD1 and OBD2.
- Options:
- OBD2 Valve Cover: Retain the OBD2 PCV setup and mount the breather valve under the intake manifold.
- OBD1 Valve Cover: Use the OBD1 breather valve that clips onto the valve cover and connect its vacuum and oil drain lines.
- Catch Can: Use a hose to connect the crankcase vent to a breather catch can.
- The original author used a combination of OBD2 valve cover and OBD1 breather valve, adapting hoses for connection.
-
Idle Control Valve (ICV) Connection:
- The OBD1 and OBD2 ICVs are the same and interchangeable.
- Reuse your OBD2 ICV. Obtain the correct hoses to connect the ICV to the OBD1 intake manifold and throttle boot vacuum port.
-
Fuel Tank Breather Valve Connection:
- Reuse your OBD2 fuel tank breather valve.
- Adapt vacuum hose connections to the vacuum port on the OBD1 throttle boot using fittings.
-
Oxygen Sensor and Secondary Air Pump Elimination:
- OBD1 uses only one pre-cat oxygen sensor. Disconnect and remove the OBD2 pre-cat and post-cat sensors and the secondary air pump system (OBD2 only).
- Plug the unused oxygen sensor ports in the exhaust manifold/headers with M18 bolts.
-
Oil Pan and Dipstick:
- OBD2 oil pan and dipstick can be reused without modification. OBD1 oil pan and dipstick are not required.
-
EWS (Immobilizer) Deactivation:
- If using a non-EWS OBD1 ECU (‘413 red label preferred), you may still encounter EWS issues.
- EWS Deactivation: Locate wire #66 on the ECU connector (solid green or black/violet). Cut this wire and insulate both ends to disable EWS.
-
Power Distribution and Grounding:
- Crucial Step: Carefully manage power and ground connections. Label everything during disassembly.
- Relocate the OBD2 power distribution box slightly forward (using existing secondary air pump mounting holes) to reach the power connections on the OBD1 harness.
- Ensure correct connections: RED wires are power, BROWN or BLACK are grounds. Double-check wiring diagrams if unsure.
- Connect the main power feed to the starter and the smaller power feed to the fuse box.
- Ground the small wire from the spark plug rail to the engine hoist loop on the VANOS unit.
-
General Wiring and Harness Installation:
- Critical: Label all connectors on the OBD1 harness before installation using painter’s tape and a marker, referencing Bentley wiring diagrams.
- Take pictures of OBD2 wiring and starter wiring during disassembly.
- Install the OBD1 harness, connecting labeled plugs to their corresponding components in the engine bay. Wire lengths are generally designed to reach their intended locations.
Dyno Results and Performance Gains
The original author reported dyno results before and after further tuning, demonstrating the performance potential of the OBD1 conversion combined with other modifications:
- Initial Dyno: 253 RWHP, 228 TQ (Rich AFR)
- After Tuning: 262 RWHP, 230 TQ (Optimized AFR)
These results, while specific to the author’s modified S52 engine, illustrate the type of performance improvements achievable with an OBD1 conversion, especially when combined with other upgrades like intake manifold, camshaft, and exhaust modifications. For a ’94 325i, the gains might be proportionally similar depending on the starting point and other modifications.
Conclusion: Is OBD1 Conversion Right for Your ’94 325i?
Converting your ’94 325i or similar BMW from OBD2 to OBD1 is a complex but rewarding project for the dedicated enthusiast. It offers potential performance gains, particularly through the M50 intake manifold swap, and simplifies engine management for certain modifications. However, it’s not a task for beginners and requires meticulous attention to detail, wiring knowledge, and access to the correct parts.
If you’re seeking maximum diagnostic capability and emissions compliance, sticking with OBD2 is advisable. But if you’re prioritizing performance, especially in naturally aspirated applications, and are comfortable with the intricacies of older engine management systems, an OBD1 conversion can be a worthwhile upgrade to unlock the full potential of your ’94 325i’s engine.
Remember to thoroughly research and understand each step before beginning this conversion. Consulting wiring diagrams, online forums, and experienced BMW mechanics is highly recommended. Good luck with your project, and feel free to share your questions and experiences in the comments below!