While you might be searching for “91 Gmc Obd2 Codes,” it’s important to clarify a key point right away: your 1991 GMC truck is equipped with an OBD1 system, not OBD2. OBD2 (On-Board Diagnostics II) became mandatory in the USA for vehicles manufactured in 1996 and later. Understanding this distinction is crucial for correctly diagnosing any issues with your classic GMC.
This guide will walk you through everything you need to know about retrieving and understanding diagnostic trouble codes on your 1991 GMC using its OBD1 system. Forget expensive scanners for now; we’ll show you how to access these codes with just a simple paper clip!
Understanding OBD1 and Your 1991 GMC
OBD1 was the precursor to the standardized OBD2 system. Manufacturers like GM used their own versions of OBD1, meaning there wasn’t a universal connector or set of codes across all makes and models. For your 1991 GMC, you have a specific OBD1 system tailored to its engine and electronics.
While OBD1 is less sophisticated than OBD2, it still provides valuable information about potential problems. It monitors various sensors and systems within your truck, and when it detects an issue, it stores a trouble code in the engine control module (ECM). This code is your starting point for diagnosing and repairing the problem.
Retrieving OBD1 Codes on Your 1991 GMC: The Paper Clip Method
You don’t need a scan tool to get the OBD1 codes from your 1991 GMC. Here’s how to do it using the “paper clip method”:
-
Locate the ALDL Connector: The Assembly Line Diagnostic Link (ALDL) connector is the diagnostic port for OBD1 systems. On your 1991 GMC, it’s typically located under the dashboard on the driver’s side. It’s a 12-pin connector, often black or gray.
-
Prepare a Jumper Wire: A simple paper clip or a short length of wire will work as a jumper.
-
Turn Ignition ON, Engine OFF: Insert your key and turn the ignition to the “ON” position. Do not start the engine.
-
Locate Terminals A and B on the ALDL Connector: Looking at the ALDL connector, identify terminals A and B. Terminal A is usually in the top right corner, and Terminal B is directly to its right. Refer to the image below for visual guidance.
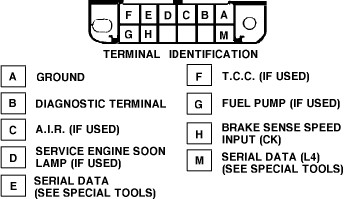 GM ALDL Connector Location for OBD1 Code Retrieval on 1991 GMC Trucks
 -
Connect Terminals A and B: Carefully insert the paper clip or jumper wire to connect terminal A and terminal B. This grounds the diagnostic terminal and puts the ECM into diagnostic mode.
-
Observe the “Check Engine” Light: Once you’ve connected the terminals, watch the “Check Engine,” “Service Engine Soon,” or “Malfunction Indicator Lamp” on your dashboard. It will begin to flash a sequence of codes.
-
Decipher the Codes: The codes are displayed in a two-digit format. Code 12 is always the starting code and is displayed three times. It signals that the diagnostic system is working. Code 12 is represented by one flash, a short pause, then two flashes in rapid succession. After Code 12, any stored trouble codes will be displayed, each repeated three times. For example, code 32 would be displayed as three flashes, a short pause, then two flashes in rapid succession. After all stored codes are displayed, code 12 will repeat again.
-
Record the Codes: Carefully count the flashes and record each two-digit code. It’s helpful to write them down as you see them.
-
Disconnect the Jumper Wire: Once you have recorded all the codes, turn the ignition OFF and remove the paper clip or jumper wire from the ALDL connector.
1991 GMC OBD1 Trouble Code Chart
Here is a comprehensive list of GM OBD1 trouble codes that may be relevant to your 1991 GMC. Remember to consult your specific GMC service manual for the most accurate code interpretations for your exact model and engine.
| Code | Description |
|---|---|
| 12 | No distributor reference pulse (diagnostic test active) |
| 13 | Oxygen sensor circuit open or no activity |
| 13 | Left bank O2 sensor circuit open or no activity |
| 14 | Engine coolant temp sensor error (high temp indicated) |
| 15 | Engine coolant temp sensor error (low temp indicated) |
| 16 | System voltage too low |
| 17 | Camshaft position sensor error |
| 21 | Throttle position sensor error (signal high) |
| 22 | Throttle position sensor error (signal low) |
| 23 | Intake air temp sensor error (low temp indicated) |
| 24 | Vehicle speed sensor error (open circuit or no activity) |
| 25 | Intake air temp sensor error (high temp indicated) |
| 26 | Quad Driver Module (QDM A) error |
| 28 | Auto transmission range pressure switch error |
| 31 | Wastegate solenoid circuit error |
| 31 | Gear Position Switch (PRNDL) error |
| 32 | Baro Sensor Circuit Error |
| 32 | EGR circuit Error |
| 32 | MAP Sensor Signal Open |
| 33 | MAP sensor circuit error (signal high indicating low vacuum) |
| 34 | MAP sensor circuit error (signal low indicating high vacuum) |
| 35 | IAC problem or idle error |
| 36 | MAF sensor error |
| 36 | 24x crankshaft position sensor circuit error |
| 36 | 4T60-E Shifting error |
| 37 | TCC brake switch circuit error |
| 38 | TCC brake switch circuit error |
| 39 | Clutch switch circuit error |
| 39 | TCC error |
| 41 | Ignition control error |
| 41 | MEM-CAL error |
| 41 | C³I Cam Sensor Signal error |
| 42 | Ignition bypass circuit error |
| 43 | Knock sensor error |
| 44 | Oxygen sensor error (lean condition indicated) |
| 44 | Left bank O2 sensor error (lean condition indicated) |
| 45 | Oxygen sensor error (rich condition indicated) |
| 45 | Left bank O2 sensor error (rich condition indicated) |
| 46 | Pass-Key II (VATS) system error – circuit out of freq range |
| 47 | UART (serial data) circuit error |
| 51 | PROM error |
| 51 | Incorrect MEM-CAL |
| 52 | Fuel cal-pak incorrect or missing |
| 53 | System voltage too high |
| 53 | Digital EGR valve solenoid 1 error |
| 54 | Fuel pump circuit low voltage |
| 54 | Digital EGR valve solenoid 2 error |
| 55 | ECM error |
| 55 | Digital EGR valve solenoid 3 error |
| 56 | Quad Driver Module (QDM B) error |
| 57 | Boost control error |
| 58 | Trans fluid temp sensor circuit error (low voltage) |
| 58 | VATS system error |
| 59 | Trans fluid temp sensor circuit error (high voltage) |
| 61 | A/C system performance |
| 63 | Right bank O2 sensor circuit error |
| 63 | MAP sensor circuit signal voltage high (low vacuum indicated) |
| 64 | Right bank O2 sensor lean exhaust indicated |
| 64 | MAP sensor circuit signal voltage low (high vacuum indicated) |
| 65 | Right bank O2 sensor rich exhaust indicated |
| 66 | A/C pressure sensor circuit error (low pressure indicated) |
| 67 | A/C pressure sensor circuit error |
| 68 | A/C clutch relay circuit error (shorted to ground) |
| 69 | A/C clutch relay circuit error (open circuit indicated) |
| 69 | A/C high pressure switch error |
| 70 | A/C pressure sensor circuit error (high pressure indicated) |
| 71 | A/C evaporator temp sensor circuit error (low temp indicated) |
| 72 | VSS signal circuit error |
| 73 | A/C evaporator temp sensor circuit error (high temp indicated) |
| 75 | Digital EGR solenoid #1 circuit error |
| 76 | Digital EGR solenoid #2 circuit error |
| 77 | Digital EGR solenoid #3 circuit error |
| 79 | Transmission fluid over temp |
| 80 | Transmission component slipping |
| 82 | 3x crankshaft position sensor circuit error |
| 85 | PROM error |
| 86 | ECM Analog/Digital error |
| 87 | EEPROM error (flash memory error) |
| 90 | TCC error |
| 93 | Transmission pressure control solenoid circuit error |
| 96 | Transmission system voltage low |
| 98 | Invalid PCM program |
| 99 | Invalid PCM program |
Interpreting Your 1991 GMC OBD1 Codes
Once you have your list of codes, use the chart above to understand what each code signifies. Remember that a trouble code points to a potential problem area, not necessarily a specific faulty component.
For example, a Code 13 (Oxygen sensor circuit open or no activity) indicates a problem within the oxygen sensor circuit. This could be a faulty sensor, wiring issues, or even a problem with the ECM itself. Further diagnosis is needed to pinpoint the exact cause.
Important Considerations:
- Multiple Codes: It’s common to have multiple codes stored. Address them in the order they appear, starting with any codes that could be related to fundamental engine functions.
- Clear Codes After Repair: After you have diagnosed and repaired the issue, it’s essential to clear the stored codes. You can usually do this by disconnecting the negative battery terminal for a few minutes. Refer to your GMC service manual for the recommended procedure.
- Consult a Professional: If you are unsure about interpreting the codes or performing repairs, it’s always best to consult a qualified mechanic. They have the tools and expertise to accurately diagnose and fix complex automotive issues.
While your 1991 GMC doesn’t use OBD2, its OBD1 system is still a valuable tool for troubleshooting. By understanding how to retrieve and interpret these codes, you can take a proactive approach to maintaining your classic truck and keeping it running smoothly for years to come.