For 5th Generation Toyota 4Runner owners looking to enhance their vehicle’s monitoring capabilities, the ScanGauge II OBD2 reader offers a comprehensive solution. Unlike basic OBD2 scanners, the ScanGauge II functions as a digital gauge display, providing real-time data for crucial vehicle parameters. While tools like Carista OBD2 excel in electronic customizations, the ScanGauge II truly shines as a diagnostic and monitoring powerhouse. If you’re keen on keeping a close eye on your 4Runner’s vitals, this gadget is an invaluable addition.
Understanding OBD2 and Its Importance: OBD2 (On-Board Diagnostics II) is a standardized system in most modern vehicles that provides access to vehicle health and performance data. An OBD2 gauge reader like ScanGauge II taps into this system, displaying information that’s often missing from your factory dashboard. To delve deeper into OBD2 scanners, explore this informative article.
Many 4Runner enthusiasts, especially those who push their vehicles off-road or use them for towing, recognize the limitations of the stock gauges. Essential metrics like transmission temperature and battery voltage are notably absent from the factory display. This lack of real-time data can be a significant drawback when navigating challenging terrains or hauling heavy loads. The ScanGauge II steps in to bridge this gap, offering a wealth of information right at your fingertips.
ScanGauge II: Real-Time Insights Directly From Your 4Runner’s System: According to ScanGauge, their ScanGaugeII device is designed to deliver crucial, real-time data about your vehicle’s operation that is often missing from standard dashboards. It boasts over 15 built-in digital gauges, comprehensive trip data, and a user-friendly scan tool capable of showing both current and pending diagnostic trouble codes. All of these features are packed into a compact unit that promises a quick and easy installation. Learn more about the ScanGauge II on the official website.
Why 4Runner Owners Need OBD2 Gauges
The 5th Gen 4Runner, while renowned for its off-road prowess and reliability, does fall short in providing comprehensive real-time vehicle data. For off-roading and overlanding, monitoring key parameters is not just helpful—it’s often critical. The factory instrument cluster omits vital gauges like transmission temperature and precise voltage readings, information that can be crucial in preventing damage and ensuring optimal performance in demanding conditions. This is precisely where the value of 4Runner OBD2 gauges, particularly the ScanGauge II, becomes apparent.
Similar to the versatility of Carista for 5th Gen 4Runners, the ScanGauge II is compatible with any OBD2 compliant vehicle. This means you can easily transfer it between your 4Runner and other OBD2 vehicles you own, making it a multi-vehicle diagnostic and monitoring tool.
Installation is designed to be user-friendly, typically taking around 20 minutes. It’s important to note that the ScanGauge II is specifically for OBD2 vehicles and will not work with older 4Runners equipped with the OBDI system.
Required Tools & Product:
- ScanGauge II – Check Price
- Zip Ties (optional, for cable management)
- Velcro Strips (included)
Step-by-Step Guide to Installing Your 4Runner OBD2 Gauge (ScanGauge II)
Step 1: Locate the OBD2 Port in Your 4Runner
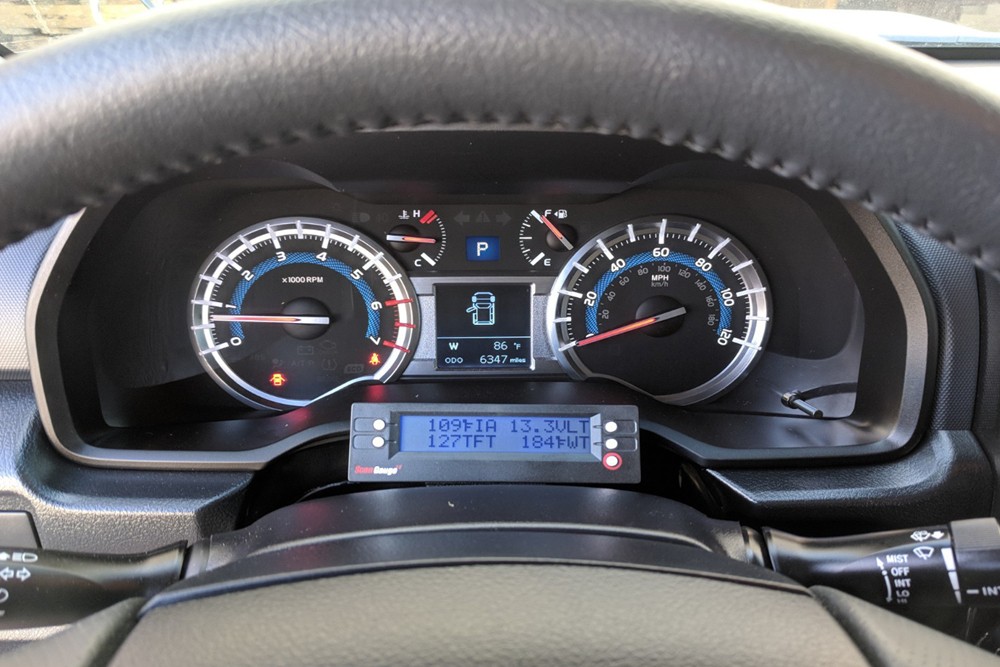
The first step is to find your 4Runner’s OBDII port. It’s conveniently located beneath the steering column, above the pedals for the accelerator and brake. This standard location makes it easily accessible for plugging in your ScanGauge II.
Step 2: Mount the ScanGauge II
Decide where you want to position your ScanGauge II for optimal viewing. A popular and straightforward mounting location is on the steering column itself. The included Velcro strips make this process simple. Attach one piece of Velcro to the back of the ScanGauge and the other to your chosen spot on the steering column. Ensure you align it properly for the best viewing angle.
Step 3: Connect the RJ45 Cable
Next, take the RJ45 cable included with your ScanGauge II and plug one end into the unit. Carefully route the cable along the side of the steering column towards the OBD2 port. You can tuck the cable neatly without needing to remove any interior panels. Once you’ve routed the cable, plug the other end firmly into the OBD2 port you located earlier.
Step 4: Program Your ScanGauge II
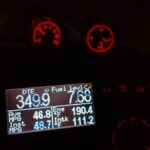
Once connected, the ScanGauge II will power on when you start your 4Runner. Use the provided manual to program the gauges you wish to monitor. The manual lists numerous available parameters. Popular choices for 4Runner owners include transmission temperature (critical for towing and heavy loads), battery voltage, intake air temperature, and coolant temperature. If you’ve upgraded your tires, you can also calibrate the ScanGauge for accurate speed readings.
For parameters not listed in the manual, such as transmission temperature for some 4Runner models, you’ll need to use ScanGauge’s X-Gauge function. This feature allows you to input specific codes for Toyota vehicles to access additional data.
Visit the ScanGauge website for X-Gauge commands for Toyota, Lexus, and Scion vehicles.
The website provides various codes; the linked page specifically mentions transmission temperature codes. Programming is straightforward, involving entering the provided codes into the ScanGauge menu.
After selecting your desired gauges, ensure you neatly manage any excess cable. Use zip ties to secure the cable away from pedals and moving parts for safety.
Step 5: Customize the Display Color
Finally, personalize your ScanGauge II by choosing a display color that complements your 4Runner’s interior. Options typically include green, blue, red, and bluish-green. Many 5th Gen 4Runner owners opt for blue to match the factory gauge cluster lighting.
You’re All Set!
Now you can drive with enhanced awareness of your 4Runner’s vital signs. Having OBD2 gauges like the ScanGauge II provides peace of mind, especially when towing, off-roading, or simply wanting to stay ahead of potential issues like overheating. It’s an invaluable tool for any 4Runner owner who demands more data and control.
ScanGauge II Key Features Recap
- Simple Installation: No tools are needed for the basic setup. Just plug and play.
- Power Efficient: The ScanGauge II draws power directly from your 4Runner’s OBD2 port, eliminating the need for batteries.
- Automatic Protocol Detection: Automatically detects your vehicle’s communication protocol for seamless connection.
- Extended Cable & Mounting: Comes with a 6-foot cable and Velcro for flexible mounting options.
- Intuitive 5-Button Interface: Easy-to-use buttons for navigating menus and features.
- Customizable Backlight Color: Matches vehicle interiors and personal preferences.
- Units of Measure: Supports both metric and imperial units (Kilometers, Liters, Celsius, kPA).
While the ScanGauge2 typically retails around $160, you can often find it at discounted prices. Alternative mounting solutions are also available, such as center console or rearview mirror mounts, but the steering column mount remains a popular choice for its ease of installation and visibility.