Dealing with a check engine light can be frustrating, but with the right tools, you can often diagnose and fix the issue yourself. If you’re facing a P0135 error code – indicating a problem with your “O2 sensor heater circuit bank 1 sensor 1” – this guide is for you. We’ll walk you through using a Bluetooth OBD2 scanner, specifically the popular BAFX ELM 327, along with the Torque Lite app, to pinpoint the problem and replace the faulty oxygen (O2) sensor. This DIY approach can save you significant money and provide a deeper understanding of your car’s system.
Understanding the Issue: Check Engine Light and O2 Sensors
The check engine light is your car’s way of telling you something isn’t right. One common culprit behind this illuminated warning is a malfunctioning oxygen sensor. Your car’s engine relies on O2 sensors to monitor the air-fuel mixture in the exhaust system. These sensors send data to the engine control unit (ECU), which then adjusts the mixture to optimize performance and emissions.
When you encounter a P0135 code, it specifically points to the “O2 sensor heater circuit bank 1 sensor 1.” Let’s break down what this means:
- O2 Sensor: This is the oxygen sensor responsible for measuring the oxygen content in your exhaust gases.
- Heater Circuit: O2 sensors need to reach a certain operating temperature to function accurately. They have a built-in heater circuit to speed up this process, especially during cold starts. The P0135 code indicates a problem within this heater circuit.
- Bank 1: In engines with multiple cylinder banks (like V6 or V8 engines), Bank 1 refers to the side of the engine where cylinder #1 is located. For inline engines, there is only one bank, which is Bank 1.
- Sensor 1: This designates the upstream sensor, which is positioned before the catalytic converter. There’s also a downstream sensor (sensor 2) located after the catalytic converter, but we’re focusing on the upstream one in this case.
A faulty upstream O2 sensor, especially the heater circuit, can lead to decreased fuel efficiency, increased emissions, and potentially affect engine performance. Replacing it promptly is important to keep your car running smoothly and efficiently.
Diagnosis with a Bluetooth OBD2 Scanner: BAFX and Torque Lite
To confirm the issue and ensure you’re on the right track, a Bluetooth OBD2 scanner is an invaluable tool. The BAFX ELM 327 Bluetooth OBD2 scan tool is a popular and affordable option. It connects wirelessly to your smartphone or tablet via Bluetooth and, when paired with an app like Torque Lite (available for free on Android), allows you to read and clear diagnostic trouble codes (DTCs) from your car’s ECU.
Here’s how to use the BAFX Bluetooth OBD2 scanner and Torque Lite for diagnosis:
- Locate the OBD-II port: This port is typically located under the dashboard on the driver’s side. In many cars, it’s near the steering column, often above the pedals.
- Plug in the BAFX scanner: Insert the BAFX scanner into the OBD-II port.
- Turn on your car’s ignition (but don’t start the engine): This provides power to the scanner.
- Pair the BAFX scanner with your Android device: Enable Bluetooth on your Android tablet or smartphone and pair it with the BAFX device. The pairing process is usually straightforward and may involve entering a PIN (often “1234” or “0000”).
- Open the Torque Lite app: Launch the Torque Lite app on your device.
- Connect to the OBD2 adapter: Torque Lite should automatically connect to the BAFX scanner. You may need to configure the adapter settings within the app if it doesn’t connect immediately.
- Read fault codes: Navigate to the fault codes or error codes section in Torque Lite. The app will communicate with your car’s ECU and display any stored DTCs.
If you see the P0135 code (“O2 sensor heater circuit bank 1 sensor 1”), it confirms the issue is likely with your upstream O2 sensor on bank 1.
Tools and Parts You’ll Need for O2 Sensor Replacement
Once you’ve diagnosed the problem, you’ll need to gather the necessary tools and parts for the replacement. Here’s a list of what you’ll likely need:
- New Upstream O2 Sensor: Make sure to get the correct sensor for your car’s make, model, and year. You can usually find this information in your car’s owner’s manual or by using online parts lookup tools.
- O2 Sensor Socket: This specialized socket has a cutout to accommodate the sensor’s wiring and is essential for removing and installing O2 sensors without damaging them. Common sizes are 22mm or 7/8 inch.
- Socket Wrench and Extension: To use with the O2 sensor socket.
- Penetrating Oil: To help loosen the old sensor, which can often be seized due to heat and corrosion. WD-40 or a dedicated penetrating oil works well.
- Anti-Seize Grease: Usually included with the new O2 sensor, this should be applied to the threads of the new sensor to prevent future seizing.
- Gloves: To protect your hands.
- Safety Glasses: To protect your eyes.
Step-by-Step O2 Sensor Replacement Guide
Now, let’s get to the replacement process. Always work on a cool engine to avoid burns.
-
Preparation:
- Apply penetrating oil to the threads of the old O2 sensor where it screws into the exhaust manifold or pipe. Let it soak for at least 15-20 minutes to help loosen the sensor.
- Locate the wiring harness connector for the upstream O2 sensor. Follow the wire from the sensor to where it connects to the car’s wiring harness.
- Inspect the wiring harness and connector for any damage.
-
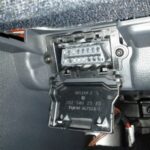
Disconnecting the Wiring Harness:
-
The wiring harness connector is typically secured to a metal bracket. First, you need to detach the connector from this bracket. There’s usually a small tab on the metal bracket that you need to push or pry to release the connector.
-
Once the connector is free from the bracket, you need to disconnect the two halves of the connector. Most connectors have a locking mechanism that you need to release. This usually involves pressing down on a tab on the socket side of the connector while gently pulling the clip and socket apart. Be patient and avoid yanking the wires. If it doesn’t come apart easily, double-check that you are properly releasing the locking tab.
-
-
Removing the Old Sensor:
- Attach the O2 sensor socket to your socket wrench.
- Carefully place the socket onto the old O2 sensor.
- Turn the wrench counter-clockwise to loosen the sensor. It might require some force, especially if it’s been in place for a long time.
- Once loosened, you should be able to unscrew the sensor by hand. Remove it completely.
-
Installing the New Sensor:
- Apply a small amount of anti-seize grease to the threads of the new O2 sensor. This will prevent it from seizing in the future and make removal easier next time.
- Thread the new sensor into the exhaust port by hand. Be careful not to cross-thread it.
- Once it’s hand-tight, use the O2 sensor socket and wrench to tighten it. Tighten it to the manufacturer’s recommended torque specification if you know it. If not, tighten it snugly but avoid over-tightening, which could damage the sensor or the exhaust threads. A good rule of thumb is to tighten it to about 1/2 to 3/4 of a turn past hand-tight.
-
Reconnecting the Wiring Harness:
- Plug the new O2 sensor’s wiring connector into the car’s wiring harness socket. Ensure it clicks into place, indicating a secure connection.
- Slide the connected wiring harness back onto the metal bracket until it clicks or snaps into place.
- Make sure the wiring is routed so it doesn’t touch the engine block or any hot exhaust components.
-
Clearing the Error Code:
- Turn on your car’s ignition (but don’t start the engine).
- Open the Torque Lite app and connect to your BAFX OBD2 scanner again.
- Navigate to the fault codes section and use the app’s function to clear the P0135 error code.
- Turn off the ignition, remove the OBD2 scanner, and start your engine.
- The check engine light should now be off.
Conclusion
Replacing your O2 sensor bank 1 sensor 1 using a Bluetooth OBD2 scanner like the BAFX ELM 327 and the Torque Lite app is a manageable DIY task for most car owners. By following these steps, you can effectively diagnose and resolve the P0135 error code, potentially saving yourself a trip to the mechanic and gaining valuable experience working on your car. Remember to always prioritize safety and consult your car’s repair manual or a professional if you are unsure about any step in the process. Using a Bluetooth OBD2 scanner is a smart investment for any car owner, empowering you to understand and maintain your vehicle more effectively.