Maintaining your 2006 Saturn Vue involves understanding its electrical system, and a crucial part of that is knowing the fuse box locations and diagrams. Fuses protect your vehicle’s electrical circuits from overloads, and when one blows, it’s essential to identify and replace it correctly. This guide will walk you through the fuse box locations in your 2006 Saturn Vue, with a focus on how they relate to systems that might be diagnosed using your OBD2 scanner.
Your 2006 Saturn Vue is equipped with two primary fuse boxes. Knowing where they are and what they control is the first step in diagnosing electrical issues, including those you might encounter when using an OBD2 scanner. Let’s explore each location in detail.
Instrument Panel Fuse Box Location and Diagram
The instrument panel fuse box in your 2006 Saturn Vue is located inside the vehicle. You can typically find it beneath the dashboard on the driver’s side. Its exact position may require you to look under the dash area, possibly near the steering column or to the left of it. Consult your vehicle’s owner’s manual for the precise location if you are having difficulty finding it.
Once you’ve located the instrument panel fuse box, you’ll see a cover. Remove this cover to access the fuses and relays inside. Often, the fuse box cover itself will have a simplified diagram indicating what each fuse is for. For a more detailed understanding, refer to the diagram and table below.
This diagram shows the layout of the Instrument Panel Fuse Block. Here’s a breakdown of the fuses and relays within this box:
| Type | No. | Description |
|---|---|---|
| Fuse MINI | 1 | (CRUISE) Cruise Control Switch, Brake Switch |
| Fuse MINI | 2 | (EPS) Electronic Power Steering |
| Fuse MINI | 3 | (IGN 1) Instrument Cluster, Brake Transmission Shift Interlock Solenoid, Traction Switch, Fog Lamp Switch |
| Fuse MINI | 4 | (LOCK/MIRROR) Power Door Locks, Power Mirror, Entry Control |
| Fuse MINI | 5 | (BCM) Body Control Module, Front Wipers, Windows, Sunroof |
| Fuse MINI | 6 | (BCM (IGN 1)) Body Control Module |
| Fuse MINI | 7 | (AIR BAG) Sensing and Diagnostic Module |
| Fuse MINI | 8 | (RADIO (IGN)) Radio, Power Mirror, Premium Radio Amplifier |
| Fuse MINI | 9 | (TURN) Turn Lamps |
| Fuse MINI | 10 | (HVAC) HVAC Control Head |
| Fuse MINI | 11 | (HAZARD) Hazard Lamps |
| Fuse MINI | 12 | (HTD SEATS) Heated Seats |
| Fuse MINI | 13 | (RADIO) Radio, Data Link Connector |
| Fuse MINI | 14 | (PARK) Park Lamps, Taillamps, Side Marker Lamps, License Lamps |
| Fuse MINI | 15 | (BCM/CLUSTER) Body Control Module, Instrument Cluster |
| Fuse MINI | 16 | (INT LTS) Body Control Module, OnStar |
| Fuse MINI | 17 | (DR LKS) Door Locks |
| Relay | R18 | (AFTER BLOW) Not Used |
| Relay | R19 | (HVAC BLOWER) HVAC Control Head |
| Relay | R20 | (PK LP) Parking Lamps |
| Relay | R21 | (DR LCK) All Door Lock Switch |
| Relay | R22 | (PSG DR UNLCK) Passenger Door Unlock Switch |
| Relay | R23 | (DRV DR UNLCK) Driver Door Unlock Switch |
| Relay | R24 | (HDLP) Headlamps |
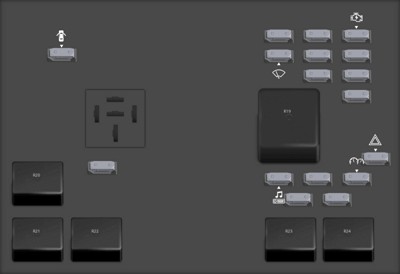
OBD2 and Fuse #13: Data Link Connector
Pay close attention to Fuse #13 in the Instrument Panel Fuse Box. Labeled “(RADIO) Radio, Data Link Connector,” this fuse is critical for your OBD2 port’s functionality. If you are experiencing issues connecting your OBD2 scanner or are unable to retrieve diagnostic codes from your 2006 Saturn Vue, checking Fuse #13 should be one of your first steps. A blown Fuse #13 can directly disable the power supply to your OBD2 port, preventing communication with diagnostic tools.
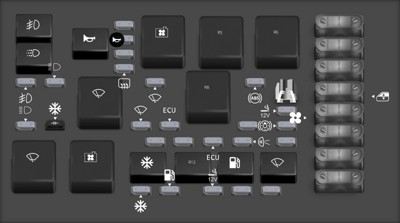
Underhood Fuse Box Location and Diagram
The second fuse box in your 2006 Saturn Vue is located under the hood, typically in the engine compartment. It’s usually positioned near the battery or along a fender wall. Locate a black plastic box, which is the underhood fuse box.
Similar to the instrument panel fuse box, the underhood fuse box has a cover that needs to be removed to access the fuses and relays. This fuse box generally houses fuses for high-power systems and engine-related components.
Here’s the diagram and description for the Underhood Fuse Block:
| Type | No. | Description |
|---|---|---|
| Fuse MINI | 1 | Battery Voltage to ECM, TCM, PCM [3.5L V6 (L66)] |
| Fuse MAXI | 2 | Instrument Panel Fuse Box |
| Fuse MINI | 3 | Horn |
| Fuse MAXI | 4 | Anti-lock Brake System Battery |
| Fuse MINI | 5 | Rear Defogger |
| Fuse MAXI | 6 | Cooling Fans High (L4)/Cooling Fan 1 (V6) |
| Fuse MINI | 7 | Fog Lamps |
| Fuse MINI | 8 | Driver’s Side Headlamp |
| Fuse MINI | 9 | Rear Wiper |
| Fuse MINI | 10 | Anti-lock Brake System Module |
| Fuse MAXI | 11 | Power Window Relay and Sunroof |
| Fuse MINI | 12 | Cigarette Lighter |
| Fuse MAXI | 13 | HVAC Blower Motor |
| Fuse MINI | 14 | Right Headlamp |
| Fuse MINI | 15 | Front Wiper |
| Fuse MINI | 16 | Engine Control Module (ECM), Electronic Throttle Control (V6) |
| Fuse MINI | 17 | Sunroof Module |
| Fuse MINI | 18 | Stoplamps |
| Fuse MAXI | 19 | Ignition switch |
| Fuse MINI | 20 | Engine Ignition Module, Fuel Injectors (2.2L L4 (L61)) Camshaft Sensor, Main Relay Voltage To PCM, Ignition Coils 1-6 |
| Fuse MINI | 21 | Fuel Injection |
| Fuse MINI | 22 | Engine Control Module (ECM), Transaxle Control Module (TCM), Transaxle, L66 Powertrain Control Module (PCM) |
| Fuse MINI | 23 | Low Coolant Switch, Backup Lamps (2.2L L4 (L61)), Vehicle Speed Sensor (Manual), Transaxle Range Switch (2.2L L4 (L61)) |
| Fuse MINI | 24 | Heated Seats |
| Fuse MAXI | 25 | Cooling Fan Low (L4), Cooling Fan (V6) |
| Fuse MINI | 26 | Air Conditioning Clutch, Back Up Lamps (3.5L V6 (L66)) |
| Fuse MINI | 27 | Fuel Pump |
| Fuse MINI | 28 | Front Auxiliary Power Outlet |
| Fuse MINI | 29 | Premium Radio Amplifier |
| Fuse MINI | 30 | Anti-lock Brake System Ignition |
| Fuse MAXI | 31 | Power Seats |
| Relay | R1 | Fog Lamps |
| Relay | R4 | Cooling Fan Motor High |
| Relay | R5 | Engine Control Module/CAM, Emissions, Injectors, Electronic Throttle Control |
| Relay | R6 | Rear Defog System |
| Relay | R3 | Horn |
| Relay | R2 | Daytime Running Lamps |
| Relay | R7 | Wiper System |
| Relay | R8 | Power Window Switch, Sunroof Module |
| Relay | R9 | Front Wiper System |
| Relay | R10 | Cooling Fan Motor Low |
| Relay | R11 | Air Conditioning Clutch |
| Relay | R12 | Back-up Lamps (V6) |
| Relay | R13 | Fuel Pump System |
| Relay | R14 | Rear Wiper System |
| Fuse puller | 48 | Extraction tool for fuse replacement. |
| Diode | 49 | Air Conditioning Diode |
| Fuse MINI | ** | Emissions |
| R38 | Cooling Fan | |
| R47 | Cooling Fan (V6) |
Fuses Relevant to OBD2 Diagnostics
While Fuse #13 in the instrument panel box directly powers the Data Link Connector (OBD2 port), other fuses in both boxes can indirectly affect systems diagnosed through OBD2. For example:
- Underhood Fuse #1, #16, #22, #27 and Relay R5, R13: These fuses and relays are related to the Engine Control Module (ECM), Powertrain Control Module (PCM), fuel pump, and ignition. Issues with these systems will likely trigger diagnostic trouble codes that you would read using an OBD2 scanner.
- Instrument Panel Fuse #3 and #7: These fuses power the Instrument Cluster and the Sensing and Diagnostic Module (Airbag system). Problems here can also lead to diagnostic codes and affect the data presented through the OBD2 port.
Using Fuse Diagrams for Troubleshooting
When troubleshooting electrical issues or OBD2 related problems in your 2006 Saturn Vue, these fuse diagrams are invaluable. Follow these steps:
- Identify the Symptom: Determine which system is malfunctioning (e.g., OBD2 port not working, engine light on, specific sensor issue).
- Consult the Diagrams: Locate the fuse diagrams for both the Instrument Panel and Underhood Fuse Boxes.
- Pinpoint Relevant Fuses: Based on the symptom and the diagrams, identify the fuses that are associated with the affected system. For OBD2 port issues, check Fuse #13 in the Instrument Panel box first. For engine-related problems, investigate fuses in the Underhood box related to the ECM/PCM and fuel systems.
- Inspect the Fuses: Physically check the fuses. A blown fuse will typically have a broken wire inside.
- Replace if Necessary: If a fuse is blown, replace it with a fuse of the same type and amperage rating. Never use a fuse with a higher amperage rating.
- Test the System: After replacing the fuse, test the system to see if the problem is resolved. If the fuse blows again immediately, there is likely a more significant electrical issue that requires professional diagnosis.
Understanding the fuse box locations and diagrams for your 2006 Saturn Vue, especially in relation to the OBD2 system and Data Link Connector fuse, is a vital part of vehicle maintenance and troubleshooting. By using these diagrams, you can effectively diagnose and resolve minor electrical problems, ensuring your Saturn Vue remains reliable.