The On-Board Diagnostics II (OBD2) port in your car is a vital gateway for accessing your vehicle’s computer systems. Mechanics and car owners alike rely on this port to diagnose issues, monitor performance, and ensure vehicles are running smoothly. However, like any other component, the OBD2 port can malfunction, becoming a “Bad Obd2 Port” and hindering your ability to communicate with your car’s computer.
When your OBD2 port isn’t working correctly, it can be frustrating and confusing. You might plug in your scan tool only to be met with silence, or experience intermittent connection issues that make diagnosis a nightmare. Understanding the symptoms of a bad OBD2 port and knowing how to troubleshoot it is essential for any car owner or DIY enthusiast.
This article will delve into the common signs of a faulty OBD2 port, explore the potential causes behind these issues, and provide a step-by-step guide to diagnose and potentially fix a bad OBD2 port. Whether you’re experiencing complete communication failure or just suspect something isn’t quite right, this guide will help you get your diagnostic port back in working order.
Symptoms of a Bad OBD2 Port
Recognizing the symptoms is the first step in diagnosing a bad OBD2 port. Here are some common indicators that your OBD2 port might be malfunctioning:
- Scan Tool Won’t Connect: This is perhaps the most obvious sign. If you plug in your OBD2 scan tool and it fails to power on or establish a connection with your vehicle’s computer, a bad OBD2 port is a prime suspect.
- Intermittent Connection Issues: Sometimes the connection might be sporadic. Your scan tool might connect intermittently, lose connection during diagnosis, or display unstable readings. This can be due to loose connections or damaged pins within the port.
- Error Messages on Scan Tool: While error messages can indicate various problems, some specific messages might point towards OBD2 port issues. These could include “communication error,” “link error,” or “no vehicle communication.”
- Scan Tool Powers On But No Data: In some cases, your scan tool might power on when plugged into the OBD2 port, but it fails to retrieve any data from the vehicle’s computer. This suggests a power or data transmission problem within the port.
- Visible Damage to the Port: A visual inspection can sometimes reveal the problem. Look for bent or broken pins inside the OBD2 port, signs of corrosion, or physical damage to the port housing itself.
Common Causes of a Bad OBD2 Port
Several factors can contribute to a bad OBD2 port. Understanding these potential causes can help you narrow down the issue and apply the correct fix:
- Bent or Damaged Pins: The pins inside the OBD2 port are relatively delicate. Frequent use, accidental impacts, or even just repeated plugging and unplugging of devices can cause these pins to bend or become damaged. Bent pins can prevent proper contact with the scan tool connector, leading to connection problems.
- Loose or Corroded Wiring: The OBD2 port is connected to your vehicle’s electrical system and computer modules via wiring. Over time, these wires can become loose, corroded, or even break, especially in harsh environments or due to physical stress. Corrosion on the pins or wiring can also impede electrical conductivity.
- Blown Fuses: The OBD2 port is typically powered by fuses in your vehicle’s fuse box. A blown fuse can cut off power to the port, preventing your scan tool from working. This is often a simple fix, but it’s essential to identify why the fuse blew in the first place.
- Module or Computer Issues: In rare cases, problems with the vehicle’s computer modules or the communication circuits themselves can be mistaken for OBD2 port issues. While less common, it’s important to consider this possibility if other troubleshooting steps don’t resolve the problem.
- Voltage Problems: The OBD2 port requires specific voltage levels to operate correctly. Issues with the vehicle’s electrical system, such as a weak battery or alternator problems, can lead to insufficient voltage at the OBD2 port, causing it to malfunction.
Diagnosing and Fixing a Bad OBD2 Port
Diagnosing a bad OBD2 port involves systematic troubleshooting. Here’s a step-by-step guide to help you pinpoint the problem and implement potential fixes:
1. Visual Inspection:
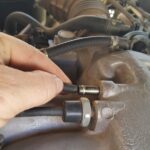
- Examine the Pins: Carefully inspect the pins inside the OBD2 port. Look for any pins that are bent, broken, pushed in, or corroded. Use a flashlight to get a better view.
- Check for Damage: Look for any physical damage to the OBD2 port housing itself. Cracks or damage to the port could indicate internal issues.
2. Fuse Check:
- Locate OBD2 Fuse: Consult your vehicle’s owner’s manual to identify the fuse that powers the OBD2 port. It’s often labeled as “diagnostic port,” “OBD,” or similar.
- Inspect the Fuse: Remove the fuse and inspect it. If the thin wire inside the fuse is broken, the fuse is blown and needs to be replaced.
- Replace Fuse (If Blown): Replace the blown fuse with a fuse of the same amperage rating. Try your scan tool again after replacing the fuse. If the fuse blows again immediately, there might be a short circuit in the OBD2 port wiring or connected components, requiring further investigation.
3. Voltage Test:
- Gather Tools: You’ll need a multimeter to perform a voltage test.
- Locate Pin 16 and Pin 4/5: Pin 16 is the positive battery voltage pin, and pins 4 and 5 are ground pins. They are typically located as described in the original article (Pin 16: upper left, Pins 4 & 5: middle of the bottom row). Refer to an OBD2 pinout diagram online if needed for your specific vehicle.
- Test for Voltage: Turn your vehicle’s ignition to the “ON” position (engine off). Set your multimeter to DC voltage mode. Connect the red probe of the multimeter to pin 16 and the black probe to pin 4 or 5.
- Expected Reading: You should read battery voltage (approximately 12V-14V) if the port is receiving power correctly. If you get no voltage or significantly low voltage, there’s a power supply issue to the OBD2 port, possibly due to wiring problems or a deeper electrical fault.
4. Pin Adjustment (Carefully):
- If Bent Pins are Found: If you identify bent pins, you can attempt to carefully straighten them using a very small, non-metallic tool like a toothpick or specialized pin straightening tool. Be extremely gentle to avoid breaking the pins.
- Reconnect and Test: After carefully adjusting the pins, try reconnecting your scan tool to see if the connection is restored.
5. Wiring Inspection (Advanced):
- Visual Wire Check: If the voltage test reveals no power, or if you suspect wiring issues, visually inspect the wiring harness leading to the OBD2 port. Look for any signs of damage, cuts, fraying, or corrosion.
- Continuity Test (If Experienced): For more advanced troubleshooting, you can perform a continuity test on the wiring between the OBD2 port connector and the vehicle’s computer modules using a multimeter. This requires wiring diagrams and a deeper understanding of automotive electrical systems. It is recommended to seek professional help for this step if you are not comfortable with automotive electrical work.
Conclusion
A bad OBD2 port can be a significant obstacle when trying to diagnose and repair your vehicle. By understanding the symptoms, common causes, and diagnostic steps outlined in this guide, you can effectively troubleshoot OBD2 port issues.
Start with a visual inspection and fuse check, which are often simple and can resolve common problems. Voltage testing is the next crucial step to verify power supply to the port. Careful pin adjustment can sometimes fix bent pin issues. However, for complex wiring problems or if you’re uncomfortable with electrical diagnostics, it’s always best to consult a qualified mechanic.
Maintaining a functional OBD2 port is crucial for modern vehicle maintenance. By proactively addressing any signs of a bad OBD2 port, you ensure you can always access your vehicle’s diagnostic information when needed, keeping your car running smoothly and efficiently.