Many Ford Ranger owners looking to troubleshoot their vehicle’s engine issues often search for “94 Ranger Obd2” diagnostic solutions. However, the 1994 Ford Ranger, while a robust and reliable truck, utilizes an earlier diagnostic system known as OBD1 (On-Board Diagnostics I), not the OBD2 system that became standard later. This means you won’t find the typical OBD2 port under your dashboard. But don’t worry, accessing your Ranger’s diagnostic codes is still achievable and doesn’t require any special converters. This guide will walk you through how to read the OBD1 codes on your 1994 Ford Ranger using just a paper clip and your check engine light (CEL).
Accessing Your 1994 Ranger OBD1 System
Instead of a dedicated OBD2 port, the OBD1 system on your 1994 Ranger is accessed through a connector located in the engine bay. Here’s how to find it and prepare your truck for code reading:
Locate the OBD1 Connector
The OBD1 connector on your 1994 Ford Ranger is typically found in the engine bay. It’s a capped connector that you can identify by its appearance.
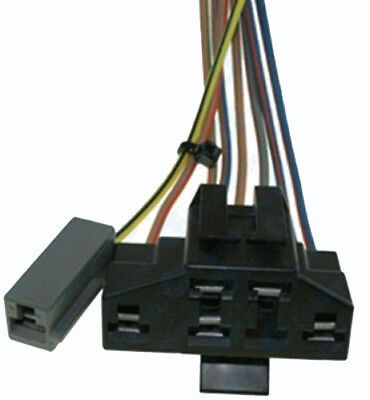
Look for a connector that resembles the one in the image above. It might still have a protective cap on it, often marked with “EEC” on top. This connector is frequently clipped to the engine fuse box or located nearby on the wiring harness.
Alongside this larger connector, you’ll notice a single grey connector on the same wiring harness. Both of these are essential for accessing the OBD1 system.
Preparing to Read Codes
To initiate the diagnostic test, you’ll need a simple jumper wire. An unfolded paper clip works perfectly for this purpose. You’ll be using this jumper to bridge two specific points on the OBD1 connector.
Referring to the image above for connector pin locations, you need to connect the single grey connector, labeled “Self Test Input,” to the “Signal Return” slot on the larger OBD1 connector.
Here’s the step-by-step process:
- Turn off the ignition key. Ensure your Ford Ranger is completely turned off before starting this procedure.
- Locate the OBD1 connector and the single grey connector in your engine bay as described earlier.
- Use your jumper wire (or paper clip) to connect the “Self Test Input” (grey connector) to the “Signal Return” slot on the larger OBD1 connector.
Reading the Check Engine Light (CEL) Codes
Once you’ve connected the jumper wire, you’re ready to put the EEC (Electronic Engine Control) system into test mode and read the diagnostic trouble codes.
- Turn the ignition key to the “ON” position, but do not start the engine. This will power up the Ranger’s electrical system and initiate the diagnostic test.
- Observe the Check Engine Light (CEL) on your dashboard. After the computer boots up, the CEL will typically flash once briefly. Following this initial flash, it will begin to blink out the diagnostic codes.
The 1994 Ford Ranger uses 3-digit trouble codes. The CEL will flash these codes using a sequence of short and long pauses. For example, a code 116 would be indicated by:
- One flash
- Short pause
- One flash
- Short pause
- Six flashes
- Long pause (indicating the end of the code)
The system will display all stored codes and then repeat them. Once you see a code sequence repeated, you know you have recorded all the active codes in the system’s memory. Code 111 indicates “System Pass” or “no codes present”.
For a complete list of 3-digit OBD1 codes for your 1994 Ford Ranger, you can refer to resources like The Ranger Station: https://www.therangerstation.com/tech_library/3digitcodes.shtml
Clearing OBD1 Codes
After you have diagnosed and addressed the issue indicated by the codes, you’ll want to clear the codes from the system’s memory.
- To clear the codes, leave the ignition key in the “ON” position and simply remove the jumper wire from the OBD1 connector. This action will erase the stored codes.
- If you only turn off the key and remove the jumper, the codes will remain saved in the memory.
It’s generally recommended to clear the codes after repairs so you can monitor if any new codes reappear during subsequent driving. If the check engine light comes back on, and new codes are set, it indicates a persistent or new issue that needs attention. Clearing codes after fixing a problem ensures you are only addressing current issues and not chasing historical problems, like those caused by a temporary issue such as “bad gas.”
By following these steps, you can effectively diagnose your 1994 Ford Ranger’s engine issues using its built-in OBD1 system and the check engine light, without needing an OBD2 converter or scan tool.