Experiencing trouble connecting to your 2013 Ford F150’s OBD2 port? A non-functional OBD2 port can prevent you from reading diagnostic codes, performing emissions tests, or using helpful scan tools. One of the most common and easiest issues to check is the OBD2 fuse. This guide will walk you through locating the OBD2 fuse in your 2013 Ford F150 and provide steps to troubleshoot and potentially resolve the problem.
The On-Board Diagnostics II (OBD2) port is crucial for modern vehicle maintenance and diagnostics. It allows mechanics and vehicle owners to communicate with the vehicle’s computer system. When this port isn’t working, it can be frustrating and even prevent you from legally operating your vehicle if emission testing is required.
In the case of the 2013 Ford F150, a frequent culprit for a dead OBD2 port is a blown fuse. Before you start suspecting more complex electrical issues, checking the fuse is a smart first step. Let’s pinpoint the location of the OBD2 fuse to get you started with your troubleshooting.
Locating the OBD2 Fuse in Your 2013 Ford F150
For the 2013 Ford F150, the fuse that powers the OBD2 port is typically located in the passenger compartment fuse panel. This fuse panel is usually found under the dashboard on the passenger side.
To access the fuse panel:
- Locate the passenger side lower dash panel. You’ll usually find this to the left of the passenger footwell.
- Look for a small indentation or release latch on the panel.
- Carefully pull the panel towards you to remove it and expose the fuse box.
Once you’ve accessed the fuse panel, you’ll need to identify the correct fuse. Refer to your owner’s manual for the fuse panel diagram specific to your 2013 Ford F150. However, generally, the fuse you are looking for is Fuse #24.
According to owner forums and diagrams, Fuse #24 is a 15 Amp Mini fuse and is often labeled for “Data Link Connector” or “Steering Wheel Control Module”. While “Steering Wheel Control Module” might seem unrelated, this fuse circuit also powers the OBD2 port, also known as the Data Link Connector (DLC).
Checking and Replacing the OBD2 Fuse
Now that you’ve located Fuse #24, follow these steps to check and replace it:
- Turn off your Ford F150 and remove the keys from the ignition. This is a crucial safety step when working with electrical components.
- Locate Fuse #24 in the fuse panel using the diagram (either from your owner’s manual or the panel itself).
- Visually inspect the fuse. A blown fuse will typically have a broken wire inside or a darkened/melted appearance. You can hold it up to the light to get a better view.
- Use a fuse puller (often found in the fuse box itself or under the fuse box cover) to carefully remove Fuse #24. If you don’t have a fuse puller, needle-nose pliers can be used with caution.
- Replace the fuse with a new 15 Amp Mini fuse. Ensure you are using the correct amperage rating. Using a fuse with a higher amperage can cause further electrical damage.
- Turn the ignition key to the “ON” position (without starting the engine) and test your OBD2 port with a scan tool or code reader.
- If the OBD2 port now works, you have successfully resolved the issue!
- If the fuse blows again immediately or the OBD2 port still doesn’t work, there might be a more serious electrical problem, such as a short circuit in the wiring or a faulty OBD2 port itself. In this case, it’s recommended to consult a qualified mechanic to diagnose and repair the underlying issue.
Additional Troubleshooting Steps if the Fuse is Not the Issue
If replacing Fuse #24 doesn’t restore power to your OBD2 port, consider these additional troubleshooting steps:
- Check for bent or damaged pins in the OBD2 port itself. Visually inspect the port for any physical damage that might be preventing a good connection.
- Inspect the wiring harness leading to the OBD2 port. Look for any signs of damage, cuts, or corrosion.
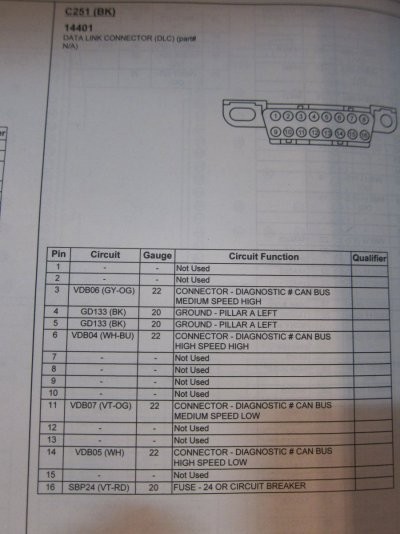
- Test the ground connection to the OBD2 port. Pin #4 and #5 are typically ground pins. Use a multimeter to check for continuity to ground.
- Check for voltage at Pin #16 of the OBD2 port with the ignition “ON”. This pin should have 12V power. If there’s no power, even with a new fuse, there’s an issue in the wiring circuit.
Important Note: Modifications or damage to the OBD2 port wiring, as mentioned in the original forum post, can lead to complex issues. If you suspect previous modifications are the cause, tracing the wiring back to the loom and comparing it to a wiring diagram is crucial.
Conclusion
Locating and checking the OBD2 fuse is a simple yet effective first step in troubleshooting a non-functional OBD2 port on your 2013 Ford F150. By following these steps, you can often resolve the issue quickly and get back to diagnosing and maintaining your vehicle. Remember to always consult your owner’s manual for specific fuse locations and amperage ratings for your vehicle model. If a fuse replacement doesn’t fix the problem, further electrical diagnosis by a professional may be necessary to ensure proper and safe repair of your vehicle’s diagnostic system.