Locating the OBD2 port in your vehicle is the first step to understanding what’s going on under the hood when that check engine light illuminates. For owners of a 1995 Isuzu Trooper, pinpointing the diagnostic port might seem a bit puzzling. While modern vehicles have standardized OBD2 locations, older models like the ’95 Trooper can sometimes present a little more of a search. This guide will help you find the 95 Trooper Obd2 Location and understand how to access your vehicle’s diagnostic trouble codes.
Identifying the Diagnostic Connector on Your 1995 Isuzu Trooper
The 1995 model year is an interesting period in automotive diagnostics. It sits on the cusp of the OBD2 standardization that became widespread in 1996. Therefore, your 1995 Isuzu Trooper might not have the typical OBD2 port you’d expect in newer cars. Instead, you might encounter an earlier type of diagnostic connector.
The most common location to begin your search for the diagnostic port is under the dashboard on the driver’s side. You’ll want to look for a connector that isn’t part of the regular wiring harness. In older vehicles, these diagnostic connectors were often simpler and could take different forms.
Here’s a look at one type of connector you might find:
Image: A 12-cavity ALDL (Assembly Line Diagnostic Link) connector, a type of diagnostic port commonly found in older vehicles, potentially present in a 1995 Isuzu Trooper.
And here’s another potential access point:
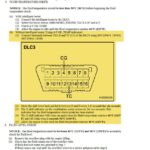
 Example of a DLC connector
Image: A 3-cavity DLC (Diagnostic Link Connector), another type of diagnostic port that could be used in vehicles around the 1995 era, possibly found in a 1995 Isuzu Trooper.
These images illustrate the possible types of connectors you may find when searching for the 95 trooper obd2 location. It’s important to visually identify the connector type on your vehicle to proceed with reading the diagnostic codes correctly.
Reading Diagnostic Trouble Codes on Your 1995 Trooper
Once you’ve located the diagnostic connector, the process for reading trouble codes on a 1995 Trooper involves a specific procedure that differs from simply plugging in an OBD2 scanner. Typically, it requires manually initiating the code reading sequence.
Step-by-step guide to access trouble codes:
-
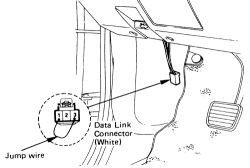
Identify your connector type: Determine if you have a 12-cavity ALDL, a 3-cavity DLC, or separate white and black diagnostic terminals. These terminals are often located under the instrument panel, near the left kick panel.
-
Ground or Connect Terminals:
- For 12-cavity ALDL: Ground test terminal B. The easiest method is to connect terminal B to terminal A (internal ECM ground). Terminal B is usually to the right of terminal A on the top row of the ALDL connector.
- For 3-cavity DLC: Connect the two outside terminals (terminals 1 and 2) together.
- For separate terminals: Connect the white and black diagnostic terminals together.
-
Turn Ignition ON (Engine OFF): After connecting the terminals, turn the ignition switch to the ON position, but do not start the engine.
-
Observe the “Service Engine Soon” or “Check Engine” Light: The “Service Engine Soon” or “Check Engine” light on your dashboard should begin to flash. If it doesn’t flash, turn the ignition OFF, remove the jumper wire, and turn the ignition back ON to ensure the bulb is working. If the light stays on but doesn’t flash after grounding the test terminal, it might indicate a system issue requiring professional diagnosis.
-
Count the Flashes to Read Codes: The flashing light will communicate diagnostic codes. It will start by flashing Code 12. Code 12 (one flash, pause, two flashes) is a system acknowledgment code, indicating that the ECM (Engine Control Module) is communicating. It’s not a fault code but a confirmation that the diagnostic process has begun. Code 12 will usually be transmitted three times at the start of the sequence.
-
Identify Fault Codes: After the Code 12 sequence, any stored fault codes will be flashed. Each fault code will also be transmitted three times and codes are displayed in numeric order from the lowest to highest. For example, Code 34 would be three flashes, a pause, and then four flashes.
-
Record the Codes: Carefully count and record each code. Refer to a diagnostic code chart specific to your 1995 Isuzu Trooper or consult a repair manual to understand the meaning of each code.
-
Turn Ignition OFF: Once you have retrieved all the codes, switch the ignition OFF.
After Reading Codes: Next Steps
After you’ve read and recorded the diagnostic trouble codes, you can begin troubleshooting the issues indicated. Remember that the order in which codes are stored doesn’t necessarily reflect the order in which the problems occurred.
If no codes are stored but you are experiencing driveability or emissions issues, further diagnosis by an experienced technician is recommended. If you did find codes, research their meaning and address the underlying problems. After making any repairs, it’s advisable to clear the trouble codes.
For this older OBD-I system, codes may remain in the system’s memory unless the power source to the ECM is disconnected. In contrast, most OBD-II systems retain codes even after battery disconnection and often require a scan tool to clear them.
Keep in mind that after clearing codes and making repairs, the “Check Engine Light” might reappear after driving if the underlying issue persists or if OBD-readiness monitors have not yet completed their cycles and detected a problem.
By following these steps, you can effectively find the 95 trooper obd2 location (even if it’s not a standard OBD2 port) and retrieve diagnostic trouble codes, empowering you to understand and address potential issues with your vehicle.