The Vehicle Anti-Theft System (VATS) in your 1995 Pontiac Firebird, while intended to protect your car, can sometimes become a source of frustration. Issues with VATS can leave you stranded, preventing your engine from starting. If you’re facing VATS problems with your 95 Firebird and are looking for a reliable solution, bypassing the system using resistors can be an effective method. This guide will walk you through the process, drawing upon expert knowledge to ensure a successful VATS bypass for your classic vehicle. While this procedure addresses the VATS directly, understanding your 95 Firebird’s OBD2 system can be helpful for broader diagnostics, though VATS issues themselves are not typically directly reported via OBD2 in this model year.
Understanding the VATS in Your 95 Firebird
The VATS in your 1995 Firebird is designed to prevent theft by disabling the engine’s ability to start if an unauthorized key is used. It works by embedding a resistor pellet within your ignition key. When you insert the key, the system reads the resistance value. If this value matches what the Body Control Module (BCM) expects, it allows the engine to start. If there’s a mismatch, or a system fault, VATS intervenes by:
- Disabling the Starter Relay: Preventing the starter from engaging.
- Disabling Fuel Enable Signal: Cutting off fuel delivery to the engine.
Common VATS problems can arise from a failing BCM, worn ignition switch contacts, or issues with the resistor pellet in your key. While a 95 Firebird is near the OBD2 transition, the diagnostic capabilities for VATS are not directly integrated into the OBD2 system in the way modern cars are. Therefore, diagnosing VATS often requires direct electrical troubleshooting rather than relying solely on OBD2 scanner data.
Why Choose a VATS Bypass?
Bypassing VATS becomes a viable option when troubleshooting and repairs become costly or complex. Reasons for considering a bypass include:
- Faulty VATS Module: Replacing the BCM or other VATS components can be expensive.
- Damaged Key Pellet: If your key’s resistor pellet is damaged or unreadable, bypass offers a more direct solution than key replacement and reprogramming.
- Systematic VATS Failures: In older vehicles like the 95 Firebird, VATS components can degrade over time, leading to intermittent or permanent failures.
- Track/Off-Road Use: For vehicles primarily used in non-street applications, the anti-theft functionality might be less critical, and reliability becomes paramount.
It’s important to note that bypassing VATS removes the anti-theft feature. Consider the implications for your vehicle’s security before proceeding.
The Resistor Bypass Method: Step-by-Step
This method involves simulating the correct key resistance value directly at the BCM, effectively “fooling” the system into thinking a valid key is always present. Here’s how to do it:
Step 1: Determine the Correct Resistance Value
You’ll need to find the resistance value of your working key.
- Use a Multimeter: Set your multimeter to measure resistance (Ohms – Ω).
- Measure the Key Pellet: Carefully place the multimeter probes on the metal contacts of the resistor pellet on your working ignition key.
- Record the Reading: Note down the resistance value displayed on your multimeter. This is the value you need to replicate with resistors.
If you do not have a working key, you’ll need to use a trial-and-error approach with a resistor selection kit or consult a VATS resistance chart for GM vehicles of that era. Kits like the DEI 20402 VATS Bypass Module offer a range of pre-set resistance values for easier selection.
Step 2: Gather Your Tools and Materials
You will need:
- Resistors: Based on the resistance value measured (or determined from a chart), obtain the correct resistor(s). The table below shows common VATS resistance values and resistor combinations.
- Multimeter: To verify resistor values and circuit connections.
- Wire Strippers/Cutters: For preparing wires.
- Electrical Tape or Heat Shrink Tubing: For insulation.
- Soldering Iron and Solder (Recommended): For a reliable long-term connection. Crimp connectors can be used as an alternative.
- Wiring Diagram (Optional but Helpful): For your 1995 Firebird VATS wiring.
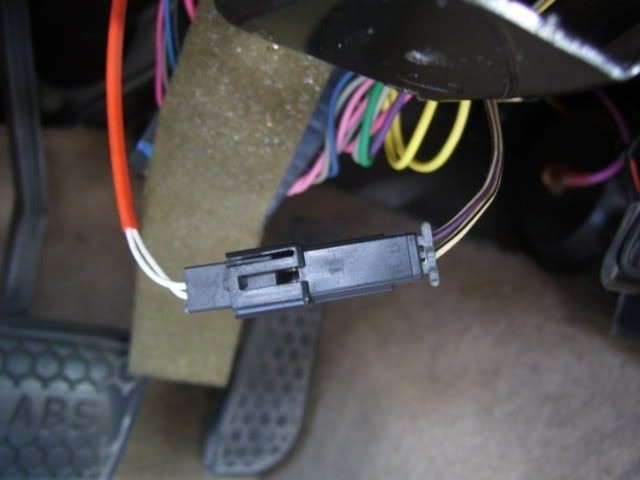
Step 3: Locate the VATS Wiring Connector
The VATS wiring connector is typically found at the base of the steering column.
- Access the Under-Dash Area: You’ll need to get under the driver’s side dashboard.
- Identify the Connector: Look for a connector with a pair of wires that are white/black and purple/white, as shown in the image below. This is the connector you need to disconnect.
Step 4: Prepare and Connect the Resistor(s)
- Disconnect the VATS Connector: Carefully unplug the identified connector.
- Prepare Resistors: If using multiple resistors to achieve the desired value (as per the table below), connect them in series or parallel as indicated. Verify the combined resistance with your multimeter.
- Connect to Wiring Harness Side: Connect the resistor or resistor combination across the purple/white and white/black wires on the wiring harness side of the connector (the side going towards the BCM, not the ignition switch).
- Temporary Test: For initial testing, you can simply insert the resistor leads into the connector terminals.
- Permanent Connection (Recommended): For a lasting solution, solder the resistor leads to the wires or use crimp connectors for a secure connection. Ensure good electrical contact.
- Insulate Connections: Properly insulate all connections with electrical tape or heat shrink tubing to prevent shorts and ensure reliability.
Step 5: Secure and Test
- Neatly Tuck Wires: Tuck the bypassed wiring and resistors neatly under the dash, away from moving parts and heat sources.
- Test the Bypass: Turn the ignition key to the “start” position. The engine should now start without VATS intervention. If successful, the security light on your dashboard should also turn off after a short period.
VATS Resistance Values and Resistor Combinations
Here’s a table detailing VATS resistance values and suggested resistor combinations to achieve them.
Important Considerations:
- Accuracy: Using the correct resistance value is crucial for a successful bypass. Double-check your measurements and resistor combinations.
- Connection Quality: Ensure solid and well-insulated electrical connections for long-term reliability. Soldering is highly recommended for durability.
- OBD2 and VATS: Remember that while your 95 Firebird has OBD2 capabilities for engine and emissions diagnostics, VATS issues are not directly reported through standard OBD2 codes. OBD2 scanners can still be valuable for diagnosing related engine starting problems or electrical issues that might be mistaken for VATS failures.
Conclusion
Bypassing the VATS on your 1995 Firebird using resistors is a cost-effective and reliable solution for overcoming VATS-related starting problems. By carefully following these steps and ensuring accurate resistance and secure wiring, you can restore your vehicle’s starting reliability. While this guide provides a comprehensive approach, always exercise caution when working with automotive electrical systems. If you are uncomfortable with any part of this procedure, consult a qualified automotive technician. Enjoy getting your Firebird back on the road!