Vehicle Anti-Theft Systems (VATS) can sometimes cause headaches for car owners, especially in older models like the 1995 Chevrolet Camaro. If you’re experiencing issues with your Camaro starting, and suspect VATS might be the culprit, bypassing it could be a viable solution. This guide will walk you through the process of bypassing the VATS system in your 95 Camaro, while also addressing the question of OBD1 and OBD2 compatibility in relation to this model year.
Understanding VATS in a ’95 Camaro (OBD1 Context)
The 1995 Camaro falls into the OBD1 era of automotive diagnostics. While the intricacies of OBD1 versus OBD2 systems aren’t directly related to the VATS bypass procedure itself, understanding the diagnostic capabilities of your ’95 Camaro is helpful context. VATS, as a security measure, works by disabling the fuel and starter systems if it doesn’t recognize the correct resistance from the ignition key’s pellet. This system is independent of the OBD1 diagnostic port in terms of its basic operation, but any electrical troubleshooting you might do on your ’95 Camaro will involve understanding it’s an OBD1 vehicle.
Step-by-Step Guide to VATS Bypass
Bypassing VATS involves tricking the system into always seeing the correct key resistance, allowing your Camaro to start reliably. Here’s how to do it using resistors:
-
Determine the Correct Resistance Value: You’ll need to find the resistance value of your working key. A multimeter can be used to measure the resistance across the pellet on your key. If you don’t have a working key, you’ll need to use a kit with multiple resistor values or try each possible combination.
-
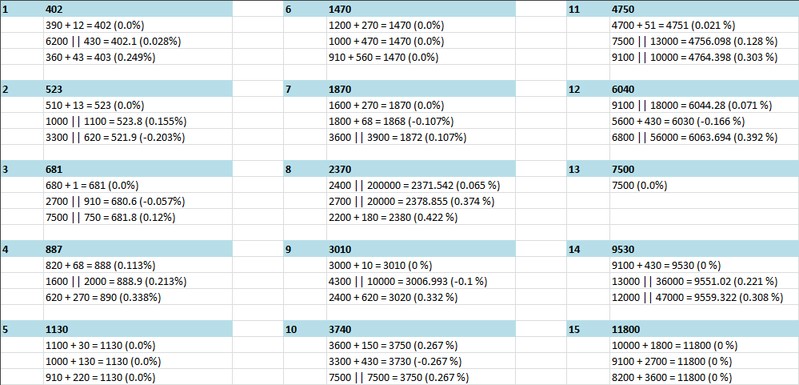
Gather Your Resistors: Once you know the resistance value, consult a VATS resistor chart (like the one below) to determine the standard resistor(s) needed to match that value. You might need to combine resistors in series (+) or parallel (||) to get the correct resistance.
-
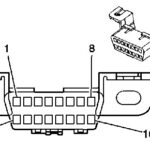
Locate the VATS Wiring: Under the dashboard, near the steering column, find the VATS connector. It’s typically a pair of wires – often white/black and purple/white – that are connected to a sensor near the ignition switch.
-
Disconnect and Install Resistors: Unplug the VATS connector. On the vehicle side of the connector (the wires going towards the Body Control Module – BCM), connect your resistor(s) across the white/black and purple/white wires. For testing, you can simply insert the resistor ends into the connector. For a permanent fix, soldering or crimp connectors are recommended.
-
Secure Connections: Ensure all connections are solid, tight, and well insulated to prevent shorts.
-
Tidy Up: Carefully tuck the wiring and resistors away under the dash.
Choosing the Right Resistor Value and Kits
If you’re unsure of your key’s resistance, or want a more convenient solution, consider using a VATS bypass kit. DEI (Directed Electronics, Inc.), the makers of Viper alarms, offers a kit (part number 20402) that includes DIP switches to select from all 15 possible VATS resistance values. There are also rotary dial kits available, though these are generally more expensive. These kits eliminate the guesswork and make the process easier, especially if you don’t have a working key to measure.
Conclusion
Bypassing the VATS system on your 1995 Camaro can resolve frustrating no-start issues related to the security system. While the OBD1 system of the ’95 Camaro is not directly involved in the VATS bypass procedure itself, understanding your vehicle’s diagnostic system is always beneficial for maintenance and repairs. By following these steps and using the right components, you can effectively bypass VATS and get your classic Camaro running reliably again. Remember to ensure all connections are secure and well-insulated for a long-lasting fix.