Are you looking to boost the electrical output of your Alfa Romeo Giulia? A popular and effective upgrade involves installing a high-output 240A alternator sourced from a 2022 Jeep Wrangler 2.0L. This modification, while straightforward, requires specific parts and knowledge to ensure a successful installation. This guide provides a comprehensive overview of the process, part numbers, and essential steps to enhance your Giulia’s charging capabilities.
Before diving in, let’s see the visual difference this upgrade makes:
Essential Parts for the High-Output Alternator Upgrade
To perform this upgrade, you’ll need a few key components. Here are the part numbers to ensure compatibility and proper installation:
5281576AB: Alternator Bracket
This bracket is crucial for adapting the mounting points on your Giulia’s engine block to accommodate the larger Jeep alternator. The stock Giulia alternator uses two parallel mounting holes, while the Jeep alternator requires three perpendicular mounting holes. This bracket bridges that difference.
6512511AA (Qty. 3): Bolt, Alternator to Bracket, M10x1.5×120, Class 10.9
These bolts are specifically designed to secure the alternator to the newly installed bracket. They are M10x1.5×120 size and Class 10.9 strength. While aftermarket bolts might seem like an option, it’s highly recommended to use OEM bolts due to precise thread length requirements. Inconsistent threading on aftermarket options could lead to fitment issues. If these are unavailable, part number 6506022AA M10x1.5×125 might work as a slightly longer alternative.
56029809AA: 240A Alternator, Wrangler Build Code “BAL”
This is the heart of the upgrade – the 240 Amp alternator from a Jeep Wrangler 2.0L. Sourcing a used unit from reputable junkyards like LKQ via eBay can significantly reduce costs compared to purchasing new. Used parts from recent models (e.g., 2-year-old vehicles) offer a cost-effective solution.
- Alternative Option: 56029762AA: 220A Alternator, Wrangler Build Code “BAJ”
If the 240A version is unavailable or you prefer a slightly less powerful option, the 220A alternator from a Jeep Wrangler (build code “BAJ”) is also a viable upgrade. Both the 240A and 220A alternators offer improved heat dissipation due to their larger size compared to the original 180A Giulia alternator.
Selecting the Correct Serpentine Belt
Important: The stock Alfa Romeo Giulia serpentine belt and the Jeep Wrangler 2.0L belt are not compatible with this upgrade. The engine timing cover and idler pulley placement differ between these engines, necessitating a specific belt length.
Through experimentation, a slightly longer belt than the Wrangler 2.0L belt, but comparable in length increase to the difference between an Alfa belt and a Cherokee 2.0L belt, has proven successful.
Recommended Effective Belt Length: 1936mm – 1940mm.
This length range is somewhat unique, limiting belt options. A 1940mm belt should position the tensioner indicator in the center when new, suggesting not to exceed this length.
Here are some belt part numbers within this range:
- 1935mm: Hyundai 25212-3C300 (Continental OEM, potentially slightly short)
- 1937mm: Gates K060763, ACDelco 6K763
- 1939mm: Mopar 5184646AC
- 1940mm: Dayco A060763, Bando 6PK1940A (Both 1940mm options are Kevlar reinforced for reduced stretching)
The Mopar 1939mm belt is a high-quality polyester belt, similar to Gates HD series.
Step-by-Step Installation Guide
Safety First: Disconnect the Battery Before Starting Any Work. This is crucial when working with electrical components like the alternator.
-
Belt Removal: Follow standard procedures to remove the serpentine belt from your Alfa Romeo Giulia.
-
Airbox and Belt Guard Removal: Completely remove the airbox assembly. Next, remove the upper serpentine belt guard. This is held in place by two nuts and one bolt, all 10mm.
-
Alternator Disconnection and Removal: Disconnect the wires from the original alternator: the positive battery cable and the regulator connector. Remove the two mounting bolts securing the stock alternator (retain these bolts).
-
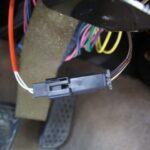
Bracket Installation and Wiring Harness Relocation: Install the new alternator bracket (5281576AB) using the original alternator bolts. Crucially, clean any corrosion from the engine block mounting points. The alternator grounds through these points. You’ll need to cut existing zip ties securing the engine wiring harness in the alternator area. Reroute and zip tie the harness directly to the two holes on the intake manifold. This relocation is necessary to provide clearance for the larger alternator. The image below illustrates the bracket installation and initial wiring harness relocation.
-
Alternator Mounting: Position the new high-output alternator onto the bracket. Before tightening any bolts, ensure the alternator sits flush against the bracket. If resistance is encountered, double-check that the engine wiring harness is not obstructing the alternator’s placement.
-
Alternator Bolt Tightening: Secure the alternator to the bracket using the three new bolts (6512511AA). While a precise torque specification isn’t provided, tightening to approximately 20-25 ft-lb, similar to an oil drain plug, should be adequate.
-
Wiring Connections: Reconnect the alternator regulator connector and the positive battery cable. You can reuse the nut from your original alternator if the new unit didn’t include one, as they are compatible. Consider that upgrading the positive battery cable to a larger gauge wire is generally unnecessary due to the short run from the starter to the alternator and consistent wire sizing in Wrangler wiring diagrams.
-
Wiring Harness Clearance Check: Thoroughly verify that the relocated engine wiring harness is not in contact with or in close proximity to any moving or hot components near the alternator. For added precaution, consider adding protective sleeving or conduit to the wiring harness in this area.
-
Belt Guard Modification: The upper belt guard will no longer fit without modification due to the alternator’s new position. Cut the belt guard at the first gullet to the left of the leftmost mounting hole, as shown in the images below, to achieve a workable fit.
-
Airbox Reinstallation and Final Checks: Reinstall the airbox and serpentine belt. Reconnect the battery. Start the vehicle and check for proper charging and any unusual noises.
Important Compatibility Note Regarding Air Intakes:
This upgrade has not been tested with the factory airbox. The increased height or pulley protrusion of the new alternator might interfere with certain air intake systems, potentially including the factory airbox. If clearance issues arise, swapping the pulley from your original alternator to the new one might resolve the problem.
By following these steps and using the correct parts, you can successfully upgrade your Alfa Romeo Giulia with a high-output Jeep Wrangler alternator, providing enhanced electrical capacity for your vehicle.