For 4Runner owners keen on maintaining their vehicles, understanding and utilizing the onboard diagnostics system, or OBD2, is invaluable. If you’re exploring how to access real-time data like tire pressure and even delve into fuel system insights on your 4Runner using an OBD2 scanner, you’re in the right place. This guide will walk you through using the OBDLink MX+ with your 4Runner to monitor your Tire Pressure Monitoring System (TPMS) and potentially gain insights into your vehicle’s fuel system performance – addressing the core of what many search for when looking up “4runner Fueld Obd2”.
Getting Started with OBD2 and Your 4Runner
Modern vehicles, including the Toyota 4Runner, are equipped with an OBD2 port. This port is your gateway to a wealth of vehicle data, from engine performance to sensor readings. An OBD2 scanner, like the OBDLink MX+, plugs into this port and, when paired with the right software, can display this information in an understandable format.
For 4Runner enthusiasts, accessing this data can be incredibly useful for proactive maintenance and troubleshooting. While the term “4runner fueld obd2” might contain a slight misspelling, the intent is clear: users want to leverage OBD2 diagnostics for fuel-related data and overall vehicle health.
Setting Up OBDLink MX+ for TPMS Readings on Your 4Runner
This section details how to configure your OBDLink MX+ and the OBDLink app to read TPMS data on your 4Runner. Ensure you have the Toyota, Lexus, and Scion Enhanced OEM Add-Ons installed in your OBDLink app as a prerequisite.
(1) Vehicle Parameter Setup
Before connecting to your 4Runner, configure the vehicle parameters in the OBDLink app:
- Open OBDLink App: Launch the OBDLink application on your Android device.
- Do Not Connect: Ensure the app is not connected to the MX+ adapter at this stage.
- Access Settings: Navigate to the “Settings” menu within the app.
- Vehicle Editor: Select “Vehicle Editor” to input your 4Runner’s details.
- Enter Vehicle Information: Provide accurate information about your 4Runner, such as year and model.
- Enhanced Network Setting: Crucially, for “Enhanced Network setting,” choose “Prompt.” This allows you to select specific modules like TPMS when connecting.
- Default Settings: For other settings, accept the defaults unless you have specific values to input (like engine size or fuel tank capacity, if desired).
- Return to Settings: Use the back button to save and return to the main Settings menu.
(2) MX+ Firmware Update
Keeping your OBDLink MX+ firmware updated ensures optimal performance and compatibility:
- Connect MX+: Plug the OBDLink MX+ adapter into your 4Runner’s OBD II port.
- Open OBDLink App: If not already open, launch the OBDLink app.
- Do Not Connect (Initially): Ensure the app is not connected to the MX+ (disconnect if it is).
- Firmware Updates: Go to “Settings” and then select “Firmware Updates.”
- Check for Updates: Tap “Check for Updates.”
- Update Firmware: If updates are available, select “Update Firmware” to begin the process.
- Return to Settings: Once updated, use the back button to return to the Settings menu.
(3) Unit Preference Configuration
Customize unit preferences for easier data interpretation:
- Open OBDLink App: Launch the OBDLink app if it’s not already running.
- Do Not Connect: Make sure the app is disconnected from the MX+.
- Preferences: Select “Settings” and then “Preferences.”
- Units: Choose “Units” to configure your preferred units of measurement.
- Pressure Units: Set “Pressure” to “psi” (pounds per square inch) for tire pressure readings. Configure other units as per your preference.
- Return to Main Page: Use the back button to save and return to the main app page.
Creating a TPMS Dashboard and Displays
Now, let’s set up a dashboard to visualize your 4Runner’s TPMS data:
- Navigate to Dashboard: From the main page, tap the “Dashboard” icon.
- Add Dashboard: In the lower-left corner, tap the vertical ellipses (menu) and select “Add Dashboard.”
- Add Display: Once the blank dashboard appears, open the menu again and select “Add Display.”
- Digital Gauge: In the “Display Type” pop-up, choose “Digital Gauge” for TPMS readings.
- Select Display Style: Choose “Dark” from the “Built-Ins” for a clean display style, or customize as you prefer.
- Select Item (PID): Ignore the initial “Vehicle Speed” display. Tap the “Item” dropdown menu (labeled “vehicle speed” with a down arrow).
- Toyota, Lexus, Scion PIDs: On the “Select PIDs” page, select “Toyota, Lexus, Scion.” (If this option is missing, double-check that you’ve correctly installed the Enhanced OEM Add-Ons).
- Tire Pressure Monitor PIDs: On the “OEM Add-Ons Select PIDs” page, select “Tire Pressure Monitor” within the “Tire Pressure Monitor” section.
- Choose TPMS PIDs: On the “OEM Tire Pressure Monitor Select PIDs” page, scroll to the bottom and then slowly scroll back up to find the ‘ID# Tire Inflation Pressure’ PIDs. The IDs are typically ordered with ID5 as Spare, ID4 as Right Front, ID3 as Right Rear, ID2 as Left Rear, and ID1 as Left Front. Select the PIDs you want to monitor.
- Confirm PID Selection: After selecting the desired PIDs (checkmarks will appear), tap “Done” at the top of the page.
- Customize Display Title: Tap the title of the newly added display (e.g., “Vehicle Speed”) and rename it to something descriptive like “Spare PSI,” “RR Tire PSI,” etc. Tap “Done” on the keyboard.
- Save Display: Tap “OK” to save the display to your dashboard.
- Customize Display Style (Optional): For further customization, tap and hold on a display, select “Edit Display,” then “Style” to adjust the visual appearance. You can save custom styles for reuse.
- Repeat for Remaining Tires: Repeat steps 3-12 to add displays for each tire’s TPMS data, selecting your saved display style for consistency.
Viewing Your 4Runner TPMS Data
With your dashboard configured, you can now view real-time TPMS data:
- Plug in MX+: Ensure the OBDLink MX+ is plugged into your 4Runner’s OBD II port.
- Start Your 4Runner: Turn on your vehicle’s engine.
- Open OBDLink App: Launch the OBDLink app on your device.
- Connect to MX+: Tap “Connect” in the app.
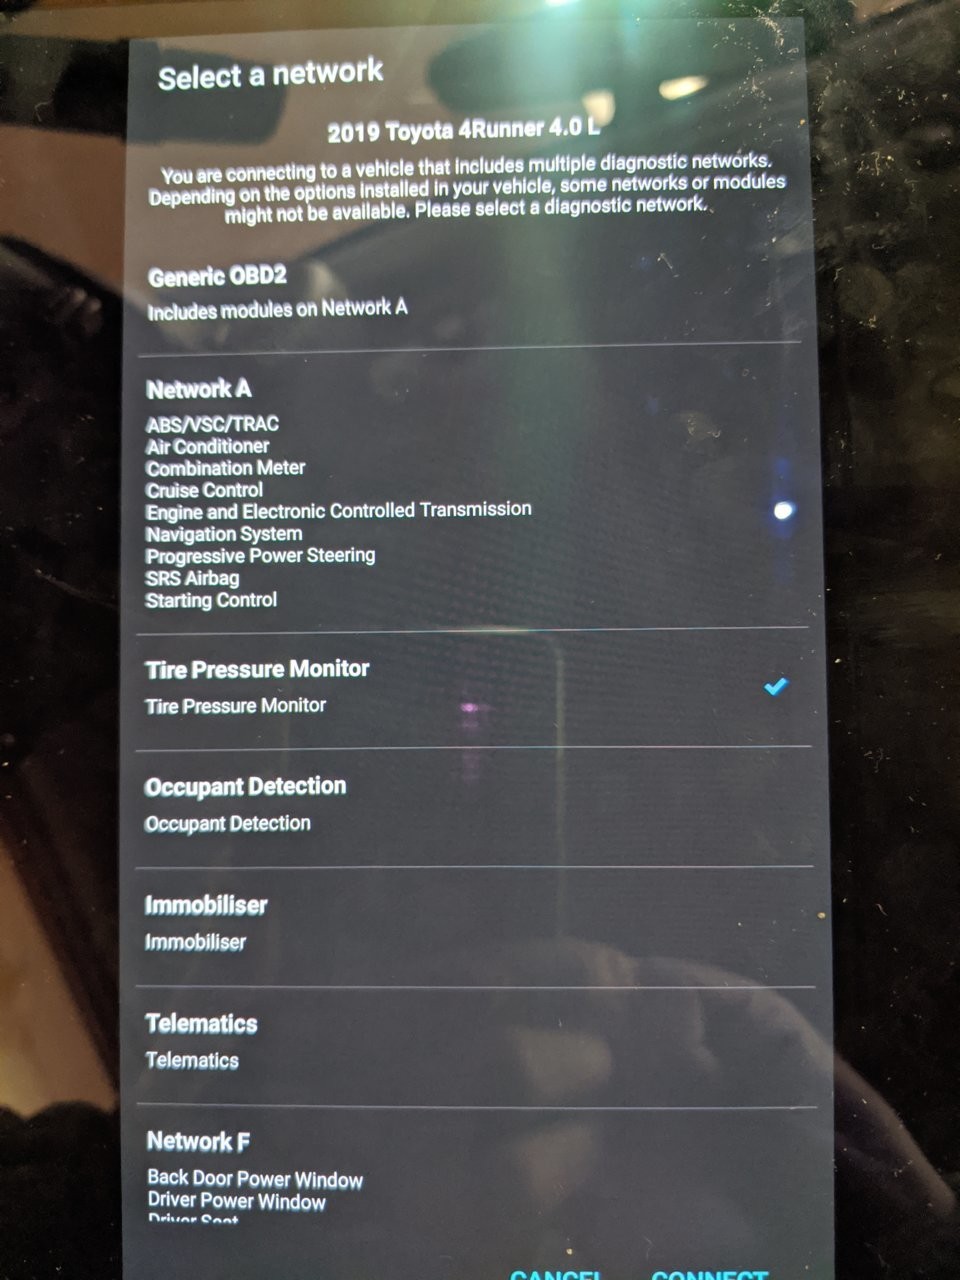
- Select Tire Pressure Monitor Network: When prompted for “Enhanced Network settings,” choose “Tire Pressure Monitor” and then “Connect.”
- Access TPMS Dashboard: Tap the “Dashboard” icon and swipe left or right to locate your TPMS dashboard. Your tire pressure readings should now be displayed.
Beyond TPMS: Exploring Fuel System Diagnostics with OBD2
While this guide focused on TPMS, remember that your OBD2 scanner and the OBDLink app can also provide valuable insights into your 4Runner’s fuel system. By exploring different PIDs within the app, you can monitor parameters like fuel pressure, fuel trim, oxygen sensor readings, and more. This data can be crucial for diagnosing fuel efficiency issues, sensor malfunctions, or other engine-related problems.
For those initially searching for “4runner fueld obd2”, expanding your OBD2 exploration beyond TPMS to include fuel system monitoring provides a more comprehensive understanding of your vehicle’s health and performance.
Conclusion
Utilizing an OBD2 scanner like the OBDLink MX+ is a powerful way to tap into your Toyota 4Runner’s diagnostic capabilities. By following these steps, you can easily monitor your TPMS and begin to explore the wealth of data available, including potential fuel system insights. This proactive approach empowers you to stay ahead of potential issues, ensuring your 4Runner remains in top condition for years to come.