Experiencing a flashing Overdrive (OD) light in your vehicle can be concerning, and it often points to issues within your transmission system. For vehicles equipped with a 4R44E transmission (and similar models like 4R55E, 5R44E, and 5R55E), a flashing OD light frequently indicates that the computer has detected an electrical or ratio problem within the transmission. This is often accompanied by OBD2 trouble codes such as P0743 (Torque Converter Clutch Circuit Electrical) and P0760 (Shift Solenoid C Malfunction). Understanding how to diagnose these issues using OBD2 tests and basic electrical checks is crucial for effective repair.
First, it’s important to recognize that the 4R44E, 4R55E, 5R44E, and 5R55E transmissions share a common design. Therefore, diagnostic procedures and troubleshooting steps applicable to one generally apply to all. When facing a flashing OD light and potential OBD2 codes, the initial step should be to inspect the transmission’s electrical wiring.
The 4R44E transmission utilizes six solenoids: four shift solenoids (SSA, SSB, SSC, SSD), a Torque Converter Clutch (TCC) solenoid, and an Electronic Pressure Control (EPC) solenoid. All of these solenoids receive a 12-volt power supply from a common wire when the ignition key is turned to the ‘on’ position. Each solenoid also has a dedicated ground wire that connects back to the vehicle’s computer (PCM or ECU). The computer activates each solenoid by grounding its respective wire. With the key on, the computer monitors the presence of 12 volts on each ground wire as a way to verify the integrity of the wiring circuit.
A key diagnostic point is the 16-pin connector located on the driver’s side of the transmission. To begin electrical testing, disconnect this 16-pin plug.
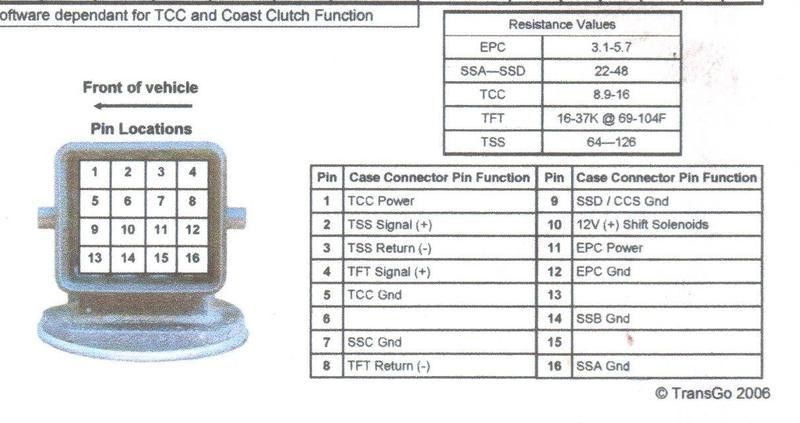 1998 5r55e 16 pin plug wiring diagram for electrical testing and solenoid resistance checks
Using a multimeter set to measure resistance (Ohms), you can test the internal wiring and solenoids of the transmission. Referencing the pin layout of the 16-pin connector:
- Torque Converter Lock-Up Solenoid: Measure resistance between Pin 1 and Pin 5. The reading should be between 9 to 16 ohms.
- Pressure Control Solenoid: Measure resistance between Pin 11 and Pin 12. The reading should be between 3 to 6 ohms.
- Shift Solenoids (SSA to SSD): Measure resistance between Pin 10 and each of the pins corresponding to solenoids SSA, SSB, SSC, and SSD. Each should show a resistance of 22 to 48 ohms.
In addition to testing resistance, physically inspect the wires at the connector. Gently pull on each wire to ensure it is securely crimped within the connector and not loose or corroded.
The error code P0760 specifically points to “Shift Solenoid C Malfunction,” which in this transmission family, is the OverDrive solenoid. It’s worth noting whether band adjustments have been performed recently, as incorrect adjustments can sometimes contribute to transmission issues.
To further understand the operation of the solenoids during gear shifts, you can consult resources that detail the on/off states of each solenoid for different gears. This knowledge can be helpful in diagnosing performance-related issues in conjunction with electrical faults. This document provides a detailed breakdown of solenoid states during shifting.
The vehicle’s computer monitors the electrical functionality of the transmission components. It also uses sensors to track engine RPM and transmission input shaft RPM (TSS sensor). This allows the computer to detect not only electrical problems but also performance issues. For instance, when the computer commands the Torque Converter Clutch (TCC) to lock, it expects the engine RPM and input shaft RPM to become synchronized. If the engine RPM increases without a corresponding increase in input shaft RPM, the computer can deduce that the torque converter is not locking correctly. However, in the case of code P0743, the issue is flagged as an electrical circuit problem rather than a performance problem like P0741 (Torque Converter Clutch Circuit Performance or Stuck Off).
Similarly, if the computer commands a shift to Overdrive and the engine RPM does not drop appropriately, or at all, it indicates that the overdrive is not engaging correctly. This type of performance issue can trigger a code like P0760, especially if coupled with electrical solenoid malfunctions. Remember that these transmissions utilize external band adjustments for the intermediate and overdrive bands, which can impact shifting performance.
In conclusion, troubleshooting a flashing OD light and OBD2 codes like P0743 and P0760 on a 4R44E transmission involves a systematic approach. Start with electrical checks of the wiring and solenoids using an OBD2 scanner to confirm codes and a multimeter for resistance testing. Understanding the relationship between electrical signals, solenoid operation, and transmission performance is key to accurately diagnosing and resolving these transmission issues.