For Tesla Model 3 owners keen on monitoring their vehicle’s performance and delving into its diagnostics, the OBD2 port is a gateway to valuable data. While often associated with gasoline cars, the OBD2 port is also present in your electric Tesla Model 3, offering access to a wealth of information. This guide will walk you through locating and accessing the OBD2 port in your Model 3, allowing you to connect diagnostic tools and gain deeper insights into your car’s operation.
Understanding the OBD2 Port in Your Tesla Model 3
The On-Board Diagnostics II (OBD2) port is a standardized interface in modern vehicles that allows access to the vehicle’s computer systems. Initially designed for emissions monitoring, it has evolved to provide a wide range of diagnostic data related to engine performance, vehicle systems, and more. Even though the Model 3 is an electric vehicle without a traditional combustion engine, Tesla has included an OBD2 port. This port allows technicians and owners to interface with the car’s internal network for diagnostics, data logging, and even some level of customization using third-party applications and devices. By connecting an OBD2 scanner or dongle, you can read real-time data, check for error codes, and use specialized apps to monitor battery health, performance metrics, and other parameters not readily available through the car’s touchscreen interface.
Locating the OBD2 Port in Your Model 3
In the Tesla Model 3, the diagnostic connector is discreetly positioned to maintain the clean aesthetics of the cabin. Unlike some vehicles where the OBD2 port is easily accessible under the dashboard, in the Model 3, you’ll find it at the rear of the center console. Specifically, it’s located underneath the rear air vents, making it accessible from the rear passenger legroom. Reaching the port requires removing a small cover panel on the rear center console. While it might seem slightly hidden, this location is consistently used across Model 3 vehicles, ensuring you can confidently find it by following these instructions.
Step-by-Step Guide to Accessing the OBD2 Port
Accessing the OBD2 port is a straightforward process that can be done in a few minutes with no special tools required, although a simple Allen wrench or L-shaped screwdriver can be helpful. However, it is crucial to prioritize safety and system integrity by ensuring your Tesla Model 3 is completely powered down before you begin.
Preparation: Powering Down Your Tesla (Crucial!)
Before you even think about locating the OBD2 port, you must shut down your Tesla Model 3. This is not the same as just parking and exiting the vehicle. A proper shutdown ensures all systems are fully powered off, preventing potential electrical damage or errors when connecting or disconnecting diagnostic equipment. The shutdown process takes approximately 15 minutes to complete. Initiate the shutdown through your Tesla’s touchscreen by navigating through the menus (typically under ‘Safety & Security’ or ‘Controls’) and selecting the option to power off the vehicle. Wait for the full 15 minutes to ensure complete shutdown before proceeding. Failure to do this can lead to vehicle damage and is entirely at your own risk.
Accessing the Diagnostic Connector: A Practical Guide
Once your Model 3 is fully powered down, you can proceed to access the OBD2 port:
-
Prepare the Interior: Begin by sliding both front seats all the way forward. This will give you ample space to work in the rear passenger area and access the center console panel.
-
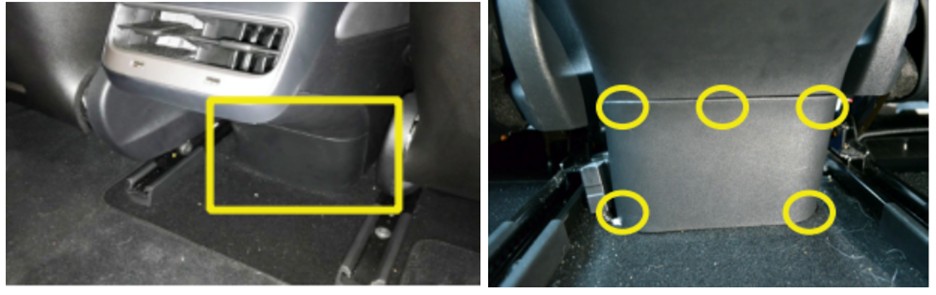
Locate the Rear Center Console Panel: Move to the back seat of your Model 3. Look at the bottom of the center console, between the two front seats. You’ll find a small, rectangular plastic panel. This is the access panel for the diagnostic connector.
-
Open the Panel: This panel is held in place by five push-fit clips. It is designed to be removed by hand, but for the first time, or if the clips are tight, using a tool can be helpful.
- Using a Tool (Optional but Recommended): Take an Allen wrench or an L-shaped screwdriver. Slide the short end of the tool gently under the panel on the right side. Rotate the tool so the short end is vertical. Now, gently pull the tool towards you, parallel to the floor. This should loosen the bottom right clip.
- Loosening Remaining Clips: Once the first clip is loose, you can often use your hands to gently pull the panel towards you. Work your fingers around the edges to loosen the top right clip, and then the remaining three clips. The panel should now come free.
-
Identify the Diagnostic Connector: With the panel removed, look inside the opening. You will see the white Tesla Proprietary Diagnostic Connector. This is the port you will use.
Connecting Your OBD2 Device
Now that you have accessed the diagnostic connector, you can connect your OBD2 equipment:
-
Release the Connector (If Necessary): In some cases, the white connector might be held in place by a clip. If you encounter resistance when trying to plug in your cable, look for a small clip on the white connector. Press this clip and slide it slightly to release the connector, allowing you to plug in your diagnostic cable.
-
Connect the Diagnostic Cable: Take your Tesla Model 3 diagnostic cable and locate the two white ends. Plug these ends into the corresponding white connectors in your vehicle. They are designed to fit only one way, so align them carefully and push until they click securely into place.
-
Connect your OBD2 Dongle: Once the diagnostic cable is connected to the car, you can plug in your OBD2 dongle (such as the recommended OBDLink MX+ or similar) into the other end of the diagnostic cable.
-
Pair with your Device and App: Follow the instructions for your chosen OBD2 dongle and app (like Scan My Tesla or TM-Spy) to establish a Bluetooth connection between the dongle and your smartphone or tablet. Once connected, you can begin accessing and interpreting the data from your Model 3.
Important Considerations and Safety Precautions
Connecting equipment to your Tesla is done entirely at your own risk. While this guide provides instructions for safely accessing the OBD2 port, it’s crucial to understand that Carvitas and techcarusa.com cannot be held responsible for any damage to your vehicle caused by improper use of this product or procedure.
Always Power Down: Reiterating the importance, never connect or disconnect anything from the diagnostic port without fully powering down your Tesla Model 3 and waiting the full 15 minutes.
Inspect Your Cable: Before each use, and upon initial receipt, thoroughly inspect your diagnostic cable for any signs of damage. Using a damaged cable can be hazardous to your vehicle’s electronics.
Use Compatible Equipment: Ensure that the OBD2 dongle and diagnostic apps you are using are specifically compatible with Tesla Model 3 vehicles to ensure accurate data and avoid potential software conflicts.
By following these steps and safety guidelines, you can safely access the OBD2 port in your Tesla Model 3 and unlock a new level of insight into your vehicle’s performance and health. Explore the data responsibly and enjoy a deeper understanding of your electric vehicle.